Creating applications
Start developing your projects conveniently and intuitively by building your application on an application template. When you create an application on a template, you save time because you reuse key elements of an existing application, such as case types or data types.
You can choose a default application template that Pega Platform provides or reuse one of your existing applications as a template. For example, you can create an application to review mortgage requests, and then supply the application with necessary case types, data types, and other elements. Then, you can build an application to review loan requests by using the application to review mortgage requests as a template. As a result, all assets from the application to review mortgage requests are automatically available in the new application to review loan requests.- Navigate to the New Application wizard:
- To build an application in App Studio, in the header of App Studio, click the name of your application, and then click New
Application, as shown in the following figure:
Creating an application in App Studio 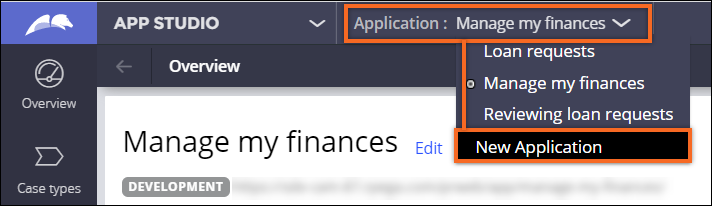
- To build an application in Dev Studio, in the header of Dev Studio, click the name of your application, and then click New Application.
- To build an application in App Studio, in the header of App Studio, click the name of your application, and then click New
Application, as shown in the following figure:
- Choose a type of application to create:
- To build an application that joins traditional UI authoring with a unique Theme Cosmos run-time experience, click Build from
scratch, and then click Theme Cosmos.
With a Theme Cosmos authoring experience you can save time by implementing a vast selection of auto-generated functionalities. You can also focus on low-code tools and solutions as Theme Cosmos is primarily designed for App Studio. For more information, see Theme Cosmos.
- To build an application that uses Cosmos React UI authoring
and run-time experience, and is also client-side rendered, click Build from
scratch, and then select Cosmos React.
Cosmos React is an innovative way of designing applications that currently supports a limited range of case management functionalities. For more information, see Cosmos React (early adopter).
- To build your application on a custom application template, hover over the
application name, click Continue, and then click Build
with application template name.
For more information, see the implementation guide for your application.
- To search for an application template, click Search all types.
- To build an application that joins traditional UI authoring with a unique Theme Cosmos run-time experience, click Build from
scratch, and then click Theme Cosmos.
- If you build your application on a custom template, and you want to reuse resources
from the application, such as case types or data types, import the resources to your new
application:
- In the Select case types section, select the check box next to each relevant case type.
- Click Continue.
- In the Select data types section, select the check box next to each relevant data type.
- Click Continue.
- In the Name your application field, enter a unique name for your application.
- Optional: To configure a custom class structure, organization, or select the base language for
your application, click Advanced configuration.For more information about the settings that you can change, see Configuring advanced settings for new applications.
- Click Create application.
- Optional: To develop your application more quickly, in the Optionally, add
users section, create a team:
- In the text field, press the Down arrow key, and then select a user name or an
email address.If you enter an email address that is new in the system, the system creates a new user.
- Control which type of access the user has to your application by selecting a role in the list.
- Click Add.
- In the text field, press the Down arrow key, and then select a user name or an
email address.
- Click Go to app.
Previous topic Building your first application Next topic Inviting collaborators to your application