Referencing a case type
Build transparent and automatic relationships between case types by creating case references. When you reference a case type, you can pass data about one case type to another case type, and you can clearly view connections between case types and their instances at run time. You also save time and take advantage of low-code tools because you can view relations between case types without creating complex report definitions.
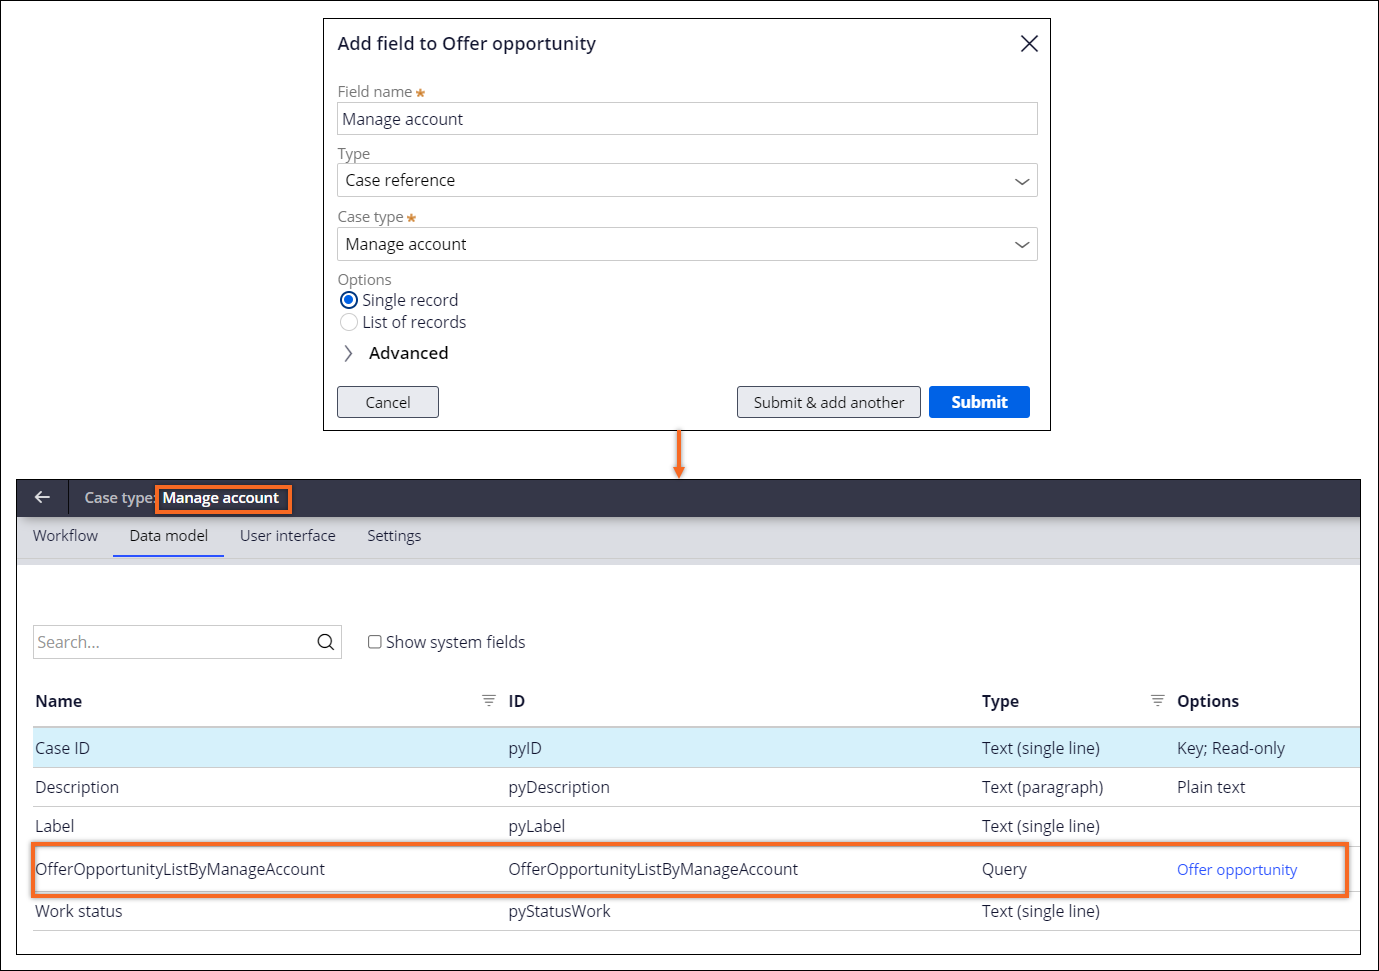
For example, you can reference a Manage account case type from an Offer opportunity case type. As a result, you can quickly view offered opportunities that are related to a managed account. You can also create a UI to display the offered opportunities at run time from the view of a case for managing an account.When you reference a case type, the system automatically creates a field of the query type in the data model of the referenced case type. For example, if you reference the Manage account case type in the Offer opportunity case type, the system automatically adds a query field in the data model of the Manage account case type. As a result, you can clearly analyze connections between case types.
To adjust the processing and display of case references at run time, you can decide whether a case references other cases as a single object or a list of objects. For example, you can reference only one run-time instance of a Manage account case type from a Offer opportunity case type. Then, an application displays only one case ID. You can also connect multiple instances of the Offer opportunity case type to the same instance of the Manage account case type, and configure an application to display a table with multiple case IDs.
You can create case type references in the following elements of your application:
- Your case type data model. For more information, see Configuring a data model for a case.
- A form in your case type for applications that do not use Cosmos React. For more information, see Adding single-value fields to forms.
- Your application visual data model. For more information, see Viewing an application data model.
- A data model of a data object. For more information, see Viewing the data model for a data object.
- Navigate to a place where you want to add a field:
Choices Actions Add a field to a case type data model - In the navigation pane of App Studio, click Case types, and then click the case type that you want to open.
- On the Data model tab, click Add field.
Add a field to a form in a view of a non-Cosmos React application - In the navigation pane of App Studio, click Case types, and then click the case type that you want to open.
- On the Workflow tab, in the Case life cycle section, click an assignment or an approval step.
- In the Step properties pane, click Configure view.
- In the dialog box, on the Fields tab, click Add field.
Add a field to an application visual data model - In the navigation pane of App Studio, click Data.
- In the Data model section, click View.
- In the data model, click a data object for which you want to create a data field.
- In the list of fields, click Create new field.
Add a field to a data object - In the navigation pane of App Studio, click Data.
- In the Data objects column, click the data object that you want to open.
- On the Data model tab, click Add field.
- In the field configuration dialog box, for the Field name parameter, enter a unique label for the field.
- In the Type list, select Case reference.
- In the Case type list, select a case type that you want to reference.
- In the Options list, define how you want to retrieve and
display data from the source case type:
- To create one entry for data from the source, select Single
record.
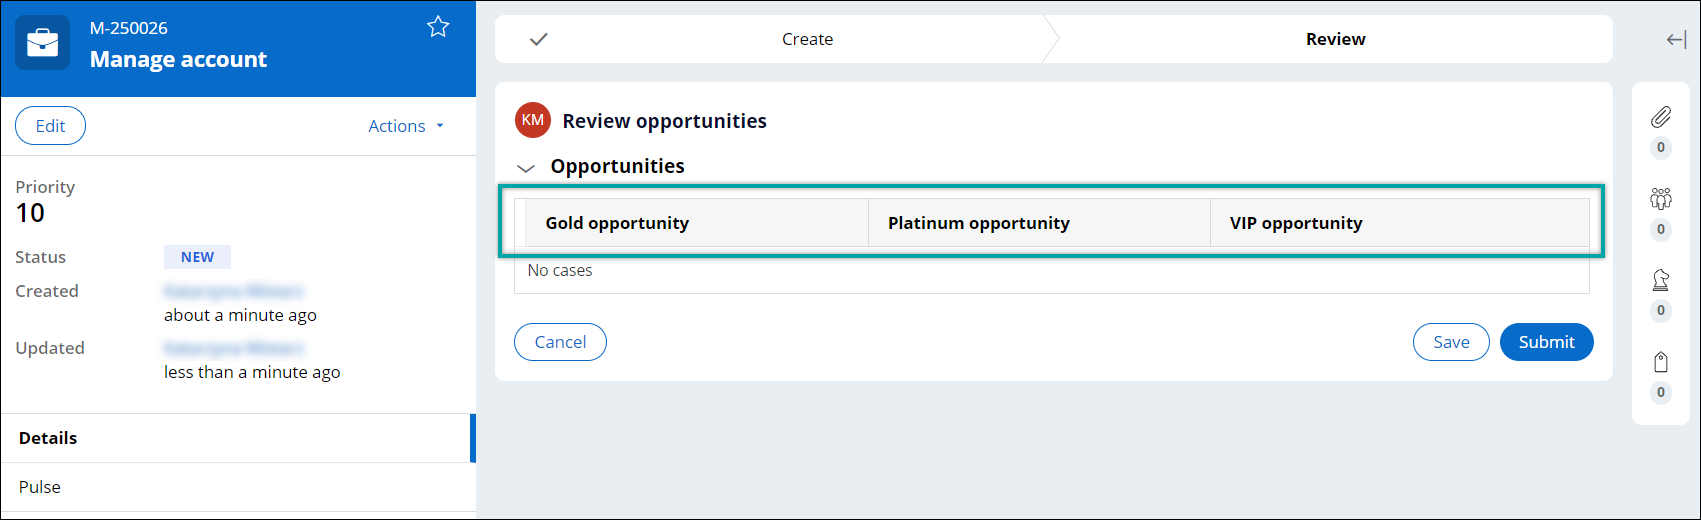
For example, you can connect an Opportunity case type to one instance of the Manage account case type. At run time, an application displays only one field for the referenced data.
- To create a list of separate entries for data from the source, select
List of records.
For example, you can connect a Manage account case type to multiple instances of an Opportunity case type. At run time, an application displays a grid table with sourced information.
- To create one entry for data from the source, select Single
record.
- Optional: To copy the referenced data into a case at run time, expand the
Advanced section, and then select the
Reference data is copied to the case check box.Copying data creates a snapshot of the referenced data and preserves the data in the target unchanged if data in the source changes.
- Optional: To provide another data page to source data, expand the Advanced section, and then, in the Data page field, enter the data page that you want to use.
- Optional: To change the unique identifier of a referenced case type, expand the
Parameters section, and then configure how an
application sources the new value:
- To manually provide a new value, in the pyID list, select Constant, and then, in the text field, enter a new unique identifier for the case type.
- To source the value from a field in the current case type, in the pyID list, select Field, and then, in the list, select a field that stores the value that you want to use as the unique identifier.
- To source the value from a field in the referenced case type, in the pyID list, select Field in target, and then, in the list, select a field that stores the value that you want to use as the unique identifier.
You can reference a unique identifier, which is also a pyID parameter, in various elements in your application, such as reports. - Save your data field:
- To save the field and instantly define another field, click Submit & add another.
- To save your field and return to the configuration view, click Submit.
Previous topic Configuring a data model for a case Next topic Creating fields for capturing data