Creating and subscribing to a notification channel
Notification channels provide a way to notify a client about changes on the server without having users explicitly refresh their application on the browser. There are two types of notification channels: system-defined and user-defined. Operator presence is the only system-defined notification channel. It enables tracking of operator presence status and notifies clients when the status of any specified operator changes. User-defined channels are channels that a developer can define.
Messaging is based on the publisher/subscriber model where messages are published to a channel that broadcasts the messages to all subscribers. You can create notification channels to send specific messages. You also can configure subscribers to listen to messages from a specific channel.
In this example, you will create a channel, create an activity to publish a message, and subscribe to the channel. The subscriber, in this case, is a dynamic layout. When the value of a property changes, an event in the dynamic layout action runs an activity.
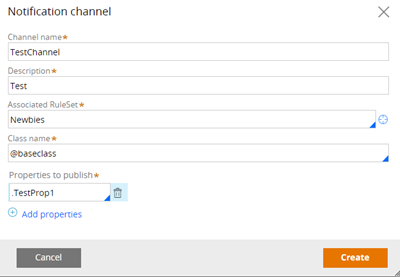
Creating a notification channel
Notification channels are a named, purpose-specific means to communicate between the server and the client by using publisher-subscriber based communication. Notification channels use WebSocket technology. When WebSockets are not available, notification channels automatically fall back to long polling. You create notification channels on the Notification channels landing page (). The landing page displays all the notification channels that are available in your application.
- Click +Create on the Notification channels landing page, and enter a unique name for the new channel and a description.
- Add an associated ruleset and class name. The class name can be as generic or as specific as you want.
- Enter the name of the property to be published in the Properties to publish field. These properties will be published as part of the notification. The event object on the notification will contain these properties and their values.
Creating the publish activity
Publishing is triggered by an activity using the Publish-Notifications method. Call this activity to publish a notification. You also can call this method from any existing activity where you would like to publish a notification. For example, if you have an activity that saves a case, you might want to publish the saved state so that other users viewing the case can be notified that another user has saved a change.
- Open the activity from where you want to publish the notification.
- Call the Publish-Notifications method at the point in the activity when you want to publish. Pass in the step page to the Publish-Notifications method. The step page should contain the properties defined as Properties to Publish on the notification channel. The Publish-Notifications method ensures that only those properties will be part of the payload of the notification. In addition, the Publish-Notifications activity needs to be given a Channel Name as part of the parameters.

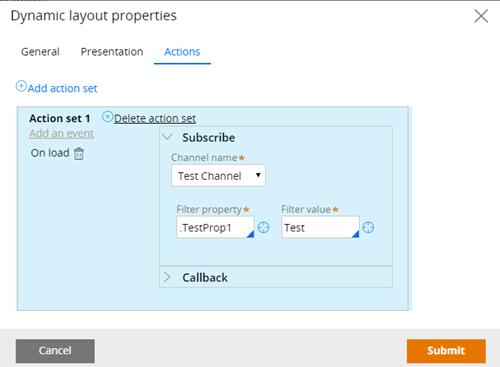
Subscribing to a channel
Subscribing is done through configuration on a dynamic layout. You use standard Events and Actions using the Actions tab on the dynamic layout property panel to subscribe to notifications. To subscribe to a channel, create an action set and create an On Load event and configure the subscription.
- Open or create the dynamic layout, and then open the layout properties
- Select the Actions tab, and then click .
- Click Add an event and select the On Load event
- On the subscribe settings, select the channel name from the drop-down list. You can select only channels that are specified on the Notification channels landing page
- In the filter property, select a property that was published as part of the notification channel.
- In the Filter Value, enter the value of the property that you want to subscribe to. The value can be a property reference. For the example mentioned earlier, you would provide either a case ID or a property reference that returns the value of the current case ID.
- In the Callback section of the action set, you can pick any action that you want to perform when the notification arrives. For example, you can perform a Refresh harness, or maybe Run data transform, or any of the other actions. You also can configure the Run Script action and call a JavaScript method. You will be able to extract the payload from the event object within your JavaScript call. In this way, you can perform the update on the client without a roundtrip to the server.