Speed up application development by creating data objects that collect related
information into reusable entities. By using data objects, you can simplify your data
structure for easier reuse across interfaces.
Note: This article describes a basic scenario in
which you build a sample Customer data object by
using default options. For more information about other options that might be
more pertinent to your use case, see Data objects overview.
The following video provides a visual walkthrough for configuring basic data objects:
The following sections provide a detailed step-by-step guide:
Adding data objects
Create a data object that is a template for a reusable entity.
Every data object consists of one or more fields that share the same context and
function. A sales application, for example, might include a
Customer data object that manages personal information
that you need to collect from your customers to complete orders.
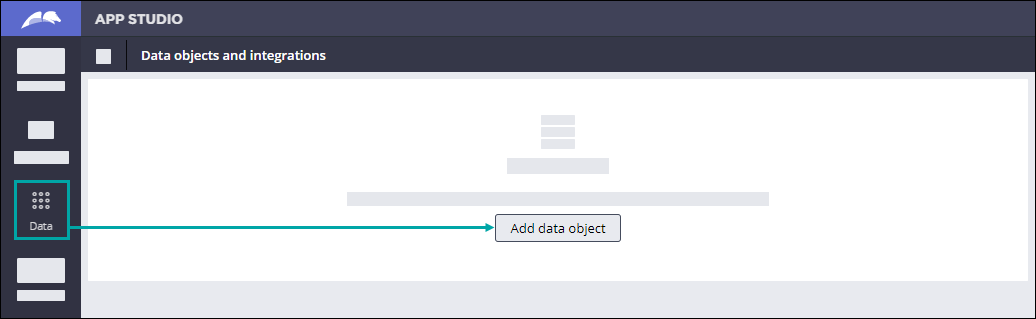
In the navigation pane of
App Studio, click Data.
Click Add data object.
See the following figure for reference:Adding a data object
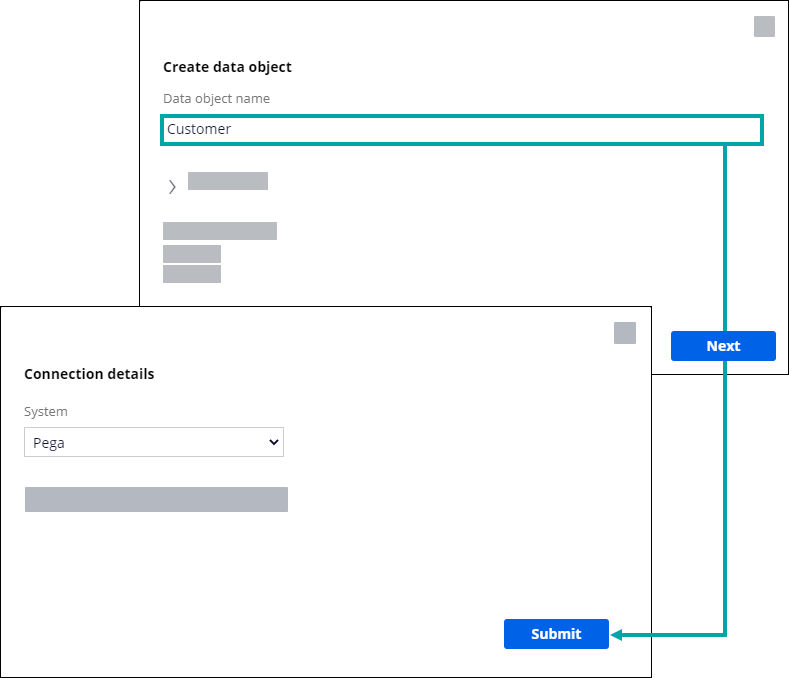
In the Create data object window, enter the data object
name.
For example: Customer
Click Next.
In the Connection details window, accept the default
settings by clicking Submit, as shown in the following
figure:
Defining a simple data object
For more information about the available data object sources, see Creating a data object.
What to do next: Organize the information that you want the data object to capture by populating the
data object with fields.
Defining data objects
Capture various types of information that define a data object by adding
fields.
In the Customer data object, you can define fields to
collect personal information of your customers such as First
Name, Last Name, Full Name,
and Phone Number.
Depending on your use case, you can add editable fields
and calculated fields. Use editable fields to gather information that requires manual
input such as customer first name, last name, and phone number. Calculated fields
display the information that you gather in the form that is adjusted to your needs. For
example, you can combine the first and last name values to automatically create a full
name.
Adding fields that require input
In the data object that you created, on the Data model
tab, click Add field, as shown in the following
figure:
Adding a field
In the Add field window, specify the field details:
In the Configure field window, specify the field
details:
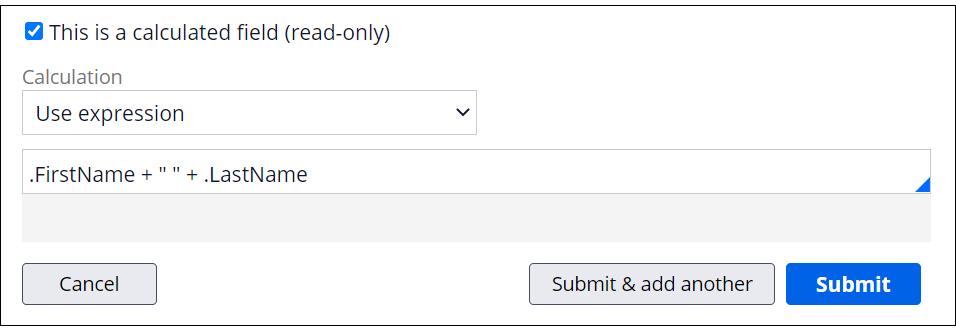
In the Field name field, enter Full
name.
In the Type list, select Text (single line).
Expand the Advanced section.
Select the This is a calculated field
(read-only) checkbox.
In the Calculation field, select Use
expression.
Combine the first and last name values to create a full name, as shown
in the following figure:
Configuring a basic expression for a read-only field
Confirm your settings by clicking Submit.
Save the data object.
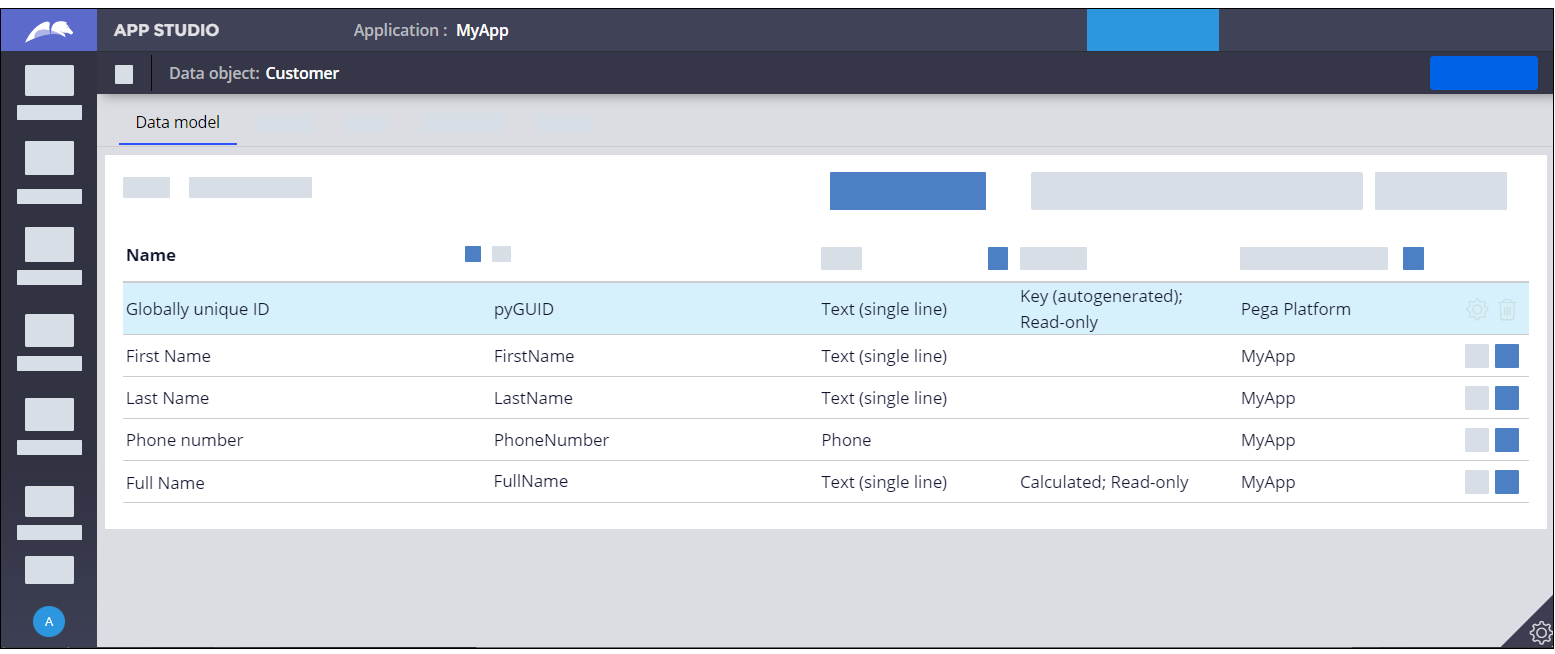
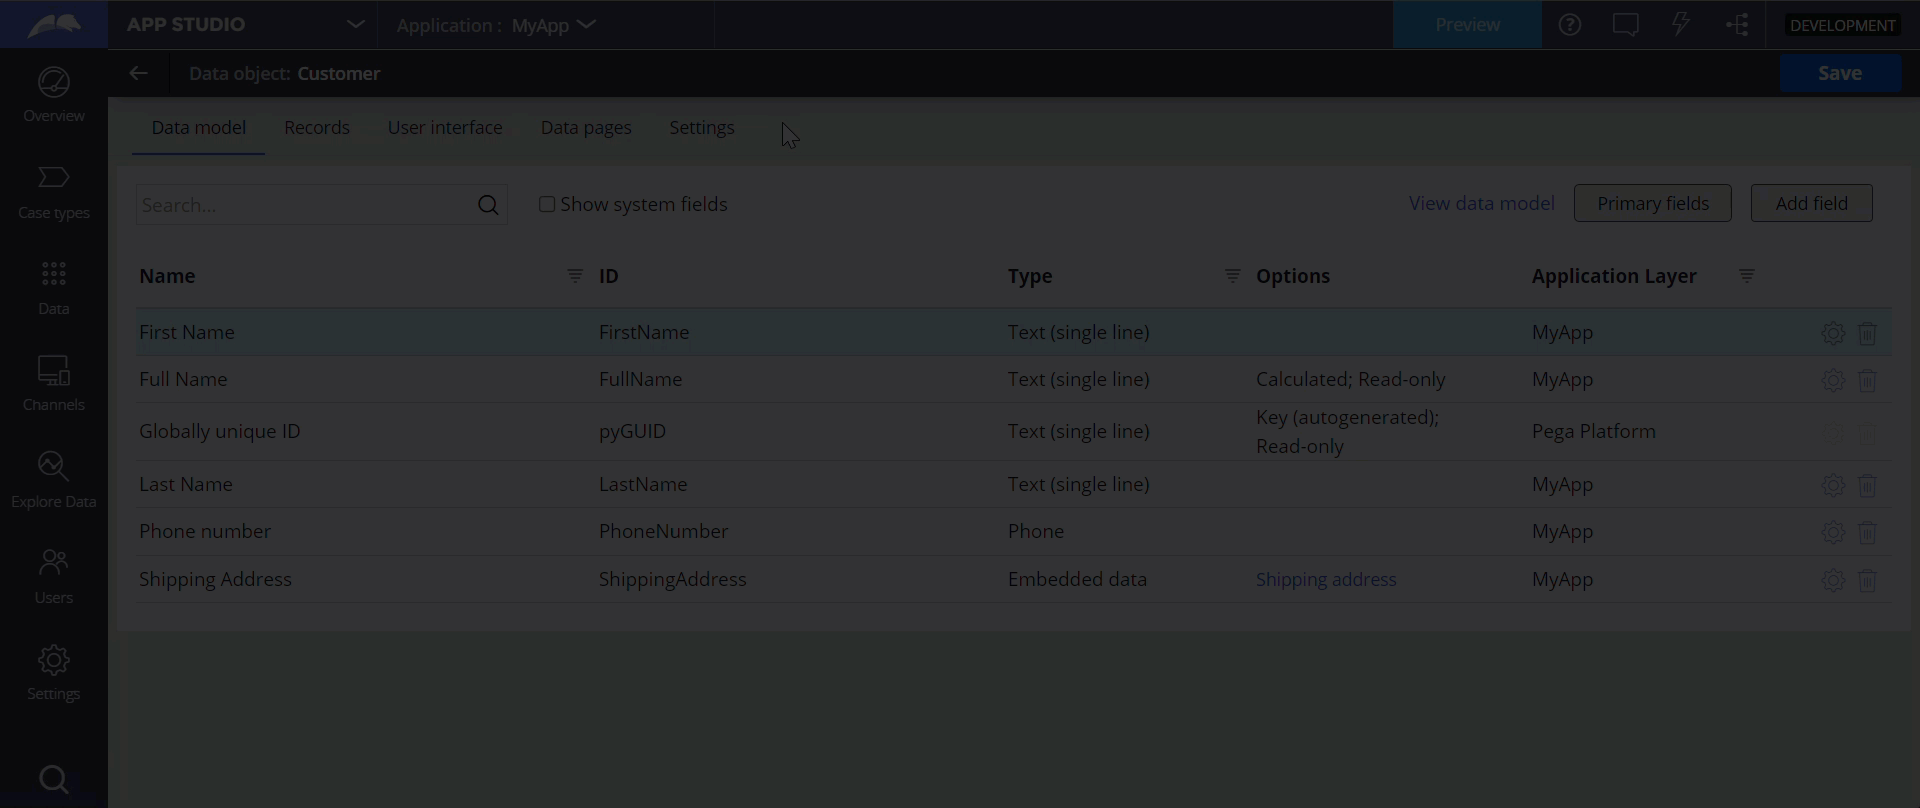
The following figure shows a sample Customer data
object with several fields that capture various types of basic information:Customer data object
Result: A reusable and extensible container for a group of related properties is
available for reuse across your applications to capture the data that you need
to complete cases.
What to do next: Populate your data object with records.
Adding records to data objects locally
After you define a data object, you can store the related data records
locally, in the Pega Platform system of records, without having to
create or maintain database tables.
For example, you can create records that
store data for each individual customer, as you defined in the
Customer data object.
In the navigation pane of
App Studio, click Data.
Open a data object that has Pega configured as the
system of record, as shown in the following example:
A data object with a local data storage
In the data object, click the Records tab.
Click Add records.
Provide values for the fields that you configured, as shown in the following
example:
What to do next: React to changing business requirements by reusing data
objects to quickly expand the amount of information that your data object
captures.
Reusing data objects
As your application evolves, you can quickly expand the amount of information
that your data object captures by referencing other data objects.
For example, you can use data objects from another application layer.
When data object A references data object B, the fields from data object
B become part of data object A. You can reuse data objects multiple
times.
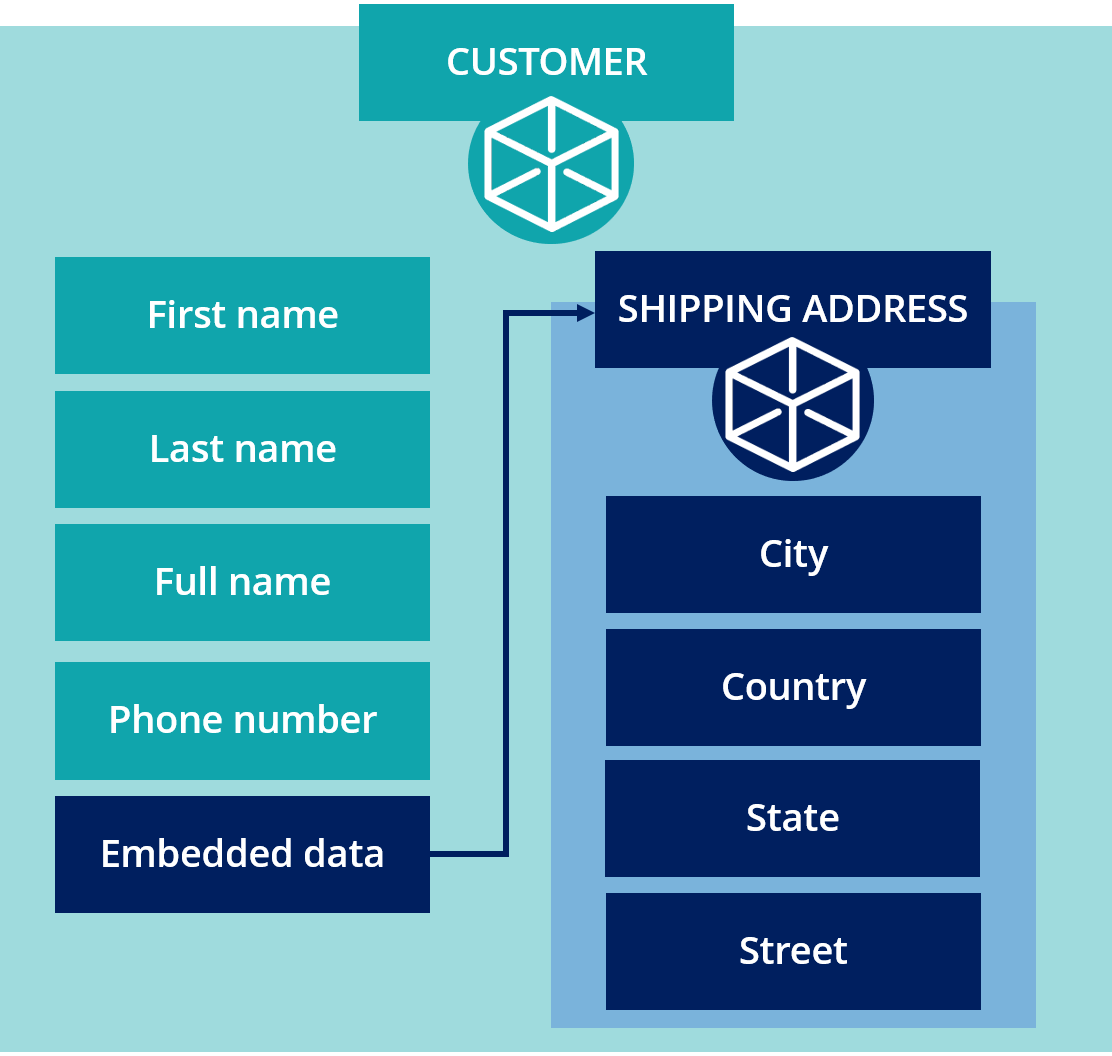
Consider an example in which a company needs to capture shipping addresses in
addition to basic customer data as a result of changing business requirements.
You can reference the Shipping address data object from
the Customer data object as embedded data to reflect
user-supplied information from a case type, as shown in the following figure:Data object reusability
Reuse an existing data object to broaden the scope of information that another data
object requires to capture.
In App Studio, open the data object that you want to
modify.
On the Data model tab, click Add
field.
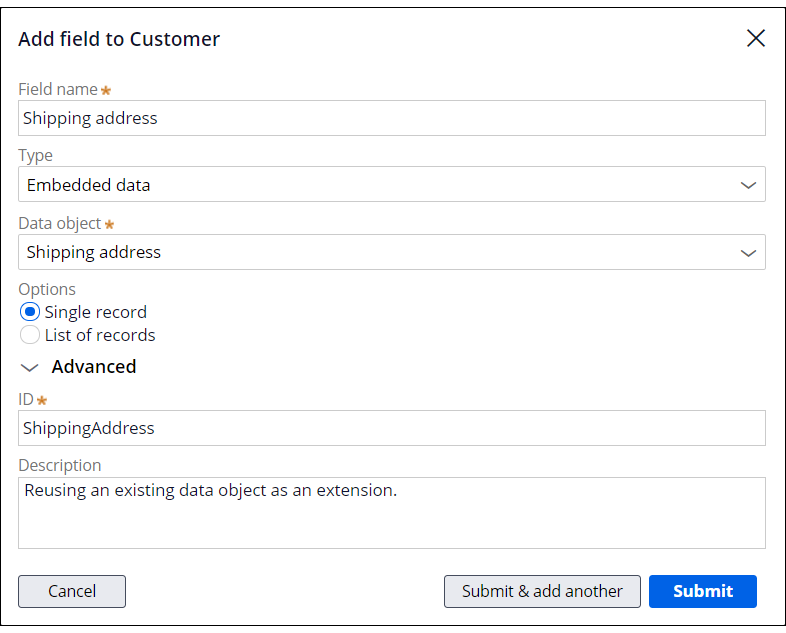
In the Add field window, enter the field name.
In the Type list, select Embedded data.
In the Data object list, select the data object you want
to reference.
For example: Shipping address
Optional: To modify the default field ID of the referenced data object, expand the
Advanced section, and then edit the
ID value.
Optional: To provide additional information about the field, expand the
Advanced section, and then complete the
Description field.
The following figure shows a sample data object reference:Referencing a data object as embedded data
Confirm your settings by clicking Submit.
Result: You created a data object reference in the Customer data
object, as shown in the following example:Data object reference
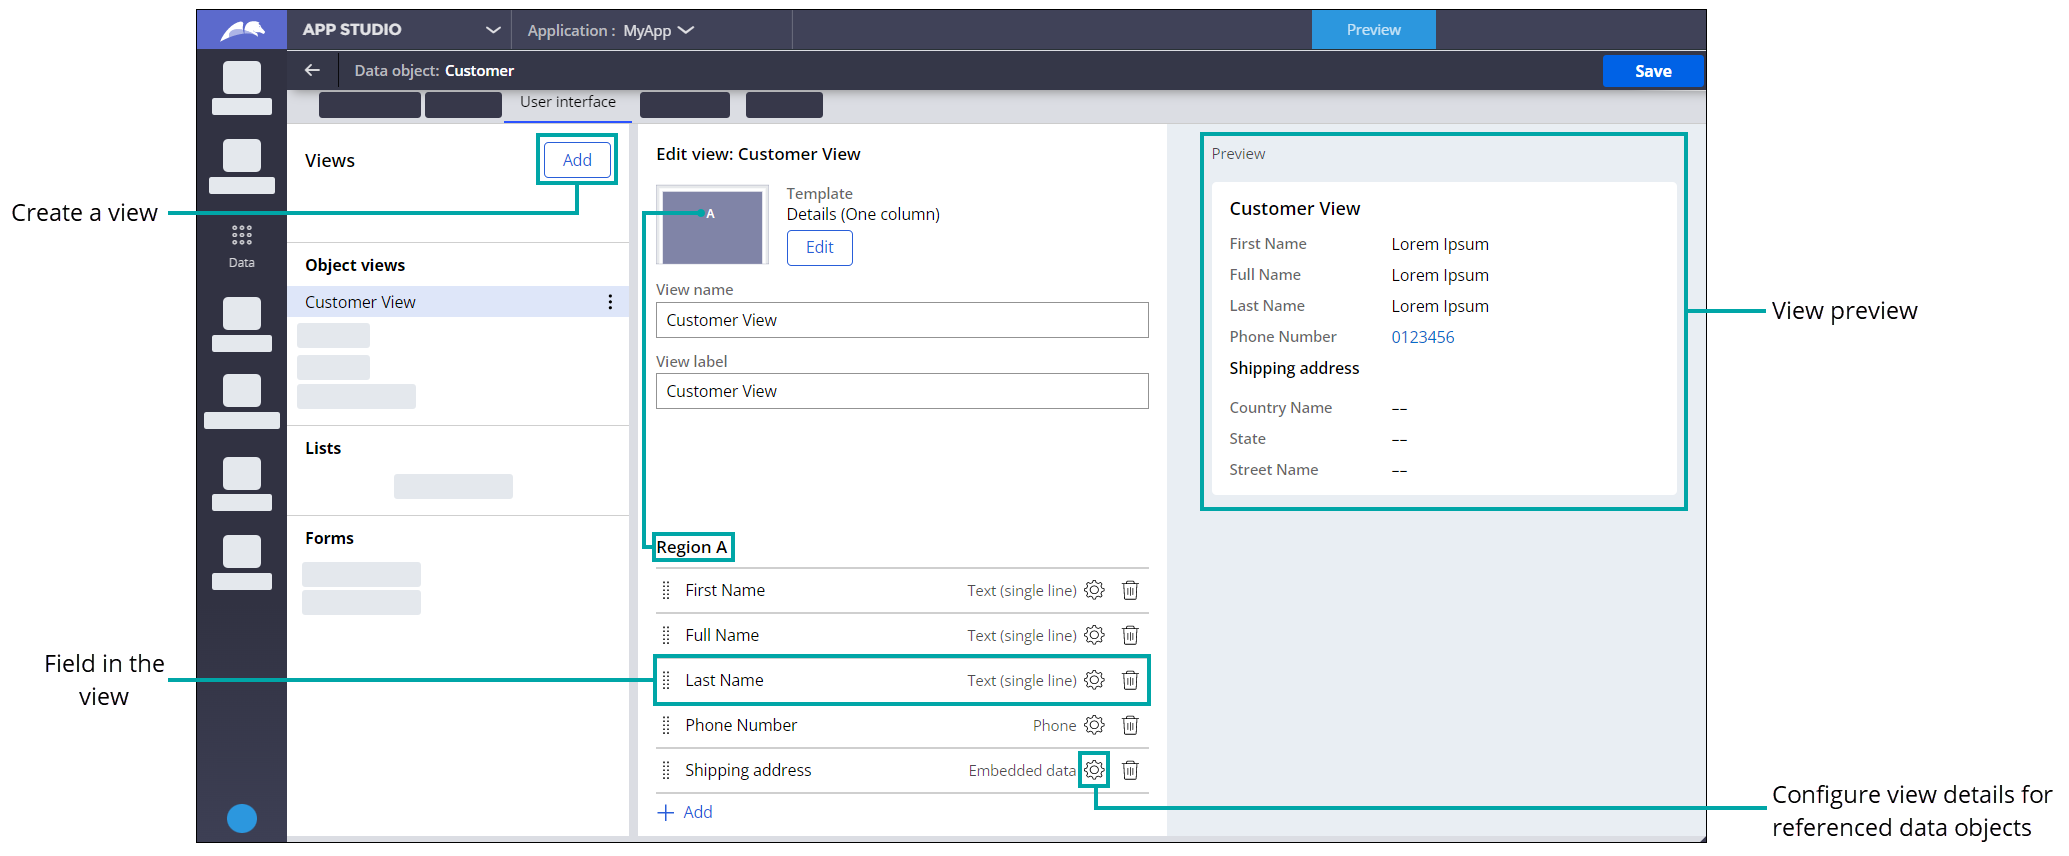
Creating views in data objects
You can take advantage of the data objects that you configured by reusing
them to speed up the creation of case views.
Views act as building blocks for
user interface forms, and support reuse across the application. For more information, see
Forms and views.
In App Studio, open the data object that you want to use as a
source for a view.
Click the User Interface tab.
On the Views section, click
Add.
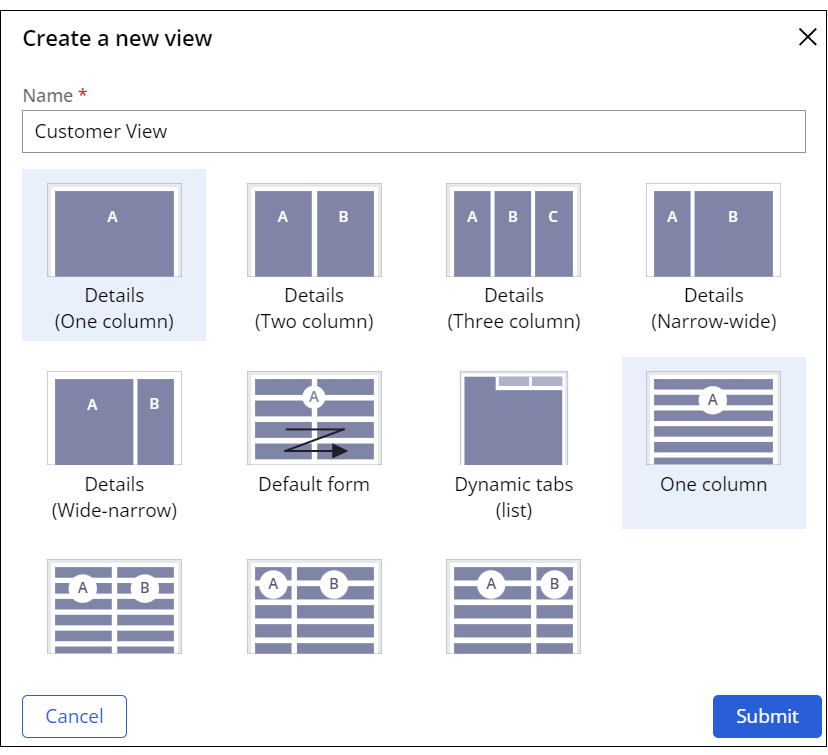
In the Create new view window, specify the basic view
details:
Enter the view name.
Select the view template.
Confirm your settings by clicking Submit.
For example: Creating a view for a data object
Add fields to each region that corresponds to the view template that you
selected:
In the Edit view section, in a
Region area, click Add
to add fields to the view.
Select each field that you want to add to the view, and then click
Add.
If your data object references other data objects as data relationships, add
fields from these data object to your view:
Click the Gear icon next to the referenced data
object whose fields you want to add to the view.
Optional: To edit the default view template for the referenced data object, in
the Template section, click
Edit, and then select a view template.
Add fields to each region that corresponds to the view template that
you selected.
When you finish adding fields to your view, save the data object.
Result: You configured a view for your data object, as shown in the following example:A view based on a data object
What to do next: You can now reuse your data object, together with an associated views, across case
types in your application. For more information, see Automating work by creating case types.