How to configure a non-blocking UI using Asynchronous Declare Pages
"Declare pages" are known starting in Pega 7 as "data pages."
While data pages load synchronously by default, you can more easily set them to load asynchronously so users can take action on a work item while other content is still loading.
There are significant changes to the data page rule form. See Data management: what's new in Pega 7.
In PRPC 6.3 SP1, you can configure non-blocking user interfaces using Asynchronous Declare Pages. This is useful for pulling in external data from systems of record, web services, and other PRPC systems. This supporting information, such as account history, purchasing history, business analytics, and local weather, can display alongside a work item.
In previous PRPC releases, you could configure such data to display in defer loaded sections — the work item displayed first and defer loaded sections displayed as they became available. However, until all defer loaded sections were visible, users could not perform an action that required interaction with the server, for example, Submit.
Using Asynchronous Declare Pages, you can enable a user to take action on a work item while other content is still being loaded. Defer loaded Asynchronous Declare Pages use a different browser connection than the main requestor servicing the work item.
Asynchronous Declare pages cannot run declarative expressions, triggers, and other rules that belong to a declarative network. For example, you can enable executing declarative expressions in a background requestor; but if the declarative expression refers to properties defined in external named pages which are not present in the background requestor, then the declarative expression may not execute.
- guidelines for configuring defer loaded Asynchronous Declare Pages — see Developers: Configuring Non-blocking User Interfaces
- information on tuning requestor pooling to ensure an optimal user experience — see System Administrators: Tuning the Requestor Pool
- information on configuring WebSphere — see System Administrators: Configuring WebSphere
The following user interface shows a work item with asynchronously defer loaded sections.
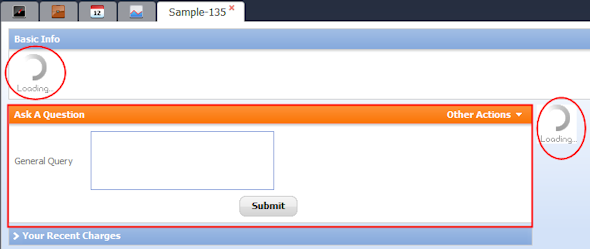
The user can interact immediately with the work item, typing in the text box. Since the other sections are asynchronously loaded, the user can even click Submit to process the action before the defer loaded sections display.
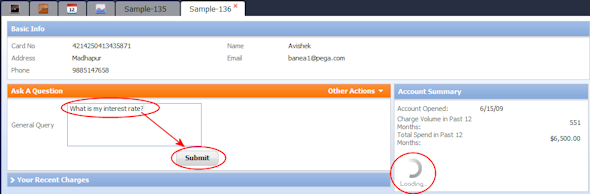
The sections using defer loaded Asynchronous Declare Pages contain information of interest to the user, but not critical in processing the work.

This article describes how developers can use Asynchronous Declare Pages to configure non-blocking user interfaces. It also illustrates how system administrators can monitor and modify requestor pool settings as necessary.
Developers: Configuring Non-blocking User Interfaces
To configure defer load of section using an Asynchronous Declare Page:
- Configure the Asynchronous Declare Page.
- Configure a defer loaded section that uses the Asynchronous Declare Page as its source.
- Evaluate the Asynchronous Declare Page using the Tracer.
Configure the Asynchronous Declare Page
To configure a non-blocking UI, create an asynchronously loaded declarative page, then create a defer loaded section that uses the Asynchronous Declare Page as its source.
- In the Application Explorer, create a new Declare Page.
For information, see How to define the contents of a Declare pages rule using a Report Definition rule and How to create a declare pages rule. - On the Definition tab, select the Load this Page Asynchronously checkbox.
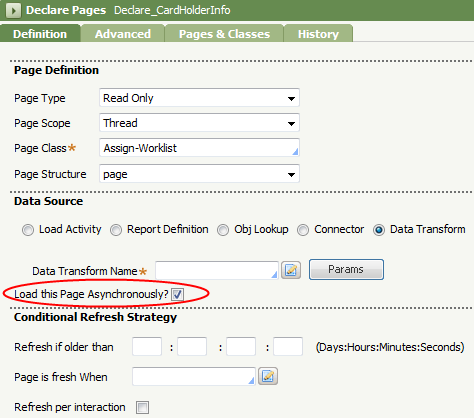
- Click Save.
Configure the section using the Asynchronous Declare Page as its source
- Create a section and include the section that uses the Asynchronous Declare Page as its source, in this case, CardHolderInfo.

- On the General tab, select the Defer Load checkbox.
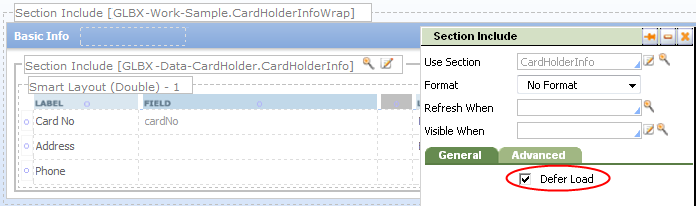
- On the Advanced tab, specify the name of the Asynchronous Declare Page in the Using Page field. In this case, the name of the Asynchronous Declare Page is Declare_CardHolderInfo.
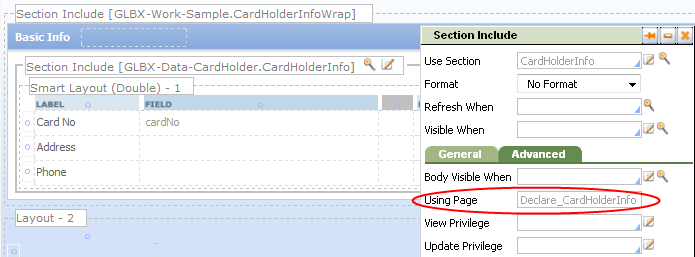
- Save the section.
Evaluate the Asynchronous Declare Page using the Tracer
You can use the Tracer to view the trace lines for the background thread (requestor) that loads a declare page asynchronously, as described below. For information on using the Tracer to debug your application, see Introduction to the Tracer tool and the Developer Help.
- Run the process.
- Click the Tracer icon
 in the Quick Launch bar to trace your current session and thread.
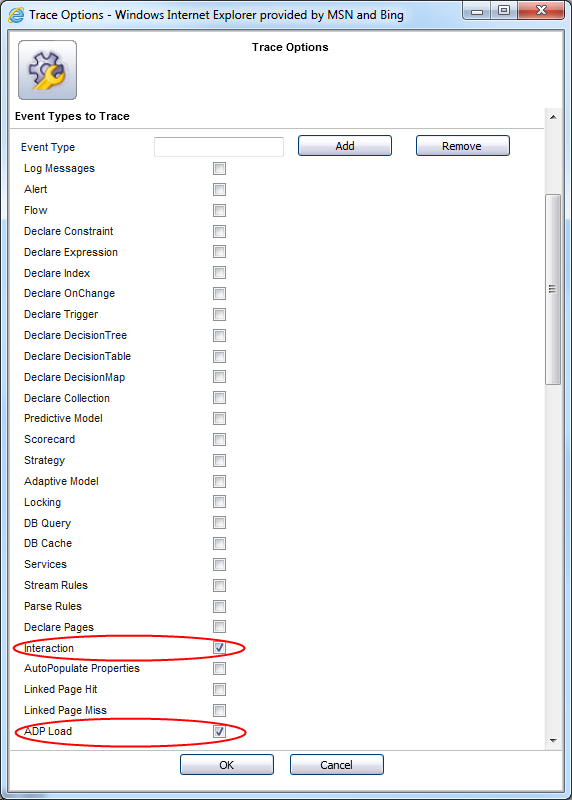
 - In the Tracer, click Settings in the tool bar to display the Trace Options.

- In the Event Types to Trace area, select the Interaction and ADP Load checkboxes.
- Review the trace. The first ADP trace of a background thread (requestor) that loads a declare page asynchronously displays a link to a pop-up window showing the corresponding trace lines for that requestor session. In the following example, clicking the
Async DP Loadlink in line 2, theDeclare_Binaries Step Page, displays a one-time view of the Load Activity.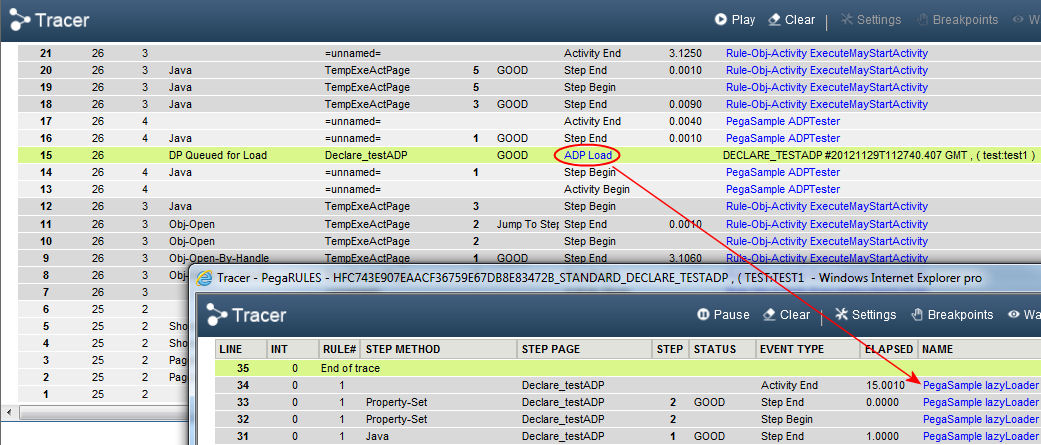
When you close this pop-up, the following warning appears:
System Administrators: Tuning the Requestor Pool
Requestor pooling often improves the performance of a service because requestors are reused, their allocated resources are shared, and the service need not wait for a requestor to be created.
You can use the System Management Application to help you determine optimal pooling settings for the Async Service Package:
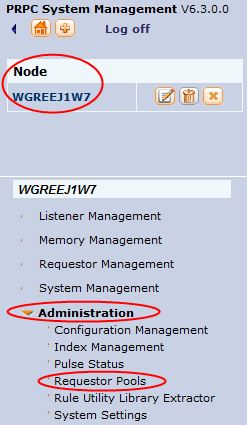
- Select
 >System>Tools>System Management Application .
 - Select the node, then select Administration>Requestor Pools.
- Run the process. Click
 as needed.
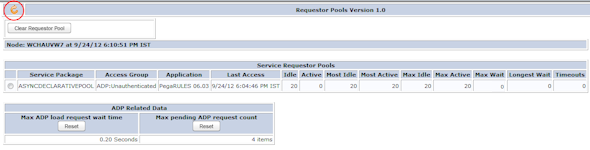
- Review the ADP Related Data:
Max ADP load request wait time— indicates the maximum amount of time that any ADP request waited for a requestor. A non-zero number indicates more requests than requestors.Max pending ADP request count— indicates the maximum number of ADP requests waiting in the queue for a requestor, up to this point in time. This does not apply to application servers that manage their own queue.
Click the Reset button to reset these ADP counters. Clicking Clear Requestor Pool disrupts the current activity and is not recommended.
- In addition, you can use the following information to determine if you need to adjust the requestor pool settings:

Idle— indicates how many more concurrent ADP can be accommodatedActive— indicates how many ADP are currently executing. The combined value of theIdleandActivefields equals the value of theMaximum Active Requestorson theAsyncDeclarativePoolService Package Pooling tab.Most Idle— indicates the minimum load on the systemMost Active— indicates the maximum load on system; the most ADPs concurrently executingMax Idle— the value ofMaximum Idle Requestorson theAsyncDeclarativePoolService Package Pooling tabMax Active— the value ofMaximum Active Requestorson theAsyncDeclarativePoolService Package Pooling tab
The value of the following fields should be zero (0). For web containers that support APIs for thread management, PRPC automatically sets the
maximum threadsto the value of theMaximum Active Requestorsspecified on theAsyncDeclarativePoolService Package Pooling tab.
However, for application servers in which you manually set the value of the maximum number of threads for the PRPC node, a configuration error, in which the maximum number of threads is less than theMaximum Active Requestors, is possible. A non-zero value in these fields indicates a configuration issue.Max WaitLongest WaitTimeouts
Tip: You can also use the alert log file to help you determine optimal pooling settings. To open the alert log, select ![]() >System>Tools>Logs>Log Files>Alert.
>System>Tools>Logs>Log Files>Alert.
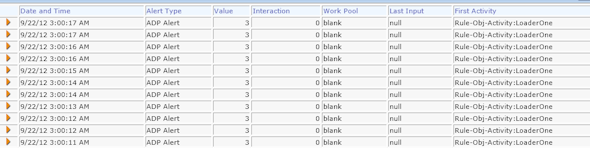
Click an alert to display additional information. The following alert indicates that you may want to increase the Maximum Active Requestors to decrease the wait time.
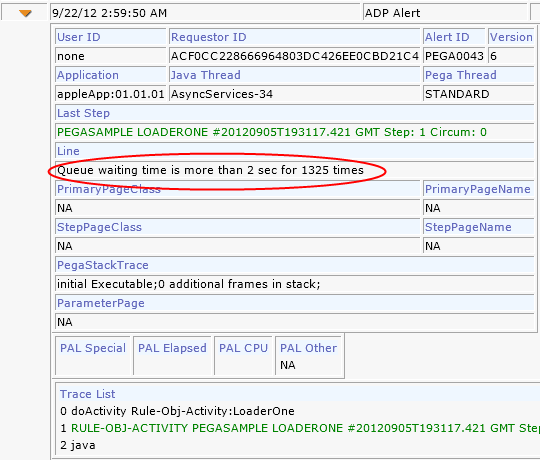
See Understanding the PEGA0043 alert: Queue waiting time is more than x for x times for details.
To adjust the alert thresholds, modify the values of the following in prconfig.xml:
alerts/ADP/queuewait/thresholdtime— indicates the wait time in the queue for a specified number of requestorsalerts/ADP/queuewait/thresholdcount— indicates the number of times that the wait time (ADP/queuewait/thresholdtime) can be exceeded before an alert is raised
For more information about alerts, see Understanding alert log message data and Performance alerts, security alerts, and AES.
For instructions on editing prconfig.xml, see How to change prconfig.xml file settings or How to set prconfig values in a Dynamic System Setting value.
Modify requestor pool settings
- Select >
 Integration>
 Resources then click the Service Packages button.
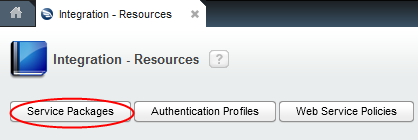
- Select the
AsyncDeclarativePoolService Package.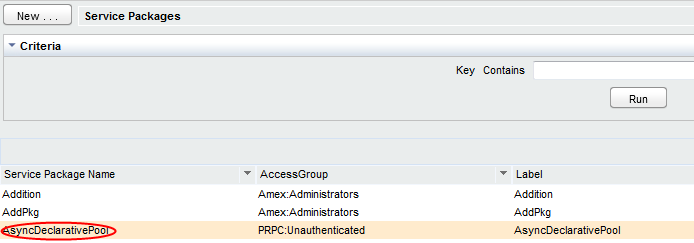
- On the Pooling tab, modify the requestor information:
Maximum Idle Requestors— defines the maximum number of idle requestors that can be in the pool for services from this package.
Often this value is similar to the value ofMaximum Active Requestors. However, in cases in you want high scalability, but the average load is relatively low, set this value to a number less than the value ofMaximum Active Requestors. For example, in this case, you may set theMaximum Active Requestorsto 100 and set theMaximum Idle Requestorsto 30. This means that a maximum of 100 requestors is available, but as soon as the requestors are free, all but 30 are discarded. This saves memory by caching/pooling only 30 requestors.Maximum Active Requestors— defines how many concurrent requestors can be created and in use for the services in this package. If a service request arrives when the number of active requestors is at this limit, PRPC waits for an idle requestor. The maximum number of Java threads at any point is equal to this value since each requestor uses one Java thread.
Note: You must manually configure the maximum threads for application servers that do not have API’s that support thread management, such as WebSphere®. As a best practice, configure theMaximum number of threadsfor the PRPC node in WebSphere equal to the value ofMaximum Active Requestorsspecified here. See Configuring the maximum number of threads in WebSphere.Maximum Wait (in seconds)— should be configured at 0 and is ignored by ADP processing.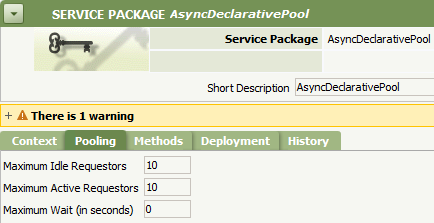
- Restart the server.
System Administrators: Configuring WebSphere
Configure the maximum number of threads for the PRPCWorkManager in WebSphere
- Start the WebSphere server.
- Log in to the administrator console: https://<hostName>:<portNumber>/ibm/console/login.do.
- Select Resources>Asynchronous beans>Work managers.
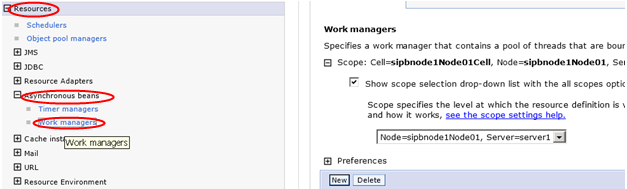
- In the Work Managers area, click the PRPC node deployed on the current server, in this case,
PRPCWorkManager.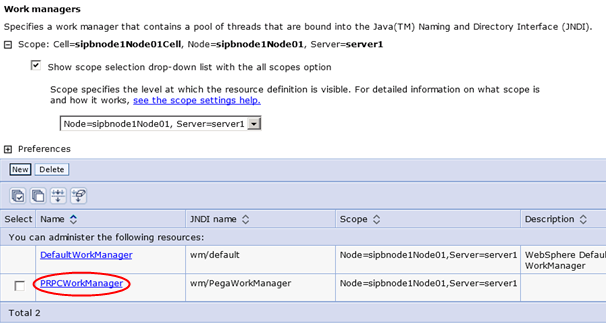
- Specify the Maximum number of threads for the selected PRPC node, then click Apply. Note the
Maximum number of threads. You will need this value to determine the maximum number of database connections.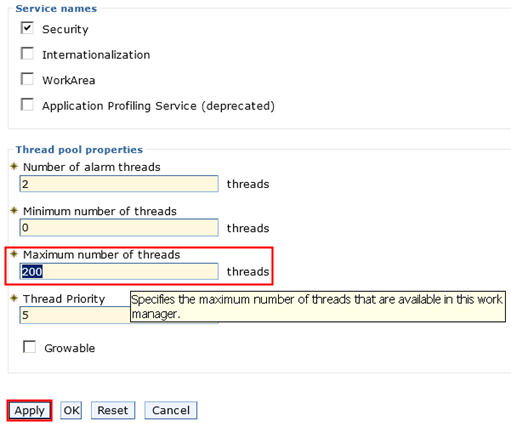
- Restart the server.
Determine the maximum number of threads for the web container
To determine the maximum number of threads for the web container:
- Start the WebSphere server.
- Log in to the administrator console: https://<hostName>:<portNumber>/ibm/console/login.do.
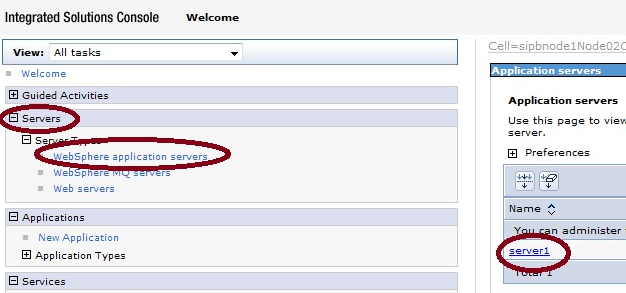
- Select Servers>WebSphere application servers then select the server, in this case, server1.
- On the server page, select in the section.
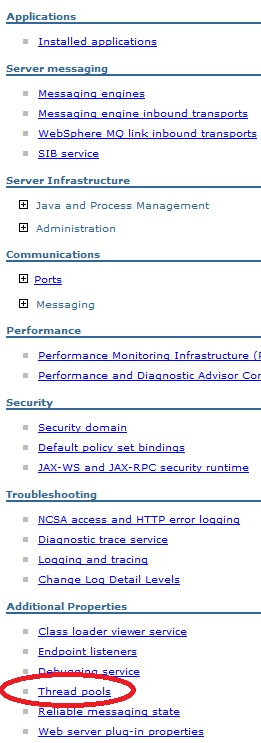
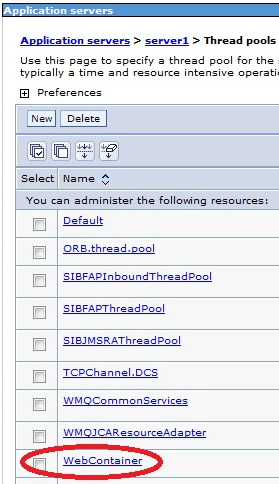
On the Thread pools page, select .
Specify the
Maximum Size,then click Apply. Note the maximum number of threads. You will need this value to determine the maximum number of database connections.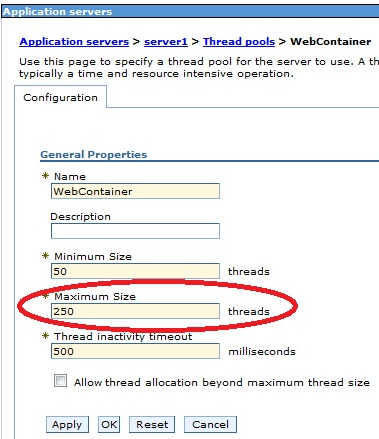
- Restart the server.
Configure the maximum number of database connections
Set the maximum number of database connections to at least 30% of the maximum number of simultaneous requests on the PRPC server, where each thread takes two to three database connections.
To determine the maximum number of simultaneous requests, add the value of the Maximum Size (threads) for the web container to the value of the Maximum number of threads for the PRPCWorkManager.
For example, if the maximum number of threads for the web container were set to 100 and the Maximum number of threads for the PRPCWorkManager were set to 50, then the maximum parallel load on the PRPC server would be 150 requestors. In this case, you would set the value of the maximum number of database connections to at least 45, 30% of 150.
To determine these values, refer to the previous sections. For information about the:
- maximum number of threads for the web container, see Configure the maximum number of threads for the web container.
Maximum number ofthreadsfor the PRPCWorkManager, see Configure the maximum number of threads for the PRPCWorkManager in WebSphere.
To specify the maximum number of database connections:
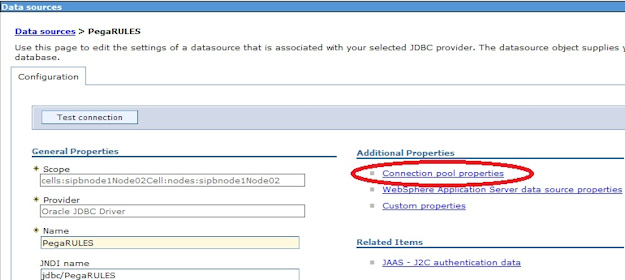
- Select Resources>Data sources>PegaRULES.
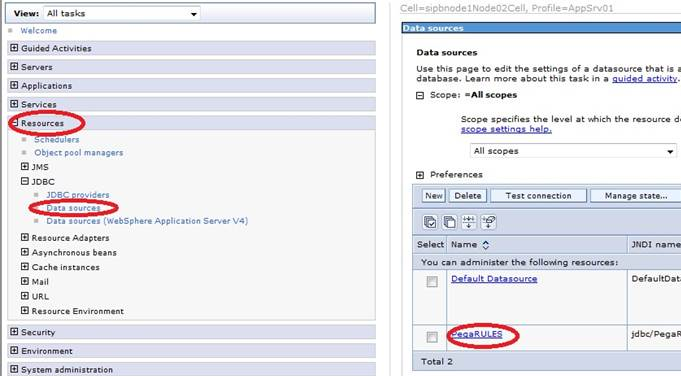
- On the PegaRULES Data sources page, select Connection pool properties.
- Specify the Maximum connections. This value should be at least 30% of the maximum number of simultaneous requests on the PRPC server, where each thread takes two to three database connections.
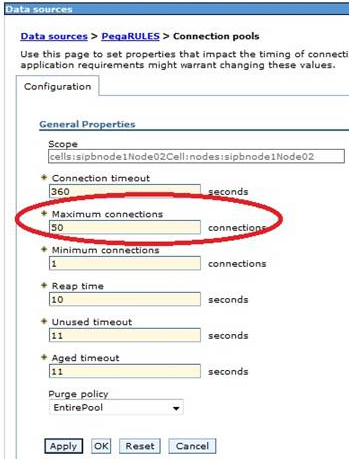
- Click Apply, then restart the server.
Disable asynchronous load of declare pages
In prconfig.xml, set the value of the env name=" initialization/asyncdeclarepages " to false:<env name=" initialization/asyncdeclarepages " value="false" />
If you set the value="false", asynchronous load of declare pages is disabled. However, the Load this Page Asynchronously? checkbox still displays on the Declare Page Definition tab. If the value in prconfig.xml is set to false and a user selects the Load this Page Asynchronously? checkbox, the page will be loaded synchronously.
For instructions on editing prconfig.xml, see How to change prconfig.xml file settings or How to set prconfig values in a Dynamic System Setting value.
Additional information
How to define the contents of a Declare pages rule using a Report Definition rule