How to create repeating layouts that contain tabbed headers
Summary
In addition to Bar and Collapsible headers, V5.4 SP2 introduces the ability to format layouts with a tabbed header. This functionality is similar to what existed for container elements in harness rules in versions prior to V5.4 SP2.
Example
Tabbed user interface elements provide the ability to place a large number of fields on a single form. A tabbed layout extends this ability further by allowing multiple tabbed elements to exist in a single section or container.
Suggested Approach
Complete the following steps to add a layout with a tabbed header:

- Open or create the harness rule or section rule to which you would like to add a tabbed layout. Tabbed layouts are not available in Flow Action rules.
- Select the existing layout in the section rule, or add a new one by selecting and dragging
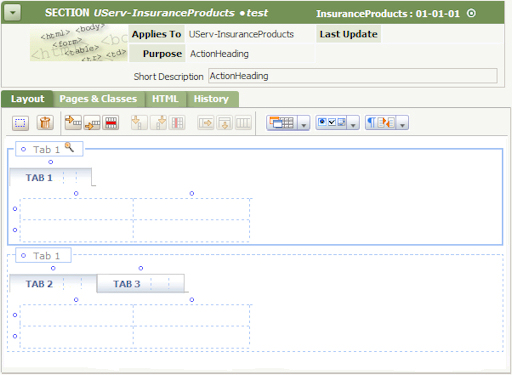
Layoutfrom the Layout group of controls. - With the layout selected, click the magnifying glass to open the layout properties panel.
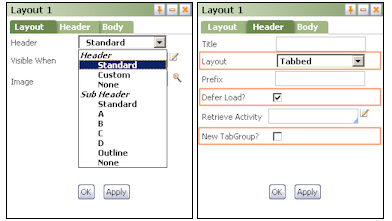
- In the Layout properties panel, on the Layout tab, select either Header >Standard or Sub Header > Standard.
- In the Layout properties panel, on the Header tab, select Tabbed in the Layout field. Selecting Defer Load? causes a delay in the loading of contents in a specific tab until that tab is selected. This is beneficial to performance. Notice the title of the layout changes from Layout to Tab.
- Selecting and dragging subsequent
Layoutelements adds additional tabs to the layout. Properties can then be set for each tab.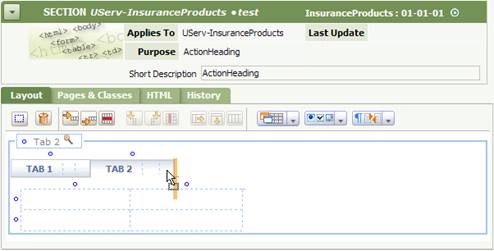
- Because each tab represents a new layout, the properties panel for each tab is accessed by clicking the magnifying glass at the top level of the wireframe. This value changes to match the number of the currently selected tab. Layout properties can be set for each tab in the tab group.
- Selecting New Tabgroup? on the properties panel of a tab causes that tab, and any tabs placed after it, to be added as a new tab group directly below the original tab group. Deselecting this property causes the separated tabs to merge back into the original tab group.