How to ensure that a product rule includes all parts of an application
Summary
A product rule (the Rule-Admin-Product rule) defines the rules and data that comprise your application. To export the application to another system you use the product rule to populate a ZIP file archive.
This article describes a three-step process to help ensure that your product rule is complete and ready for export.
Suggested Approach
Step 1: Identify and Select the Application RuleSets
- Identify all the application RuleSets that will contain the product or product patch rule, the RuleSet rules, the RuleSet version rules, versions, and the application rules associated with RuleSets
- Select View > Rules > All Checkouts from the menu to run a rules report and ensure that all the rules are checked in. As a best practice, lock the RuleSet Versions and the application rules to prevent unexpected changes. When you attempt to create a .zip file that includes checked out rules, a warning message appears, is reported identifying the checked-out rule or rules — neither the original version nor the checked-out version of the rule is included in the ZIP archive.
- Create a product rule by selecting Application > New > Rule > SysAdmin > Product from the menu .
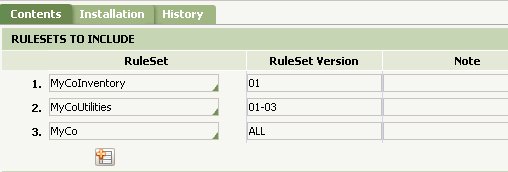
- In the RuleSets to Include section, enter the RuleSets and the appropriate RuleSet versions. Order the RuleSets in the list as they would appear on a RuleSet hierarchy as shown in this example
Step 2: Identify the Application Data
- Identify the data classes and instances that you are exporting, including all the data classes that are part of your application. The classes may include instances for the organization structure, security (access groups), connections to databases, external systems, and other Process Commander system-related instances. Consider carefully any dependencies among data instances or between data instances and your rules. During import of the ZIP archive on the destination system, data instances that are already present are not overwritten unless you specify that they should be. The following provides a categorized checklist of data classes as you build your product rule.
Access and Portal Gadget Data Classes
- Data-Admin-AuthService — The authorization Service AuthService is specified in the Web.xml file.
- Data-Admin-Operator-ID — Operator IDs if applicable
- Data-Admin-Operator-AccessGroup — These should be organized by the specialized types of users of the system that have unique roles, portals, and access to applications.
- System-User-MyRules Instances
Organization Data Classes
- Data-Admin-Organization — Always set to “Your org name”
- Data-Admin-OrgDivision — The Divisions with your company
- Data-Admin-OrgUnit —Set to “Agency” or the internal department
- Data-Admin-Workgroup — Work group name
- Data-Admin-Workbasket— Workbasket name should identify the function it is serving
Services/Connectors Data Classes
- Data-Admin-ServicePackage — Always reference the appropriate service name
- Data-Admin-Connect-EmailListener
- Data-Admin-Connect-EmailServer
- Data-Admin-Connect-FileListener
- Data-Admin-Connect-JCAAAdaper
- Data-Admin-Connect-JMSListener
- Data-Admin-Connect-JMSProducerModel
- Data-Admin-Connect-JNDIServer
- Data-Admin-Connect-MQListener
- Data-Admin-Connect-MQServer
- Data-Admin-EmailAccount
Mapping Data Classes
The following classes control where instances of a class are stored. Since many applications depend on database tables and class groups, it is a best practice to always include them:
- Data-Admin-DB-Name
- Data-Admin-DB-ClassGroup
- Data-Admin-DB-Table
Other Application Data Classes
Display Data Instances (not shown above that inherit from Data-)
Note: Some concrete Data- classes contain information that is valid only on a single Process Commander system, or only on one node of a single system. For example, the system creates a Data-Agent-Queue record automatically on each node, and the Node ID is part of the key. Listeners and similar data instances (Data-Admin-Connect-* ) contain port numbers, computer names, and passwords. Do not include instances of these Data- classes in a product ZIP archive unless you have carefully confirmed that they are valid on the target system.
Step 3: Select the Application Data
To ensure that you include the requisite data objects for your application you can use either when rules or query data instances from data classes.
Using when rules:
- To specify all instances from all data classes derived from a specific name, create a when rule that evaluates to the pxInsName property of a class that is defined in the top-level class of your application. For example, if the top-level class of your application is named MyCo-, you can create a When rule that evaluates for the condition in which pxInsName is MyCo, as shown here.
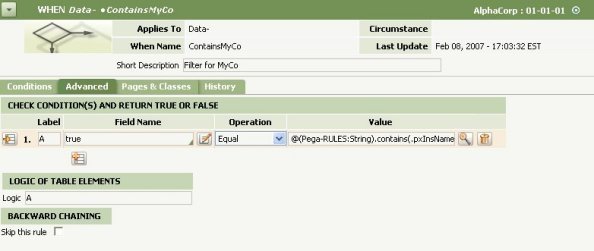
The text in the Value field is
@(Pega-RULES:String).contains(.pxInsName, MYCO).
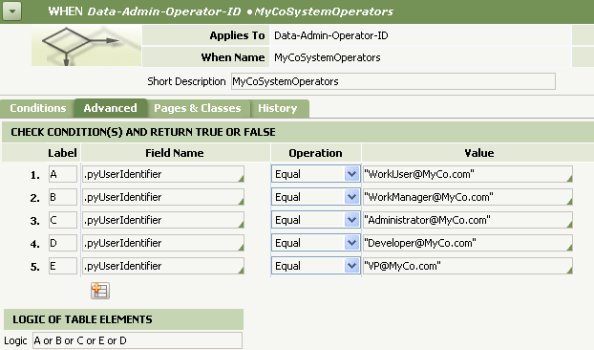
- To select only specific instances from a data class create a when rule that evaluates to a key property within an application class. For example, you can create a when rule that includes a limited set of operators by specifying key values for .pyUserIdentifier as shown here.
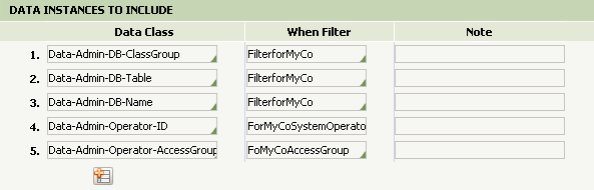
- After you have created your when rules, enter the appropriate application data classes in the Data Class list located in the Data Instances to Include section of the Product rule form. Next to each data class in the list, select your When rule from the Smart Prompt list in the When Filter field as shown here.
-
Query data instances by Inskey:
You also use the Query Data Instances to Include section of the Product form to select specific data instances. Use the Smart Prompt to select a concrete class in the Data Class field and click the Query button.

A list of data instances appears. Select the instance you want to add from the list, and then click OK in the list. Information about the instance is set in the InsKey, Label, and ObjClass fields.
You can edit the value of the Label field, but do not change the values in the InsKey or ObjClass fields.
Note: If you use one product rule repeatedly to create multiple .zip archives, the data instances selected by a when condition rule (on the Contents tab) may vary from file to file, depending on how the when rule is defined. In contrast, the data instances selected by internal key (listed in the Inskey array) are always included.