Using the Application Express to prototype applications
Summary
Use the Application Express tool to quickly create and prototype a starter application for experimentation, demonstration, and learning. With a few clicks and one input value — the application name — the system creates the elements for a working application.
Note: This article describes the Application Express in Version 6.2 SP2. For information about using the Application Express in Version 6.2 SP1, see ![]() About the Application Express tool.
About the Application Express tool.
The Application Express is best used when you want to rapidly prototype your business processes, case design, and user interfaces — and experiment with and demonstrate the results. Although the result of the Application Express is a working application, the class structure of that application is not suitable for the reuse features that facilitate enterprise-wide use.
Use the Application Accelerator, not the Application Express, to create applications that have the class structure and RuleSets that are suitable for enterprise-wide use.
Suggested Approach
 To create a new application using the Application Express:
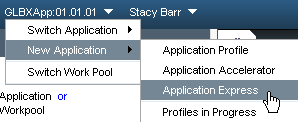
- From the application menu, select New Application > Application Express.
- After the system displays the introduction screen, click Create New Application.
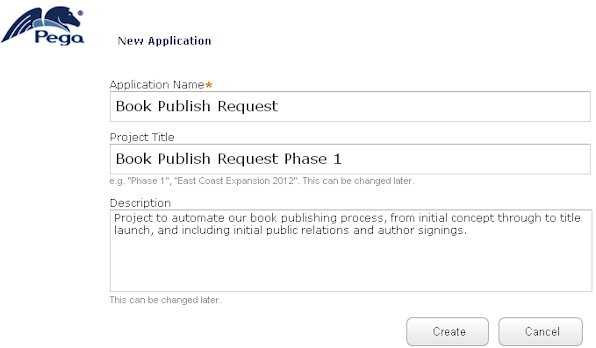
- Enter a name for the application.
When the system generates the starter set of elements for the application, it uses this name for the initial process and case name. Therefore, you typically enter a name that reflects the business purpose that the application fulfills (for example,
Equipment RequestorBook Publish Request). - Optional: Enter a title and description of the project in which this application is being developed.
If you do not make an entry, the system uses default values based on the application name. A project title is usually the name given to the project by the sponsoring organization (such as
Transform Procurement Phase 1) or the organization's code name for the project (such asProject Green). - Click Create.
Example: Entry values for a new application
When you click Create, the system begins generating the necessary elements that seed the initial base of the application. When the elements are created, the Designer Studio portal refreshes with the newly created application as the current application, and displays the Profile Explorer and Case Designer landing page.
The following image shows an example when creating an application with the name Book Publish Request:
- The Application menu displays the name entered for the application (
Book Publish Request). - The generated base starting flow (displayed in the Processes tab) is named
StartBookPublishRequest— a default value based on the application name. - The generated base case type is named
Book Publish Request— a default value based on the application name.
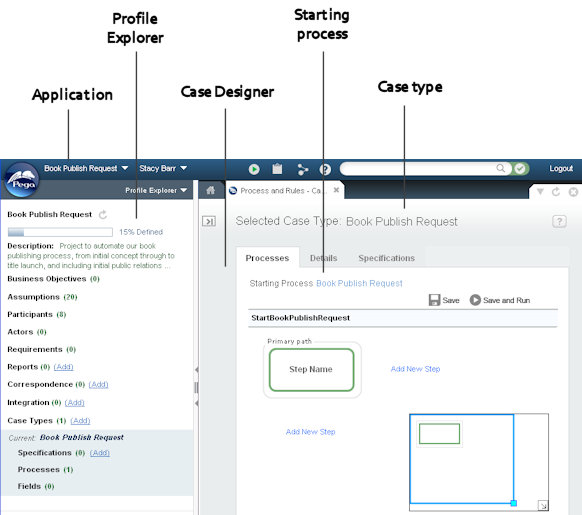
To see the class and rule structure initially created, select Application Explorer in the Explorer area and expand the tree structure.
Next step
After your new application appears in the Designer Studio, you can evolve it further:
- On the Processes tab, build out the business process and subprocesses by capturing the process steps, as well as the specifications and (optionally) fields for each step.
- Add more case types using the case types tree.
- Use the Profile Explorer to capture application elements such as requirements and actors, and to capture specifications about things such as reports and correspondence.
- Use wizards, tools, and other facilities to create rules in the application.
The usual first post-Application-Express step is to build out the business process — adding named steps, putting them in the preferred order, adding fields to display in the user interface of the running process. At any time in the Case Designer landing page, you can run the current state of the business process by clicking ![]() .
.
Build out the business process
The Processes tab displays the process in the Discovery Map view. The Discovery Map view is a design tool for visually laying out process steps. Immediately after running the Application Express, the process has a single default step. From here, build out the process by adding steps, moving them into the places you want, and naming them according to how you want the process to run from start to finish.
Building out the process involves the following tasks. You do not have to perform them in any particular order — the Discovery Map view supports iterative process design. Add a few steps and fields, run the process, then do some more.
- Build the structure by adding named steps. Each colored shape is a step.
- Add specification information to steps.
- Specify fields for the human-based steps. The specified fields result in the user interface fields displayed on the form at that step in the process.
- Save and run the process to see its current behavior.
Note: For detailed information about working with the Discovery Map view, entering specification information, and adding fields, open the Developer Help using the Case Designer's help icon (![]() ).
).
To save your updates, click ![]() . To run the updated process after making changes, click
. To run the updated process after making changes, click ![]() .
.
Build the structure by adding named steps
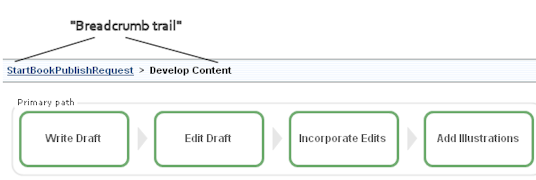
For example, here is the structure built for the StartBookPublishRequest business process. To build the structure, lay out the steps in the primary path of the process horizontally, and lay out steps in subprocesses vertically. You can drag and drop steps. Add an alternate step by right-clicking and selecting Add Alternate Step.
To delete a step, select the step and press the Delete key on your keyboard
To drill-down into a subprocess and display its steps only, click ![]() on the subprocess shape. When a subprocess is displayed, you can use the process breadcrumb trail to re-display the path it starts in.
on the subprocess shape. When a subprocess is displayed, you can use the process breadcrumb trail to re-display the path it starts in.
Example: StartBookPublishRequest process in Discovery Map view

Example: Develop Content subprocess in Discovery Map view
Add specification information to steps
To open a window in which to add specification information to a step, double-click the step.
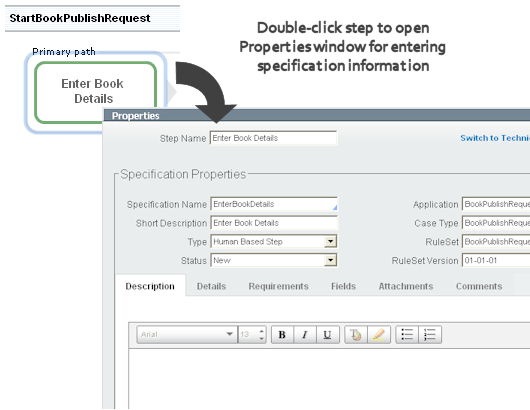
Enter the specification information and click OK to save.
The Type field determines the color and type of the shape displayed for that step in the Discovery Map view.
For example, the following illustration shows the result of selecting the Integration choice for Type and adding specification details for the Retrieve Prospects step in the Assign Team Members subprocess:

Note: For detailed information about entering specification information, see the Edit Specification window - Working with specifications help topic in the Developer Help.
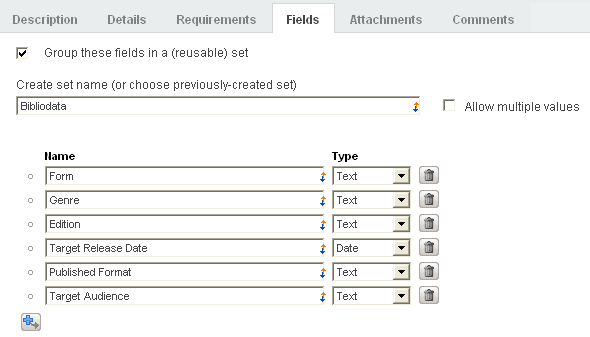
Specify fields for human-based steps
Steps that have Type of Human Based Step are process steps at which the system needs input from or selections chosen by a user who is going through the process. For example, in the Book Publish Request scenario, the first step of the process (Enter Book Details) is for the user to provide details about the proposed book such as its genre, physical characteristics, target audience, etc.
You can prototype the user interface of the form in which the end user provides input by specifying fields for the corresponding human-based step. The fields are specified in the same window as the specification information: double-click a step to open the window and click the Fields tab.
Example: Fields specified for the Enter Book Details step
Note: For detailed information about specifying fields for human-based steps, see the Edit Specification window - Working with specifications help topic in the Developer Help.
Save and run the process to see its current behavior
At any time, you can click ![]() to run the process and see the results of your recent changes to the process. The system generates the underlying sections and displays the user entry forms using the default work harnesses and the generated sections.
to run the process and see the results of your recent changes to the process. The system generates the underlying sections and displays the user entry forms using the default work harnesses and the generated sections.
For example, running the StartBookPublishRequest process after adding fields to the Enter Book Details step shows the resulting form for user input. The form shows the specified fields, and reflects the selected type for each field (for example, the Target Release Date is a Date field).
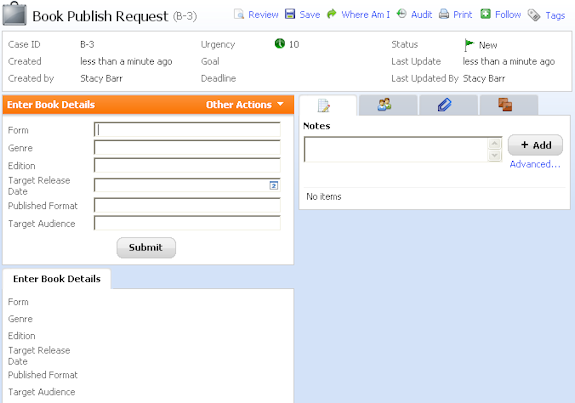
You can enter values for fields and continue running the process. After clicking Submit in the Enter Book Details step, the process moves to the next human-based step (Fill Positions in the Assign Team Members subprocess).

By iteratively updating and running the process, you can continue to experiment and refine the design.
Note: To make it easy to rapidly prototype and experiment in an application created by Application Express, when you're working in such an application, the system automatically performs certain actions when you save a process that is in draft mode. When you click either ![]() or
or ![]() , if the specification information changed since the last save, the system updates various underlying values and rules that correspond to that specification and its associated step. If you wish to avoid these automated changes while working in an application created by Application Express, remove the process's flow from draft mode in the rule form for the flow. For specific details, see the About the Application Express tool help topic in the Developer Help.
, if the specification information changed since the last save, the system updates various underlying values and rules that correspond to that specification and its associated step. If you wish to avoid these automated changes while working in an application created by Application Express, remove the process's flow from draft mode in the rule form for the flow. For specific details, see the About the Application Express tool help topic in the Developer Help.
Additional information
Previous topic When and how to use the private check-out feature Next topic How to model the user interface of your application before all properties are defined (PRPC 6.1)