Personal Auto Claim - FNOL Microjourney
These topics describe how to configure and extend the Personal Auto Claim Microjourney™, which is part of the Pega Customer Service™ for Insurance application. This microjourney supports the first notice of loss (FNOL) process.
- Business value
- Personas, channels, and usage
- Example
- Stages and steps
- Data model
- Enabling the integration to Pega Claims for Insurance
- Extension points for claims integration
- Extension points for communication
- FAQs
Business value
The Personal Auto Claim Microjourney™ allows a customer or customer service representative (CSR) to quickly and easily file a personal auto claim, also known as the first notice of loss (FNOL), within seconds of an incident occurring. The application reduces the time it takes to file a claim by using geolocation, time and date, and a mobile device's photo library or camera. A fast and easy claim process increases Net Promoter Score (NPS) score. This microjourney also uses the Pega email bot capability to save the insurance carrier thousands of hours of processing time. The email bot processes a police report by using optical character recognition (OCR) to read the body of the police report email and also the attached police report.
To view a quick video, see Simplifying First Notice of Loss in Insurance.
Personas, channels, and usage
The following table shows the personas and channels for each use case in this microjourney.
| Persona | Channel | Use case |
|---|---|---|
| Customer | Mobile or desktop self-service website | Create or check the status of an auto claim. |
| Customer service representative (CSR) | Interaction portal | Support customers wanting to create or check the status of an auto claim. |
Example
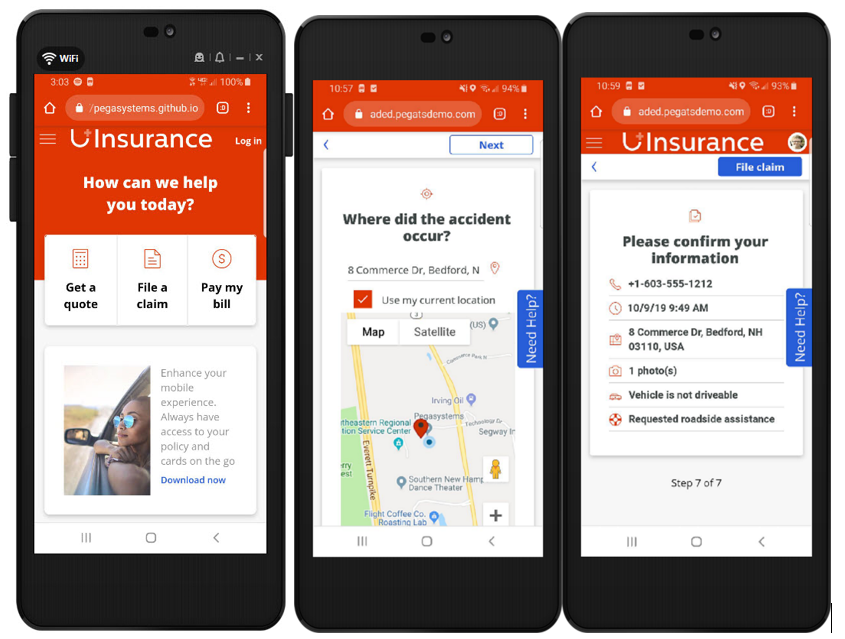
A customer had an auto accident and navigates to their insurance portal to create an auto claim. The following figure shows the mobile self-service interface that customers see when they file the claim.
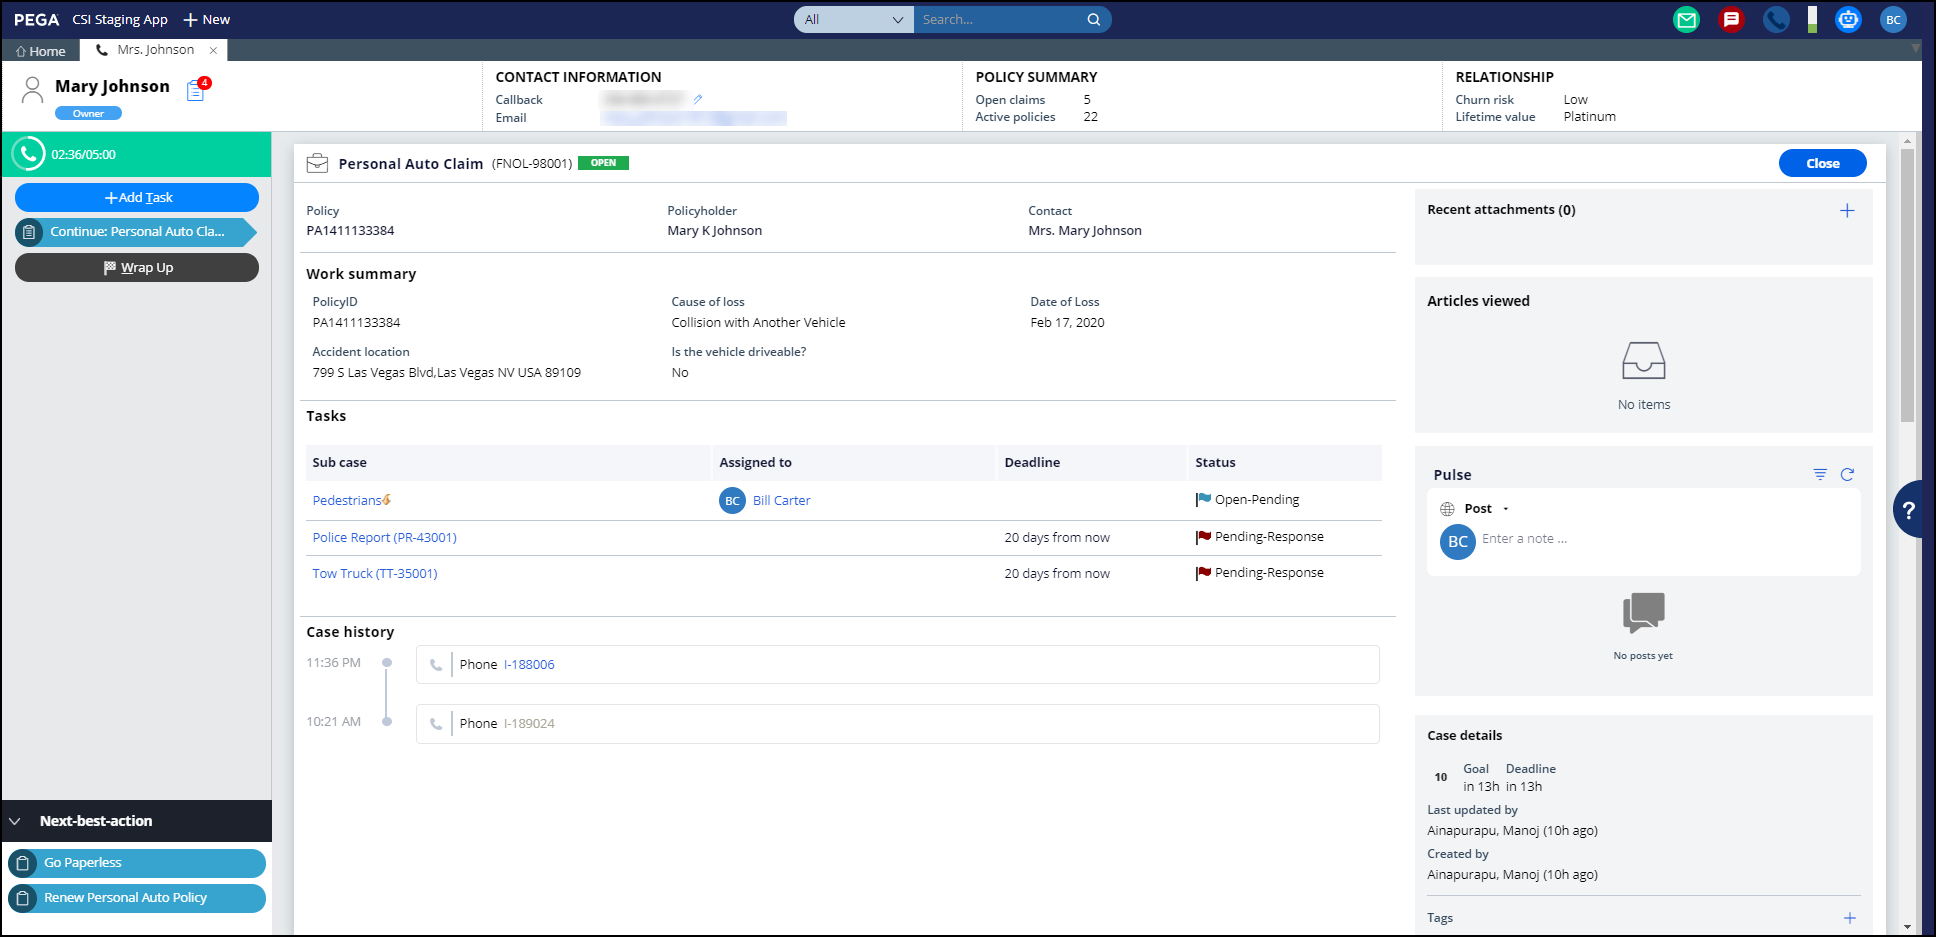
The following figure shows the CSR view of the customer’s claim in the Interaction Portal.
Pega Customer Service for Insurance sends an email requesting the police report via a subcase. The email bot receives the email, and then scans the subject, message body, and police report attachment. Using natural language processing (NLP), the email bot scans and finds key fields, and then populates the case properties, saving countless hours for the person who reviews the police report.
The following example shows how the email bot uses OCR and NLP to analyze the email and the police report.

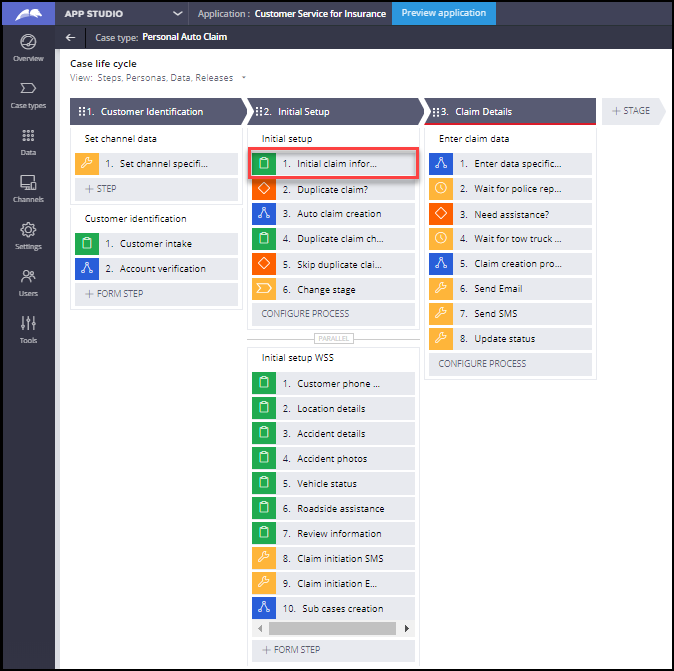
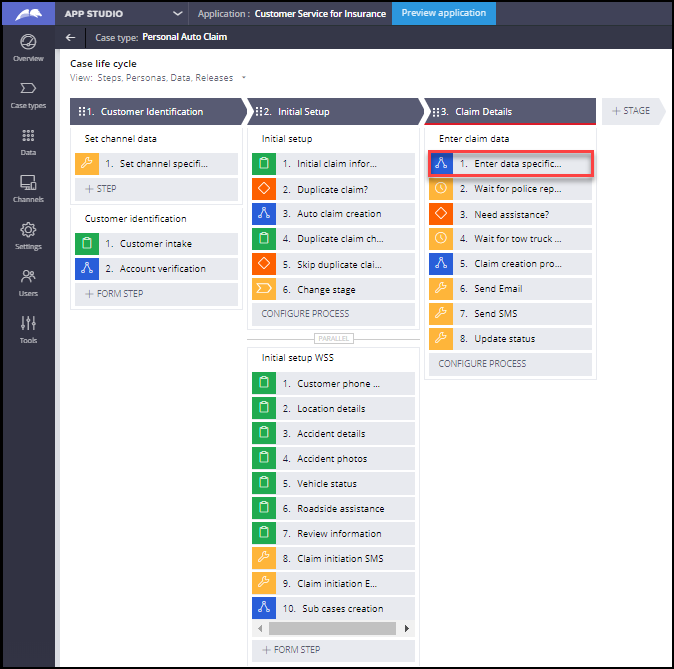
Stages and steps
The project team can modify and extend this microjourney in App Studio, allowing business users to Build for Change™.

Data model
The data model refers to a set of rules that work together to populate the data in your application. This data is displayed on the user interface, which can help users process cases and automate business decisions.
Quickly understand and update your data model by using the visual data model tool in App Studio. View your application's data model, see how its entities are related, update and delete fields, and add fields to the model without exiting the visual data model.
You can find the visual data model for the Report Incident case type in App Studio.
View and export the data model
- Log in as the csinsurancesysadmin operator.
- Open App Studio.
- From the navigation pane, click Case types > Report Incident.
- Click the Data model tab.
- Click View data model.
.
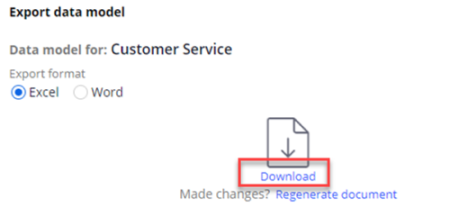
- To export the data model, click Actions menu > Export data model.
- Select the output format (Excel or Word), and then click Generate.
- When the document is complete, click Download to download the document.
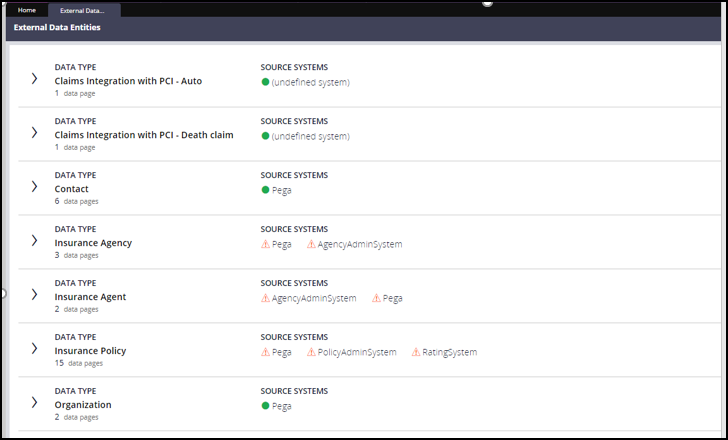
View external data entities
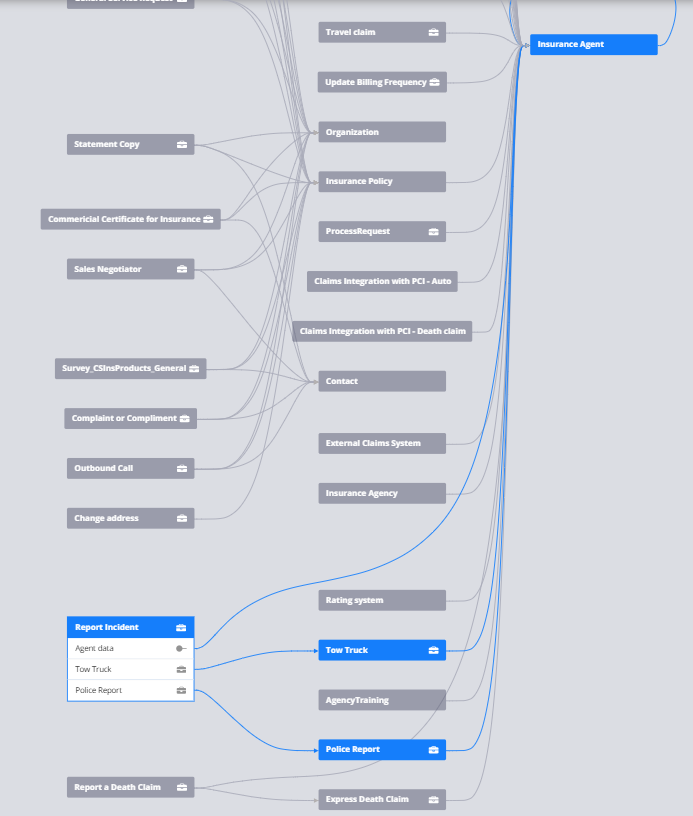
To access external data entities within Dev Studio, go to Configure > Data Model > View external data entities. The following figure shows the external data entities.
Enabling the integration to Pega Claims for Insurance
This microjourney has an integration to Pega Claims™ for Insurance for claims processing. Complete the following procedure to enable the personal auto claim use case for this integration. Alternatively, you can configure an integration to any third-party claims system. For more information, see Support for integration with a third-party claims system.
- Log in to your application as the csinsurancesysadmin operator.
- In the CSIApplicationSettings data transform, enable claims integration.
- In Dev Studio, in the search field, search for and select the CSIApplicationSettings data transform.
- Save a copy of the data transform to the implementation layer.
- Set the ClaimIntegrationEnabled property to true.
- Click Save.
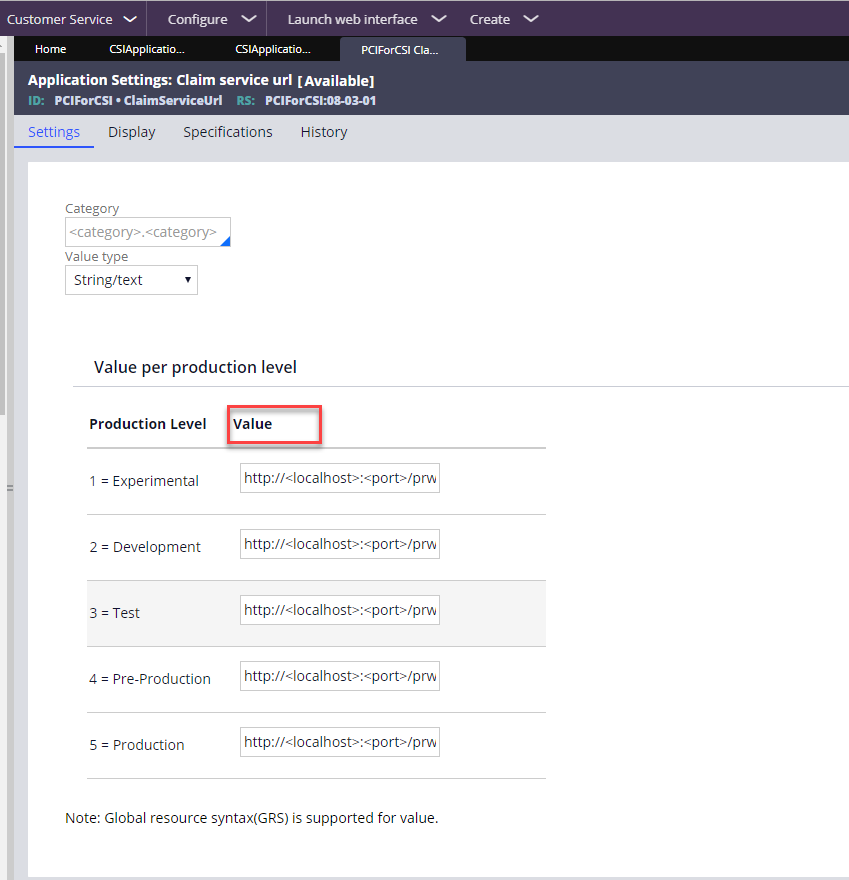
- In the ClaimServiceUrl application settings rule, enter the claim server service URL from your third-party application or the URL from Pega Claims for Insurance.
- In Dev Studio, in the search field, search for and select the ClaimServiceUrl application settings rule.
- Save a copy of the application settings rule to the implementation layer.
- Set the URL value to the claim creation service URL, based on the environment (production level).
For an integration to Pega Claims for Insurance, the syntax for the claim service URL is as follows:http://<localhost>:<port>/prweb/PRRestService/ClaimFileCreationPackage/PegaIns-CSB-Work-FNOL/ClaimFileCreationService.
The following figure shows this configuration:
- Click Save.
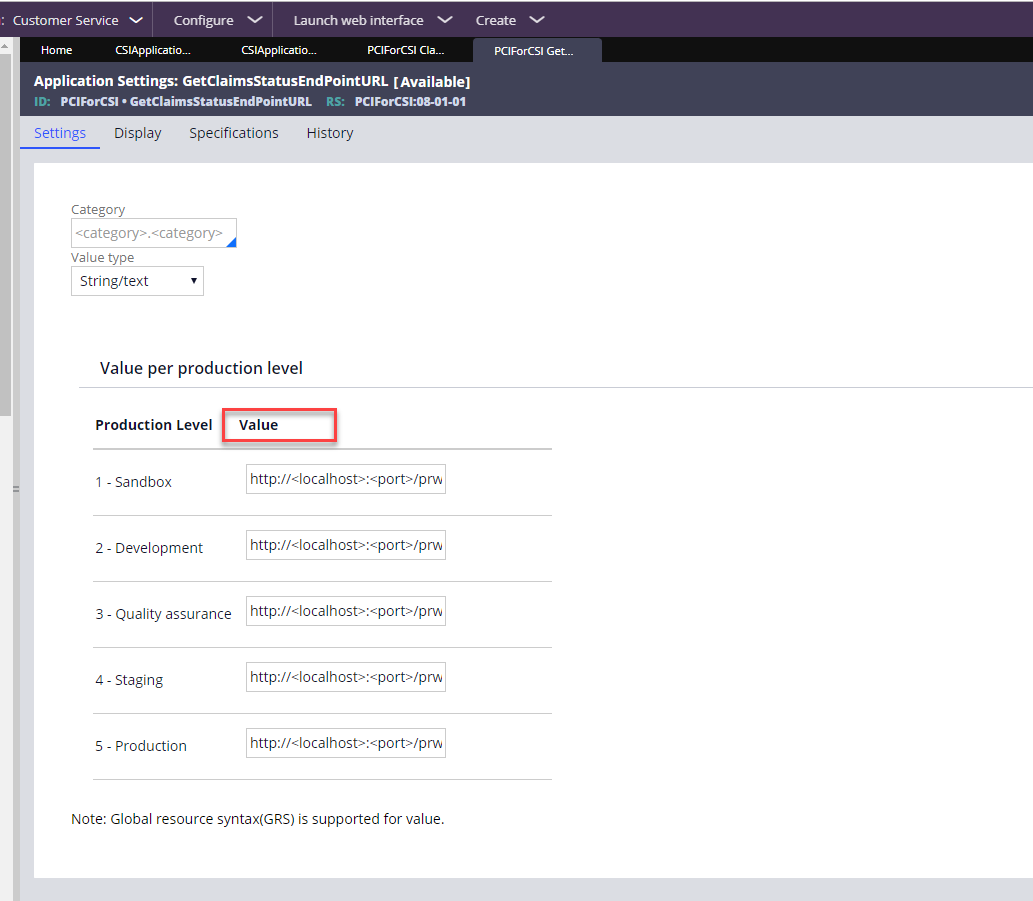
- In the GetClaimsStatusEndPointURL application settings rule, enter the claim server service URL from your third-party application or the URL from Pega Claims for Insurance.
In Dev Studio, in the search field, search for and select the GetClaimsStatusEndPointURL application settings rule.
Save a copy of the application settings rule to the implementation layer.
- Set the URL value to the claim creation service URL, based on the environment (production level).
For an integration to Pega Claims for Insurance, the syntax for the claim status URL is as follows:http://<localhost>:<port>/prweb/PRRestService/ClaimFileDetails/08.01/ClaimFileDetails/{ClaimFileID}/{PolicyID}/{BeneficiaryFirstName}/{BeneficiaryLastName}.
The following figure shows this configuration:
- Click Save.
- In the PCIClaimFileAuthentication authentication profile, update the claim system credentials.
- In Dev Studio, in the search field, search for and select the PCIClaimFileAuthentication authentication profile.
- Save a copy of the authentication profile to the implementation layer.
- In the User name field, enter the user name required to access the claims system.
- Click Set password, and then configure the password required to access the claims system.
- Click Save.
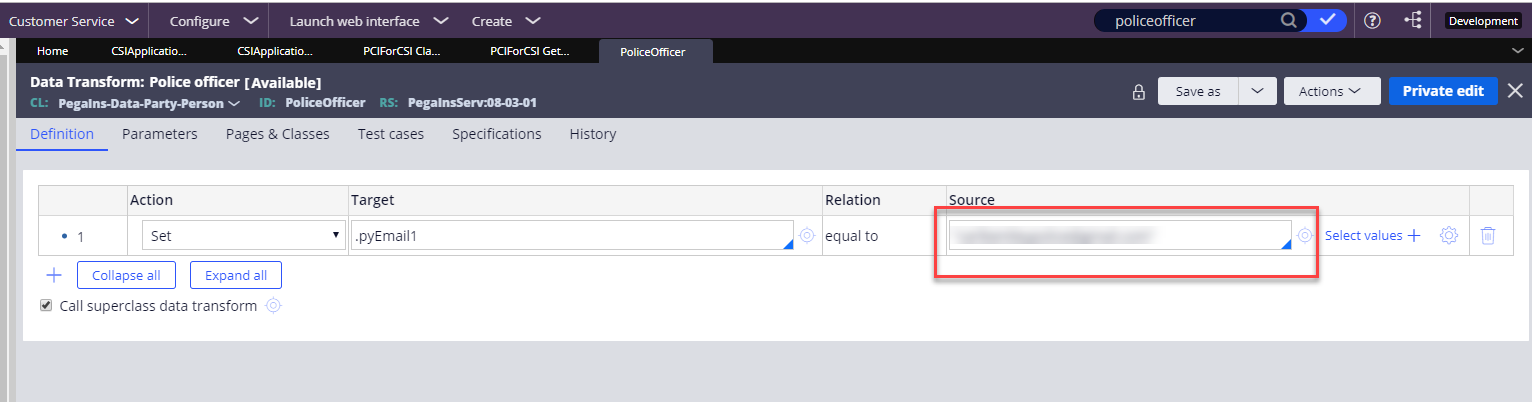
- In the PoliceOfficer data transform, enter the police email address for the town from which you will request the police report.
- In Dev Studio, in the search field, search for and select the PoliceOfficer data transform.
Save a copy of the data transform to the implementation layer.
- Set the pyEmail1 property to the email address of the police office who provides the police report.
The following figure shows this configuration:
- Click Save.
- In the SetTowTruckDetails data transform, update the tow truck details.
- In Dev Studio, in the search field, search for and select the SetTowTruckDetails data transform.
- Save copy of the data transform to the implementation layer.
- Enter the tow truck company name and address details.
The following figure shows which properties to configure:
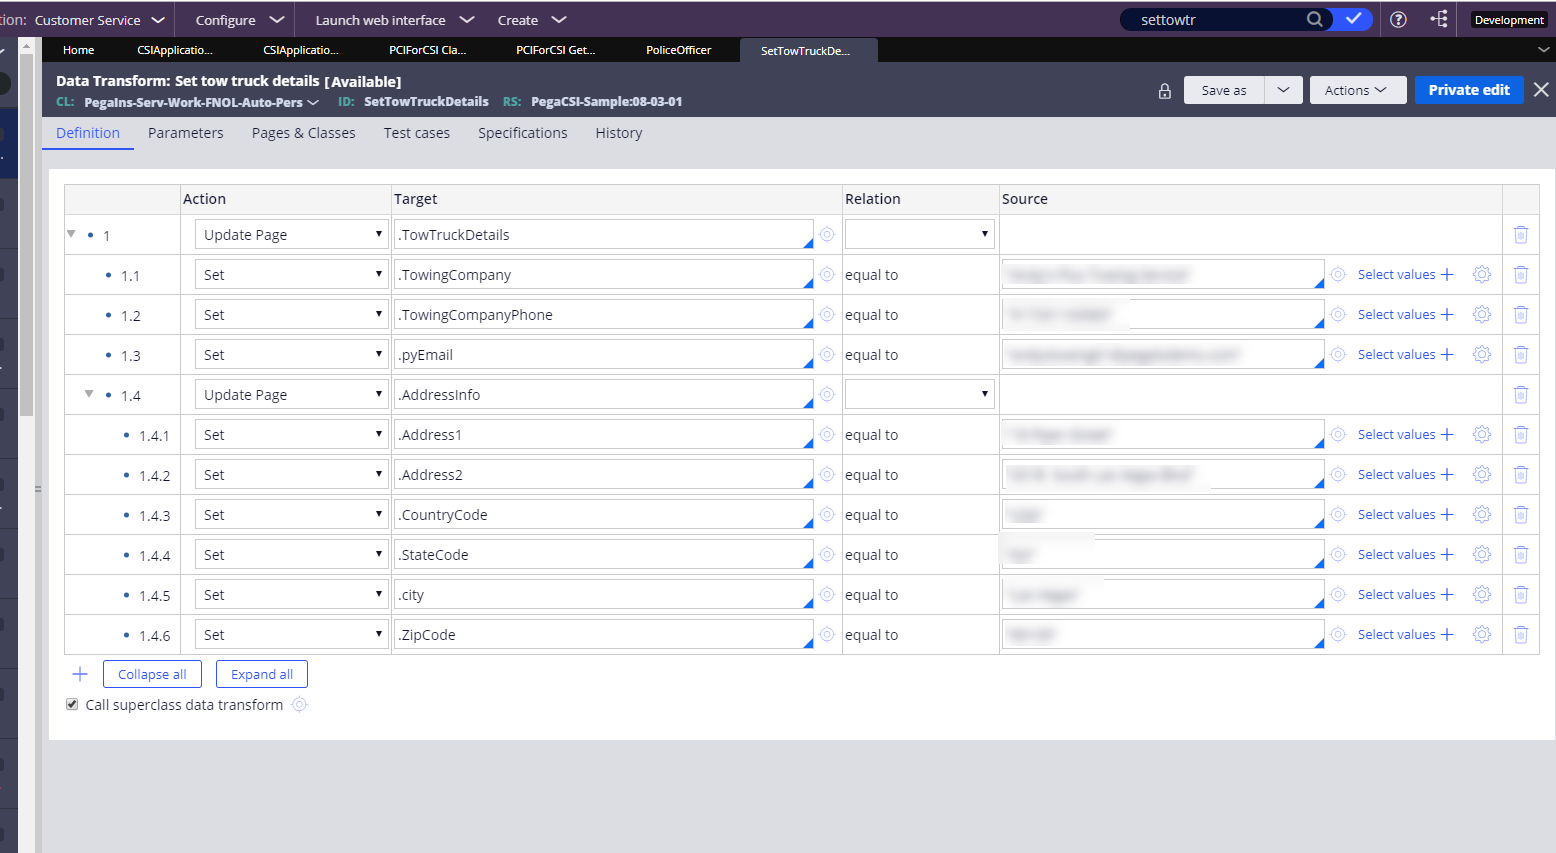
- Click Save.
Extension points for claims integration
Two integration points are related to claims, one to initiate a claim and another to retrieve the claim status. Additionally, an integration extension point retrieves the details of the personal auto policy, and another retrieves the vehicle details
The following integration extension points are for Pega Claims for Insurance. You can use integration extension points to extend to other lines of business (LOBs) and to connect with a third-party claims systems.
Retrieving the personal auto policy
Data Page D_Policy_Details in class PegaIns-Interface-InsurancePolicy is used to retrieve the details related to the policy such as policyholder data for a personal automobile policy.
- PolicyID is passed as a required parameter to this data page to fetch the details related to that specific policy.
- Retrieve the list of policy IDs and pass it as a paramater to this page.
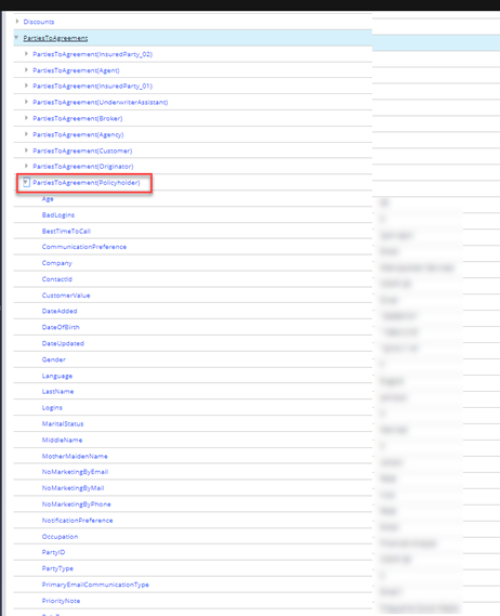
Extension points for policy details
- Add an external integration source for D_Policy_Details data page to source it from an external system in the highlighted field in the following figure.

Expected response after the source is updated
Policy type and policyholder data in a list of parties to the agreement are received as a response from the data page. The changes can be made for each of the policy types from the response for different policy IDs.
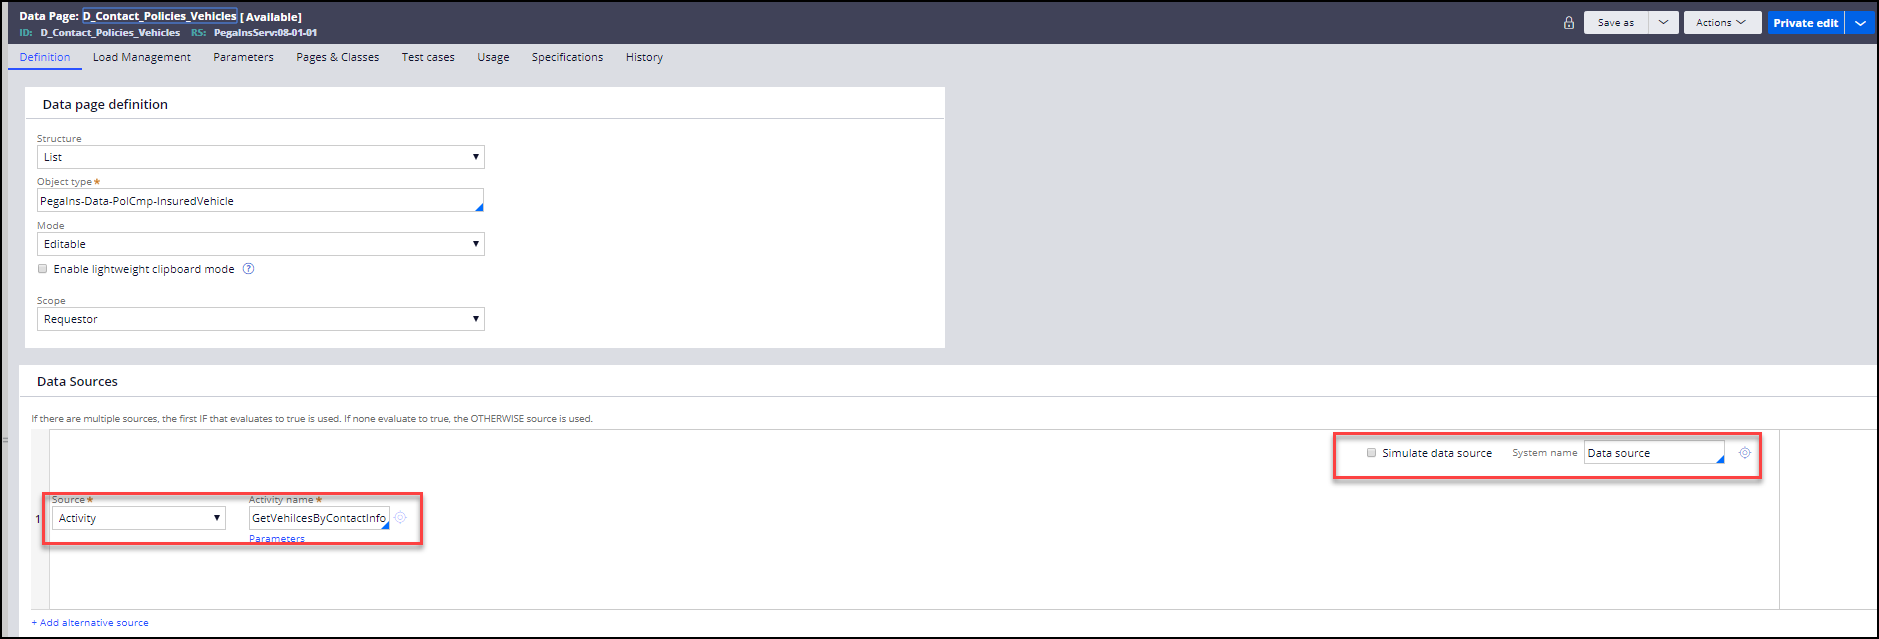
Retrieving vehicle details
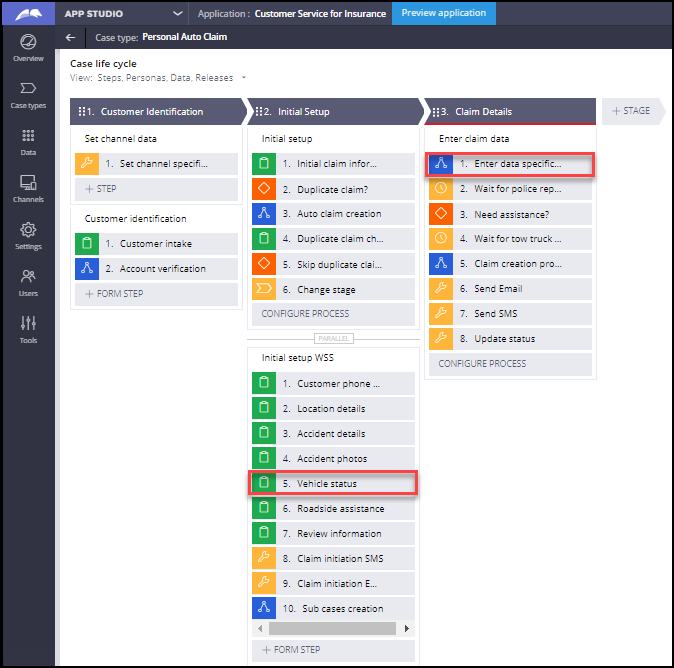
Data Page D_Contact _Policies_Vehicles in class PegaIns-Data-PolCmp-InsuredVehicle is used to fetch the vehicle details related to the contact.
- ContactID is passed as a required parameter to this data page to fetch the details related to that specific contact.
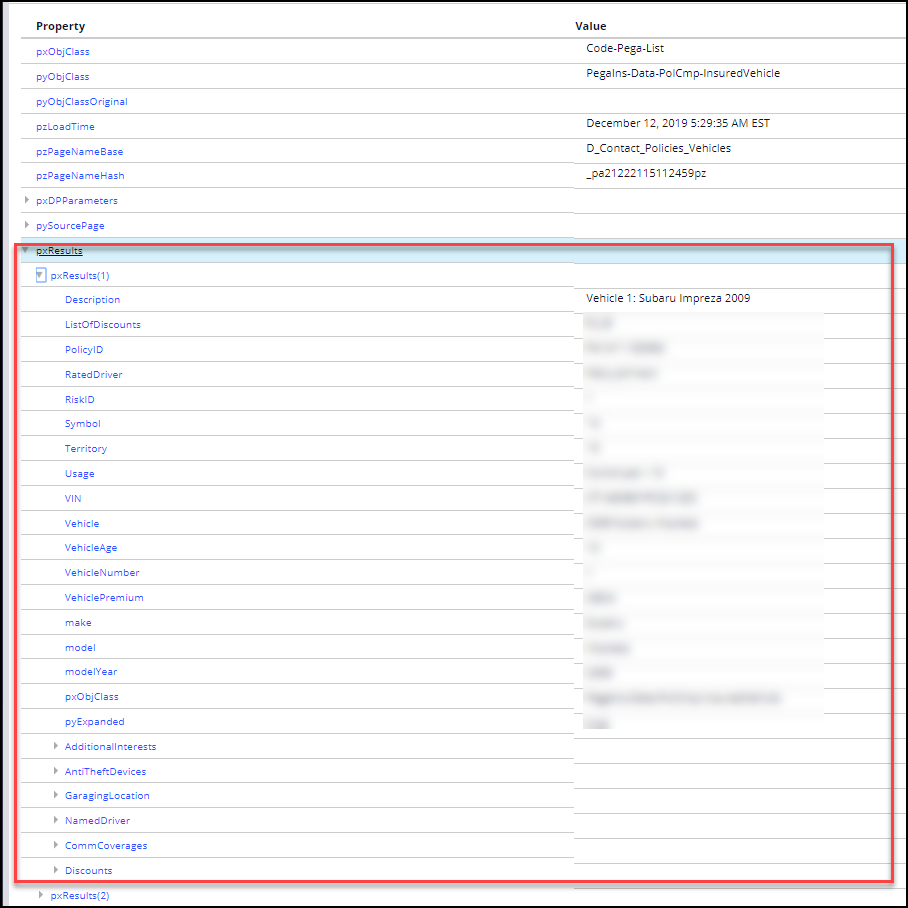
Expected response after the source is updated
The list of vehicle details agreement is received as a response from the data page.
Claim creation
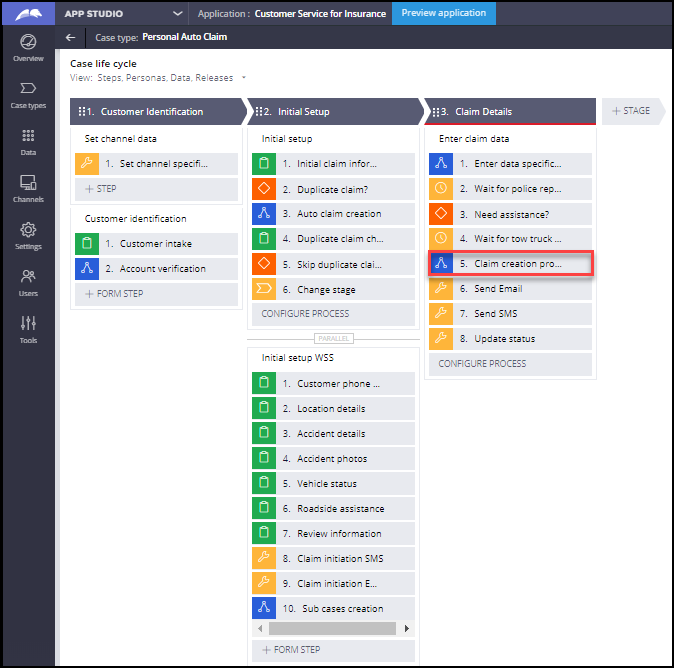
The PegaIns-Serv-Work-FNOL class includes a generic ClaimCreationProcess flow activity, which is used to create a claim in an external third-party system. The ClaimCreationProcess activity performs the following actions:
- Calls a data page (D_CreateClaim) to create a claim in a third-party claims system.
- Uses the response from a third-party claims system to create a claim file case in Pega Customer Service for Insurance. The case has the same case ID as the claim in the third-party claims system.
Both ClaimCreationProcess flow and activity are parameterized with claim type as the parameter. The ClaimType parameter is set based on the LOB.
Extension points
- Save as SetDataToCreateClaim data transform to a specific LOB class and map required data
- Save as D_CreateClaim data page to the implementation layer and add your external claim integration as shown in the following highlighted field:
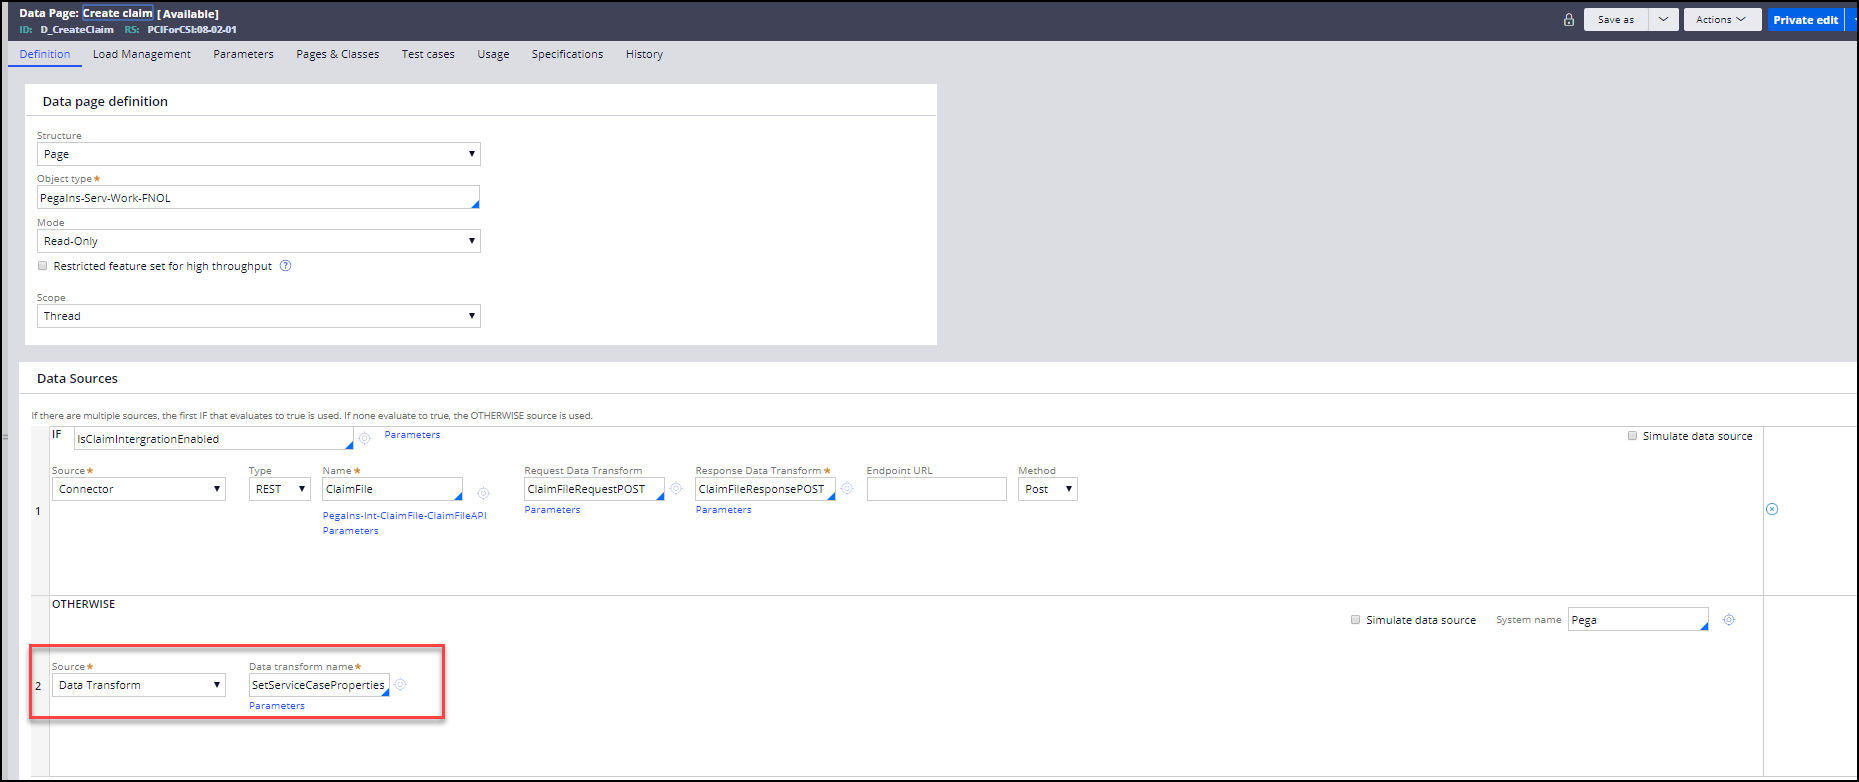
Double-click the image to enlarge it.
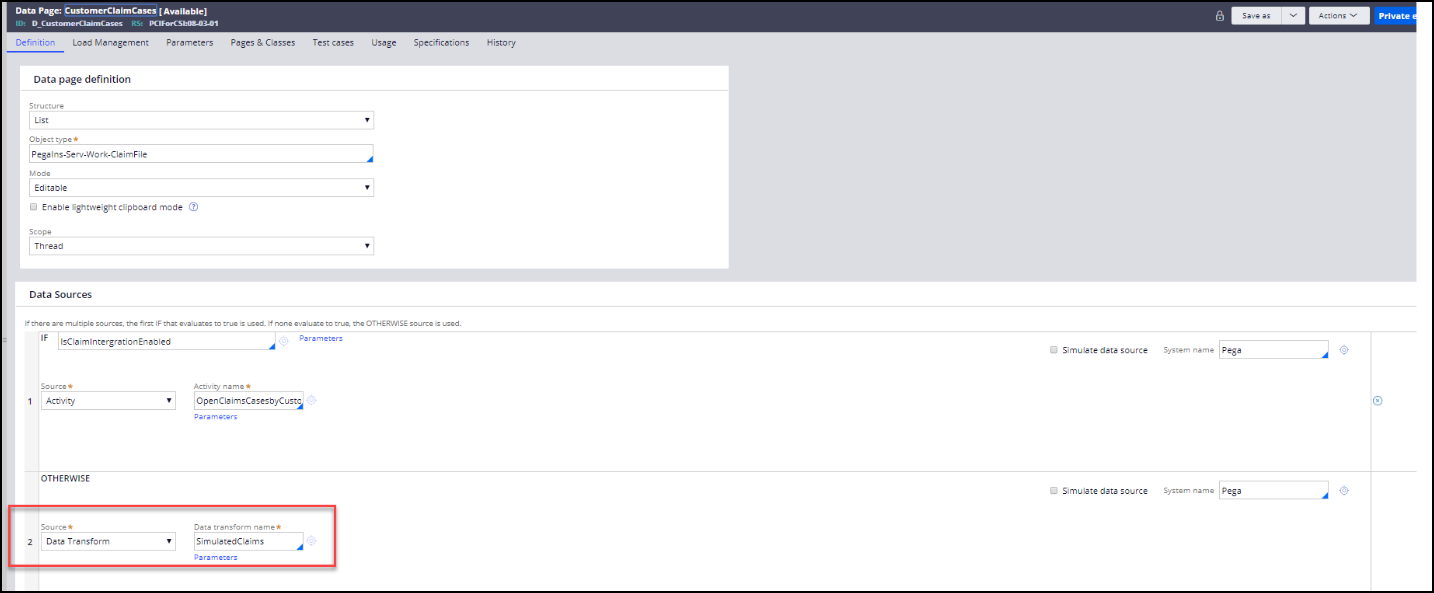
Claim status
D_CustomerClaimCases is used to retrieve fetch claims from Pega Customer Service for Insurance. Then include all the claims from Pega Customer Service for Insurance and fetch each claim status by using the D_GetClaimsStatus (Parameters: ClaimFileID, PolicyID, BeneficiaryFirstName, BeneficiaryLastName,URL) integration data page.
Extension points
- Save as D_CustomerClaimCases to the implementation layer and add your external claims system directly in the following highlighted field.
- Save as GetClaimFileStatus activity to a specific LOB class, if saving logic based upon LOB is needed.
- Save as D_GetClaimsStatus (integration data page) to the implementation layer and add your external claims system as shown in the following highlighted field.
Extension points for communication
There are two extension points to trigger communication that can be utilized depending on the communication preference of the customer. The customer can be notified by email or SMS (text message). Use extension points to extend to other LOBs and connect with a third-party external claim system.
SMS notification
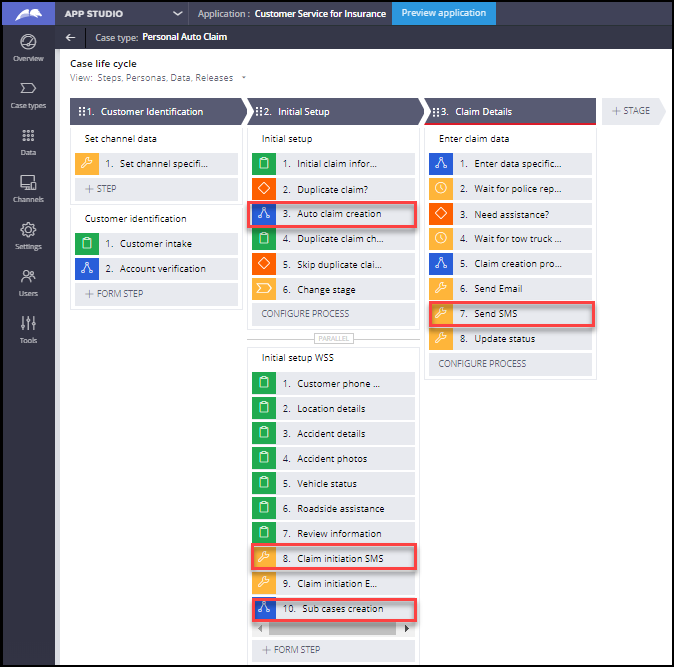
Utility CSIPhoneNotification is used to send an SMS to the recipients. Mobile number and correspondence template names are accepted as the parameter to the utility. Policyholder contact number and the respective correspondence template for various scenarios are passed as the parameter. The list of recipients can be passed as the parameter.
An SMS is sent for the following scenarios in the flow:
- Notification after tow truck case is created during initial setup through the Interaction Portal.
- Claim initiation notification from a web self-service (WSS) website.
- Notification after tow truck case is created during initial setup through WSS.
- Notification after claim creation process.
Extension points
- The utility can be looped over the list of recipients to send the SMS to multiple recipients.
- The correspondence templates can be overridden to send specific content.
Email notification
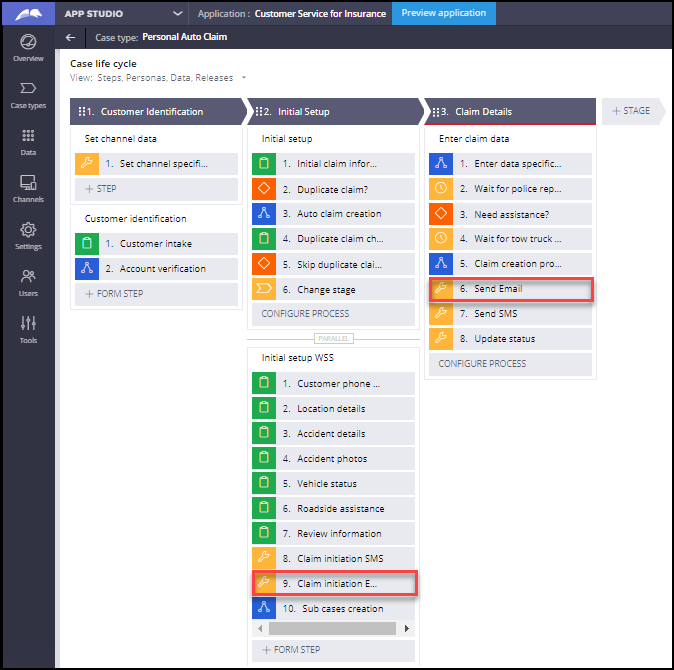
Utility SendSimpleEmail is used to send email to the recipients when the claim is initiated.
- Email address, subject, and correspondence template names are passed as the parameter to the utility. Policyholder email address, subject, and the respective correspondence template for various scenarios are passed as the parameter.
- The list of recipients can be passed as the parameter to the utility as comma-separated values. The utility sends the email to each of the comma separated recipients.
The CorrNew utility is used to send email to the recipients when the claim is created.
- Party role, correspondence template, and subject are passed as the parameter. This sends the email for all the matching party recipients.
The email is sent for the following scenarios in the flow:
- Claim initiation notification from WSS
- Email notification after claim creation process
Extension points
- The correspondence templates can be overridden to send specific content.
- The “To” parameter can be overridden to send emails to specific recipients or list of parties.
FAQs
Are all the integration points required?
The claim status integration point is not required if you do not want to show the claim status within Pega Customer Service for Insurance.
Previous topic Personal Auto Claim - Status Inquiry Microjourney Next topic Policy Inquiry Microjourney