Policy Inquiry Microjourney
Configure and extend the Policy Inquiry Microjourney™, which is part of the Pega Customer Service™ for Insurance application.
- Business value
- Personas, channels, and use cases
- Example
- Stages and steps
- Data model
- Extending the Microjourney
Business value
With one customer support interaction, policyholders can find out the difference between their current premium and their previous year's premium or the upcoming (renewal) premium.
Insurance carriers can provide a better customer experience with reduced average handle time (AHT) for queries that are related to premium changes. Customer service representatives (CSRs) can instantly compare policies without having to refer to multiple sources of information.
Personas, channels, and use cases
The following table shows the personas, channels, and use cases for this Microjourney:
| Persona (Actor) | Channel | Use case |
|---|---|---|
| Customer | Assisted service | In a single interaction with the customer service team, find out why the current policy premium is higher or lower compared to the previous or upcoming year’s policy. |
| CSR | Interaction Portal | With a few clicks, view the difference between a policy's current year's premium and previous or upcoming (renewal) premium and answer related queries. |
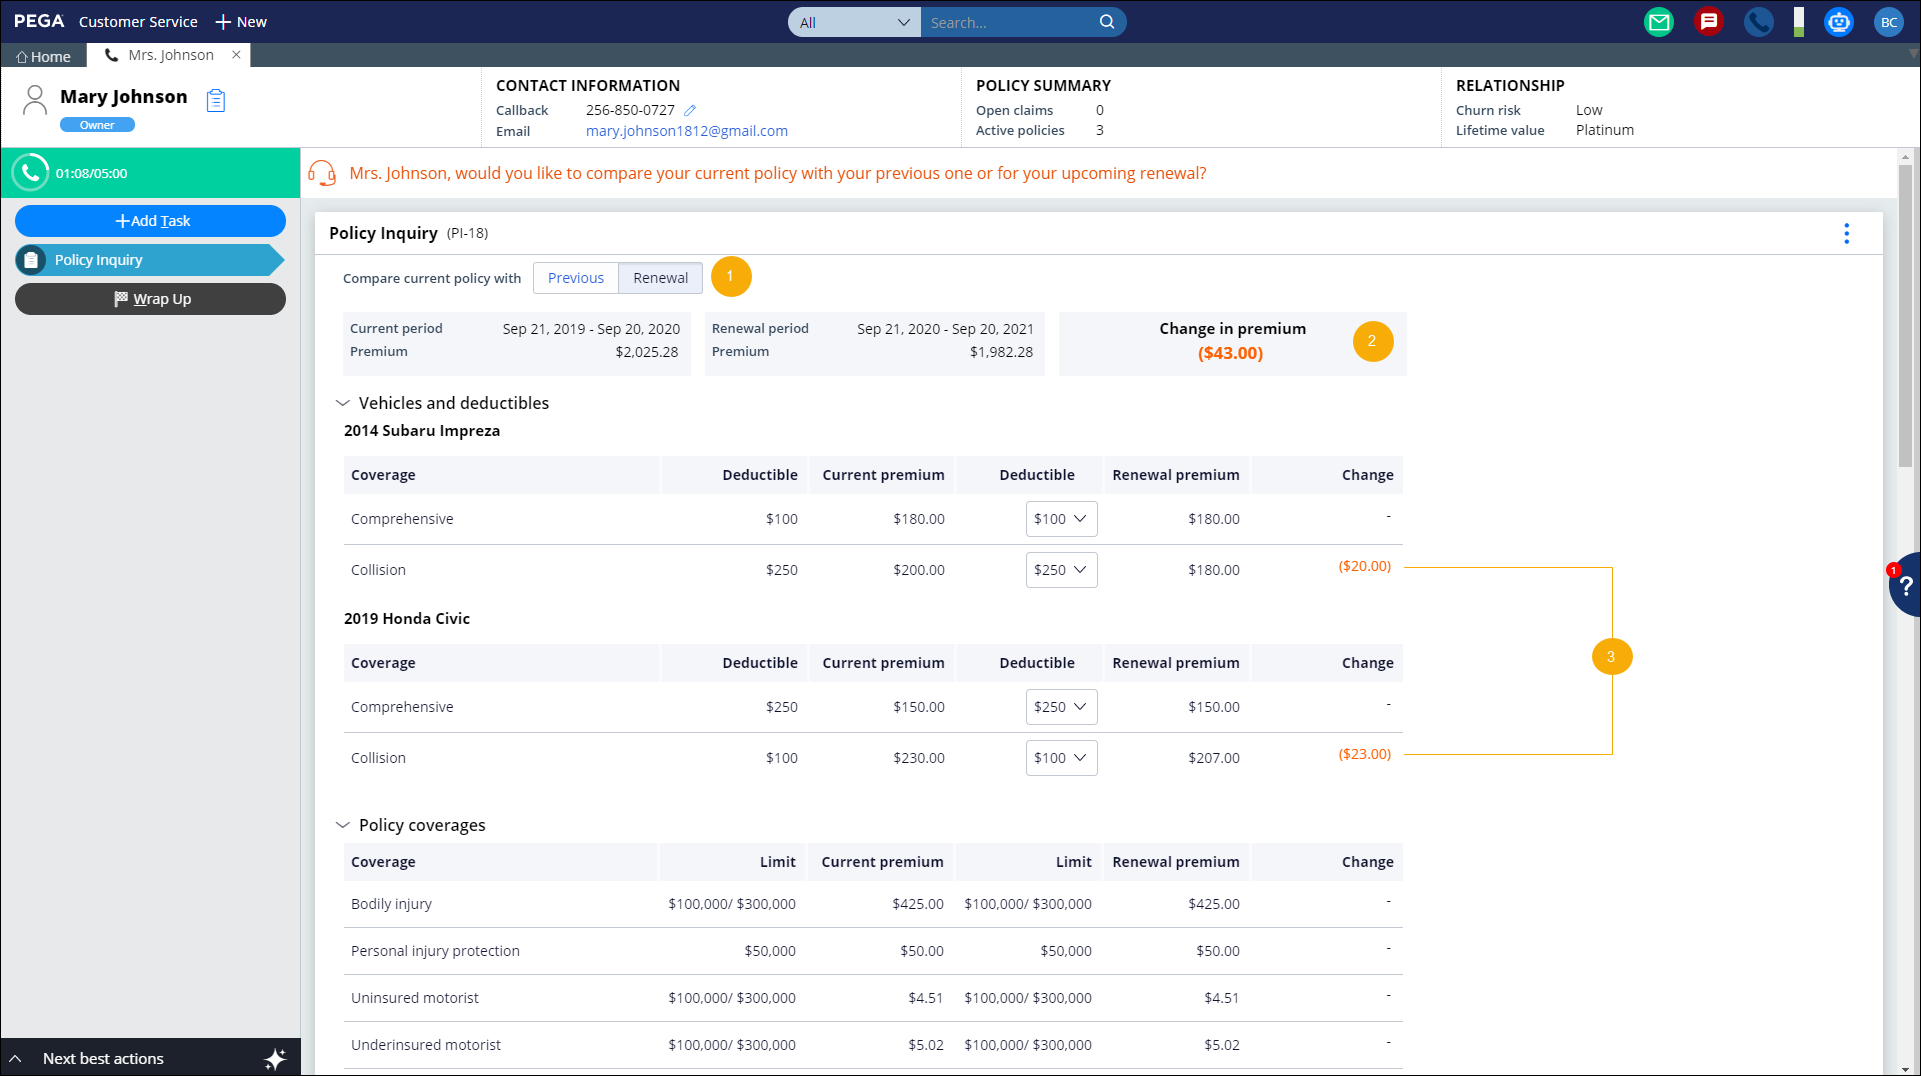
Example
A customer contacts the customer service team to learn why their premium increased. The CSR answers the customer's query by immediately comparing the customer's current policy information with their previous or upcoming year's policy information in the Interaction Portal.
In a typical use case, the CSR follows the system prompts and asks the customer whether their inquiry is about the previous year's policy or the upcoming (renewal) policy. Based on the customer response, the CSR:
- Selects or as appropriate in the Interaction Portal.
- Views the difference between the current policy premium and the selected policy's premium, and then informs the customer about the difference.
- If necessary, reviews changes to individual line items that make up the net increase in premium and answers related queries.
The following figure shows the stages of that process:
Stages and steps
The following figure shows the stages and steps in the Policy Inquiry case type designed for this Microjourney:

The project team can modify and extend most areas of this Microjourney in App Studio, thereby supporting users to Build for Change®.
Data model
Use the Data model page in App Studio to quickly view and understand the relationship between all data objects in the application. You can add, update, and delete data objects without exiting the visual data model.
For information about the Data model page, see Data modeling. For information about connecting to external data entities, see Managing data and integrations with the Integration Designer.
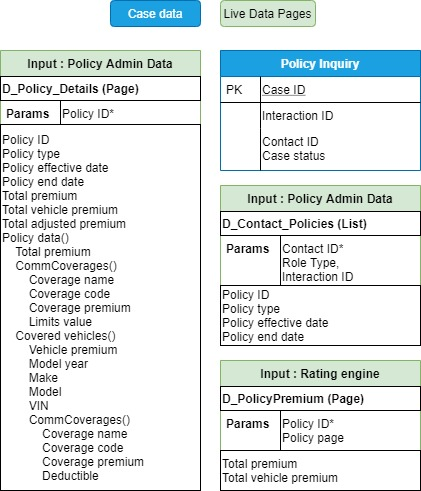
The following figure shows the entity relationship diagram (ERD) for this Microjourney. For each data object, the ERD shows only the properties that apply to this Microjourney.
Extending the Microjourney
Use extension points to configure the Microjourney to meet your specific business needs, and upgrade the Microjourney in the future. For more information, see Extension points.
The Policy Inquiry case type is designed for common insurance scenarios, and, therefore, provides extension points to connect your application to external sources. Most policy details are sourced from an external policy administration system. Often, insurance carriers also require an external rating engine for premium calculations.
These extension points are available in the Capture Case Details step in the Intake stage.
To add an external data source to a data page by using App Studio:
- In the navigation pane of App Studio, click Data > Data objects and integrations.
- Open the data object, for example, Insurance Policy , and then click the Data views tab.
- In the Source column for the data view that you want to modify, for example, List of Policies for Contact, click Replace source.
- Enter the system details and connection details. For more information, see Updating connections and field mappings for a data source.
For a data source to be replaceable through App Studio, the following conditions must be met:
- The class associated with the data page must be included in the list of data classes used in the application. If it is not already included, in Dev Studio, click the drop-down list next to the application name, click Definition > Cases & data tab, and add the class to the Data section. If you are not sure about the class name, you can find it in the Object type field in the data page definition.
- The data object name must not exceed 56 characters. The data object name is the label, or the short description, of the class. If the data object name exceeds 56 characters, edit the data source by using Dev Studio.
- The data source must be a simulated one. You can configure this by selecting the Simulate data source check box for the data source in the data page definition in Dev Studio. If you do not want to do this, replace the data source by using Dev Studio.
For information about extending specific features, see the following sections:
Extending policy details
You can configure the application's data model to fetch policy information, including the policyholder's contact and household details, from an external source. The D_Contact_Policies and D_Policy_Details data pages in the Capture Case Details step serve as extension points for the configuration.
Populating the policy list
The D_Contact_Policies data page, represented in App Studio as the List of policies for contact data view, fetches the list of policies for specific contacts (policyholders).
This data page has the following parameters:
- CustomerID - Required parameter to fetch the details related to a policyholder.
- RoleType - Optional parameter to get the list of policies where the customer is the policyholder and not a beneficiary.
To source the policy details from an external system, in App Studio, add the external data source to the List of policies for contact data view.
After you add the data source, when a CSR looks up policy details for a contact, the external source sends a list of policies as a response to the data page, along with details such as the start date and effective date for each policy. The CSR can view this data in the Interaction Portal. The details are also displayed in the Clipboard tool in Dev Studio when a policy is selected.
Populating additional policy information
The D_Contact_Policies data page fetches a default set of details about each policy. There might be additional policy details available in the external data source. You can use the D_Policy_Details data page, represented in App Studio as the the Lookup Policy Information data view to fetch these additional details.
This data page has the following parameter:
- PolicyID - Required parameter to fetch policy details.
To source additional policy details from an external system, in App Studio, add the external data source to the Lookup Policy Information data view.
After you add the data source, when a CSR looks up policy details, the response the external source sends to the data page includes additional policy details required for this Microjourney, such as policy type, billing details, commercial coverages, and covered vehicles.
Integrating an external rating engine
Depending on your line of business (LOB), your application might or might not require a rating engine. For example, automobile insurance carriers must configure an external rating engine to calculate the premium based on deductibles and various other factors. The D_PolicyPremium data page, represented in App Studio as the Get premium from rating system data view, computes the total premium value.
This data page has the following parameter:
- PolicyID - Required parameter to calculate premium.
By default, the D_PolicyPremium data page is sourced from a sample rating system provided by Pega. To use an external system, in App Studio, add the external data source to the Get premium from rating system data view.
After you add the data source, when a CSR looks up policy details, the rating system sends a response to the data page with the total premium for the policy and the total vehicle premium for each covered vehicle. It also returns the discounted premium where applicable.
Previous topic Personal Auto Claim - FNOL Microjourney Next topic Policy Loan Microjourney