Policy Loan Microjourney
Configure and extend the Policy Loan Microjourney™, which is part of the Pega Customer Service™ for Insurance application.
- Business value
- Personas, channels, and use cases
- Self-service example
- Assisted service example
- Stages and steps
- Data model
- Enabling and extending the Microjourney
Business value
The Policy Loan Microjourney enables insurance policyholders to request a loan against one or more of their whole life policies, and get an instant approval where possible. They can request a policy loan either by themselves, using the self-service portal, or through the customer service team. Business rules define whether the loan is approved instantly or sent for further processing, which involves dispatch of the required forms to policyholders and verification of the returned forms by the back-office team.
This Microjourney integrates self-service, front-office, and back-office operations to seamlessly process policy loan requests.
Personas, channels, and use cases
The following table shows the personas, channels, and use cases for this Microjourney:
| Persona (Actor) | Channel | Use case |
|---|---|---|
| Customer | Self-service and assisted service | Request a loan against one or more of their whole life policies. |
| Customer service representative (CSR) | Interaction Portal | Support customers who request a policy loan. |
| Back-office representative | Back office portal | Upload signed forms returned by customers, review them, and submit the loan request for approval. If DocuSign is used to send and receive forms, the upload is automatic. |
| Back-office supervisor | Back office portal | Perform the necessary checks and approve the loan. |
Self-service example
Customers can request a loan against one or more of their life insurance policies by logging in to the self-service portal. If the request is below a specified limit, the loan is approved instantly. If it is above the specified limit, customers need to sign and return a form, which the back-office team verifies before approving the loan.
The typical flow for this interaction is as follows:
- The customer selects the policies they want to apply a loan against.
- The customer enters details related to the loan request, such as the loan type, loan amount, and loan effective date.
- The customer selects the disbursement method for the loan.
- Depending on the loan amount, the loan is either approved instantly or sent for further processing. If approved instantly, a confirmation email is sent to the customer.
- If further processing is required, the customer selects the delivery method for receiving the required forms.
- If the form is not processed through DocuSign, when the customer fills, signs, and returns the form, a back-office representative uploads the form to the case.
- A back-office representative verifies the form and submits it to the back-office supervisor for approval.
The back-office supervisor verifies and approves the request. If the loan is approved, a confirmation email is sent to the customer.
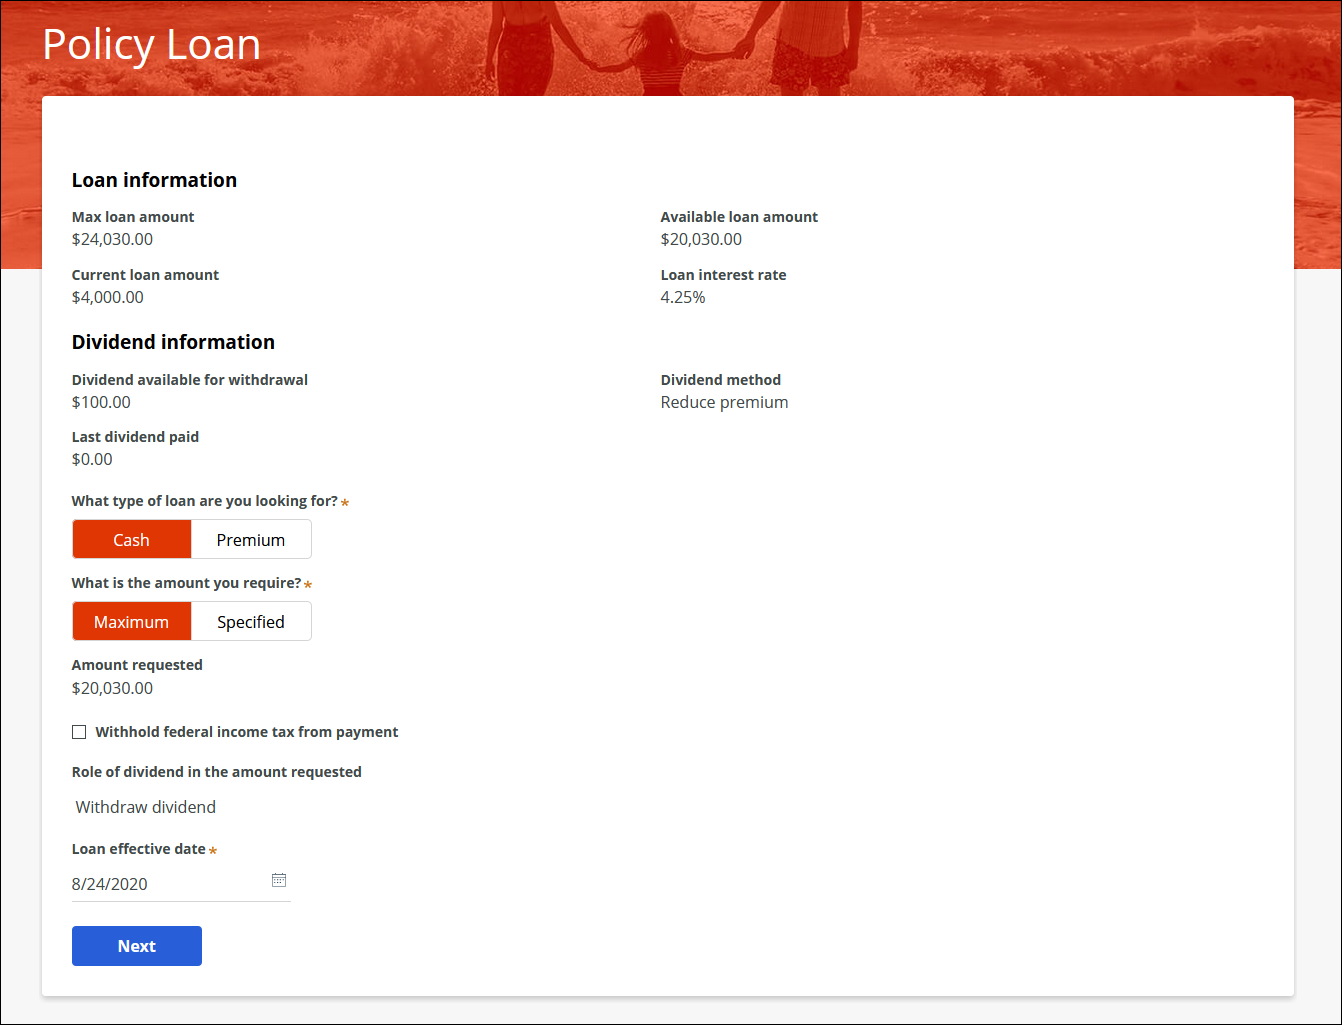
The following figure shows the policy loan page for a specific policy in a self-service portal:
Assisted service example
Customers can request a loan against multiple whole life policies at the same time by contacting the customer service team. Pega makes handling policy loan requests easy for CSRs through a guided process that enables them to service more than one policy at a time. Pega also provides a user-friendly interface for the back-office team to verify the required forms and process the change.
The typical flow for this interaction is as follows:
- The CSR asks the customer which policies they want to apply a loan from, and based on the customer response, selects the appropriate policies.
- The CSR enters details related to the loan request, such as the loan type, loan amount, and loan effective date.
- The CSR selects the disbursement method for the loan.
- Depending on the loan amount, the loan is either approved instantly or sent for further processing. If approved instantly, a confirmation email is sent to the customer.
- If further processing is required, the CSR selects the delivery method for sending the required forms to the customer.
- If the form is not processed through DocuSign, when the customer fills, signs, and returns the form, a back-office representative uploads the form to the case.
- A back-office representative verifies the form and submits it to the back-office supervisor for approval.
The back-office supervisor approves or rejects the loan request. If the loan is approved, a confirmation email is sent to the customer.
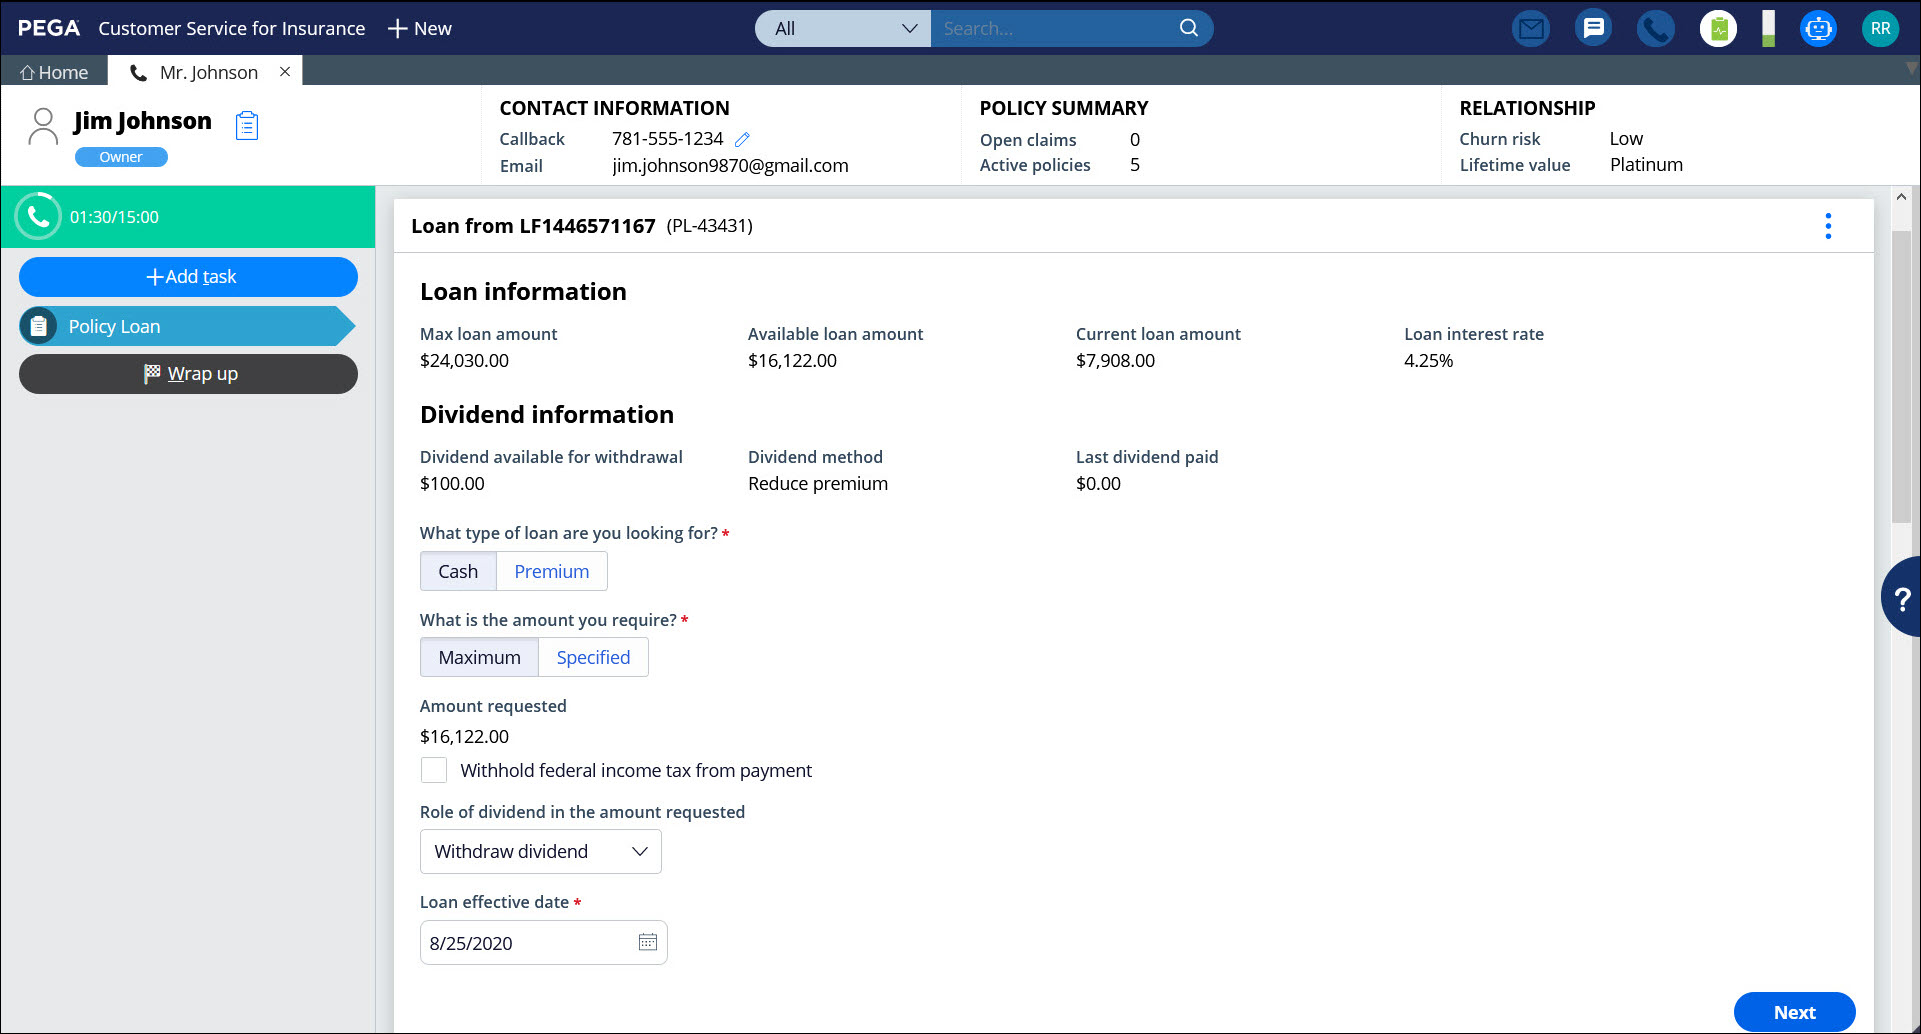
The following figure shows the policy loan intak page for a specific policy in the Interaction Portal:
Stages and steps
The following figure shows the stages and steps in the Policy Loan case type designed for this Microjourney:
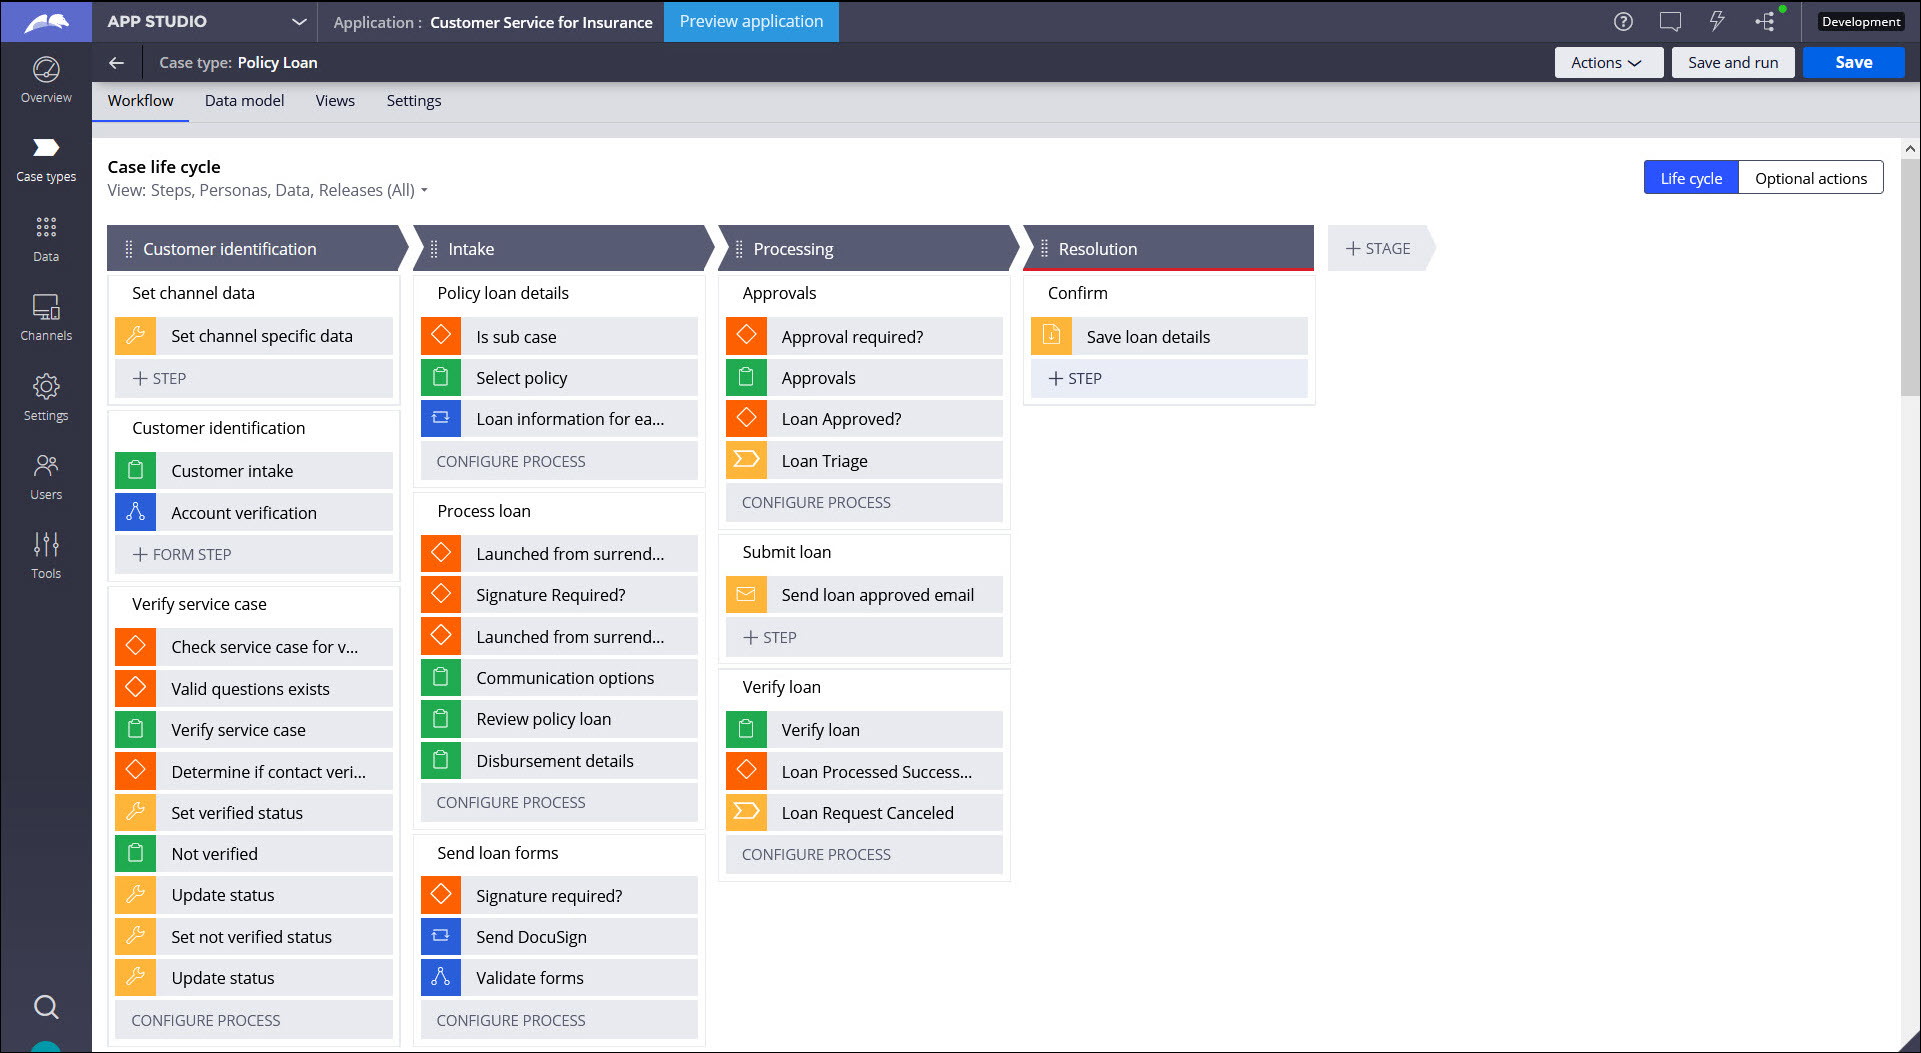
The project team can modify and extend most areas of this Microjourney in App Studio, thereby supporting users to Build for Change®.
Data model
Use the Data model page in App Studio to quickly view and understand the relationship between all data objects in the application. You can add, update, and delete data objects without exiting the visual data model.
For information about the Data model page, see Data modeling. For information about connecting to external data entities, see Managing data and integrations with the Integration Designer.
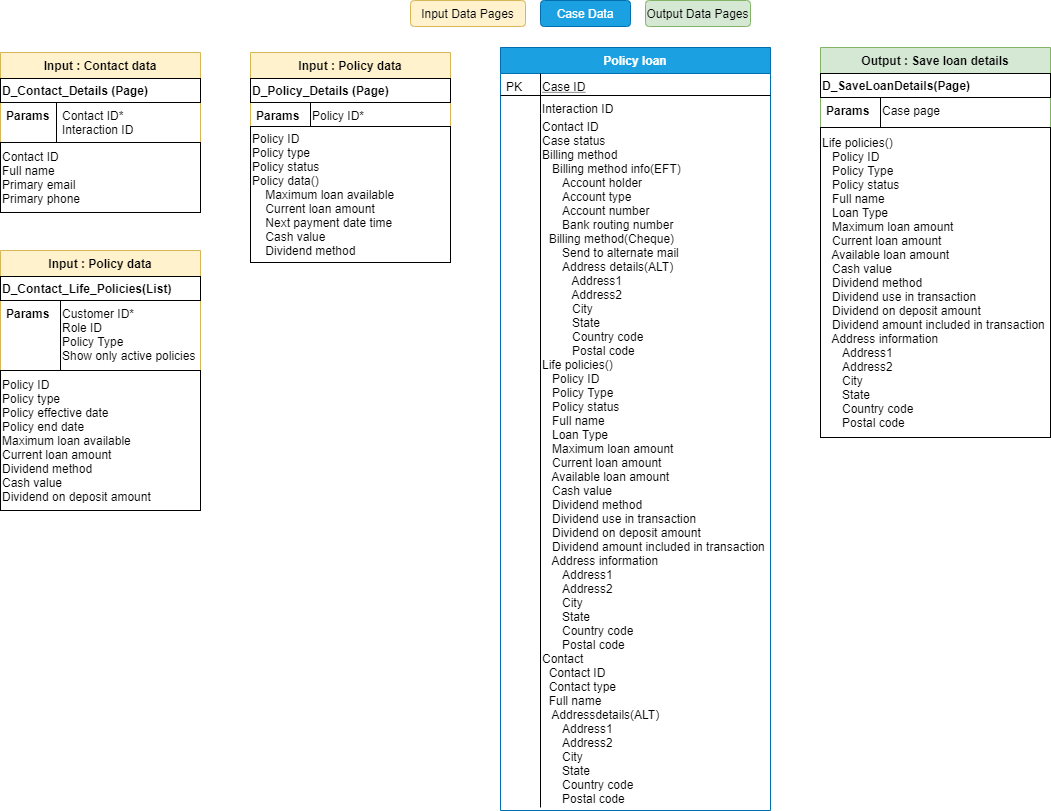
The following figure shows the entity relationship diagram (ERD) for this Microjourney. For each data object, the ERD shows only the properties that apply to this Microjourney.
Enabling and extending the Microjourney
Extension points make it faster and easier to configure this Microjourney to meet your specific business needs and easier to upgrade this Microjourney in the future. For more information, see Extension points.
The Policy Loan Microjourney is designed for common insurance scenarios, and enables you to customize the following items:
- Data sources – Retrieve policy information from external data sources
- Form upload process – Automate the processing of forms through DocuSign integration
- Loan processing – Modify the default loan processing workflow, including the back-office process, by editing the appropriate flows
- Post-approval data processing – Save the updated policy loan information to a different system of record (SOR) for further processing
This section includes steps to update data sources by using both App Studio and Dev Studio. For a data source to be replaceable through App Studio, the following conditions must be met:
- The class associated with the data page must be included in the list of data classes used in the application. If it is not already included, in Dev Studio, click the drop-down list next to the application name, click Definition > Cases & data tab, and add the class to the Data section. If you are not sure about the class name, you can find it in the Object type field in the data page definition.
- The data object name must not exceed 56 characters. The data object name is the label, or the short description, of the class. If the data object name exceeds 56 characters, edit the data source by using Dev Studio.
- The data source must be a simulated one. You can configure this by selecting the Simulate data source check box for the data source in the data page definition in Dev Studio. If you do not want to do this, replace the data source by using Dev Studio.
The following sections provide more information about the extension points in the Policy Loan Microjourney:
- Extending policy details
- DocuSign integration
- Loan processing
- Saving the beneficiary details to an external SOR
Extending policy details
You can configure the application's data model to fetch policy information from an external data source. The D_Contact_Details, D_Contact_Life_Policies, and D_Policy_Details data pages serve as extension points for the configuration.
Populating policyholder information
The D_Contact_Details data page retrieves the personal details of the policyholder.
This data page has the following parameters:
- ContactId – Required parameter to fetch the details of the specific policyholder
- InteractionId – Optional parameter to maintain interaction-specific contact data
To retrieve the data from an external source, replace the data source of the D_Contact_Details data page:
- In the navigation pane of App Studio, click Data > Data objects and integrations.
- Click the Contact data object to open it, and then click the Data views tab.
- For the Contact details data view, in the Source column, click Replace source.
- Enter the system details and connection details. For more information, see Updating connections and field mappings for a data source.
After you modify the source of the data page, the following fields are populated from the new source:
- FirstName
- MiddleInitial
- LastName
- PrimaryEmail
Populating the policy list
The D_Contact_Life_Policies data page retrieves the list of life insurance policies associated with a policyholder. This list typically includes all active policies for the policyholder.
This data page has the following parameters:
- CustomerID– Required parameter to fetch the details related to that specific policyholder
- RoleType– Optional parameter to get the list of policies where the customer is a policyholder and not a beneficiary
- PolicyType – Optional parameter to get the list of policies of a specific type, in this case, whole life policies
- ShowOnlyActivePolicies – Optional parameter to limit the list to active policies only
To retrieve the data from an external source, replace the data source of the D_Contact_Life_Policies data page:
- In the navigation pane of App Studio, click Data > Data objects and integrations.
- Click the Life Insurance Policy data object to open it, and then click the Data views tab.
- For the Life policies of contact data view, in the Source column, click Replace source.
- Enter the system details and connection details. For more information, see Updating connections and field mappings for a data source.
After you modify the source of the data page, the following fields are populated from the new source:
- Policy ID
- Policy type
- Policy status
- Policy effective date
- Policy end date
To customize the policies that are listed for processing, modify the UpdateLifePoliciesList data transform. For more information about configuring data transforms, see Configuring a data transform.
Populating loan information
The D_Contact_Life_Policies data page fetches a default set of details about each life insurance policy. You can use the D_Policy_Details data page to fetch additional details, including loan details such as maximum loan eligibility and cash value, from an external source.
This data page has the following parameter:
- PolicyID– Required parameter to fetch details related to a specific policy
To retrieve this data from an external source, replace the data source of the D_Policy_Details data page:
- In the navigation pane of App Studio, click Data > Data objects and integrations.
- Click the Provide access for dataclass to hold insurance policy data data object to open it, and then click the Data views tab.
- For the Data Page for Policy Details data view, in the Source column, click Replace source.
- Enter the system details and connection details. For more information, see Updating connections and field mappings for a data source.
After you modify the source of the data page, the following fields are populated from the new source:
- Current loan amount
- Maximum loan available
- Dividend method
DocuSign integration
Integrating DocuSign into this Microjourney prevents the need to manually upload the forms received from customers to the case.
If the customer returns the form by using DocuSign, the form is automatically uploaded to the case for review. Otherwise, a back-office representative uploads it to the case.
To enable DocuSign, in the InsServInterfaceLayerSettings data transform from the PegaIns-Serv-Admin-ApplicationSetting class, set the Cloud property to True.
To modify the form upload process when using DocuSign and otherwise, edit the SendFormsForLifePolicy flow, seen in the following figure:

Loan processing
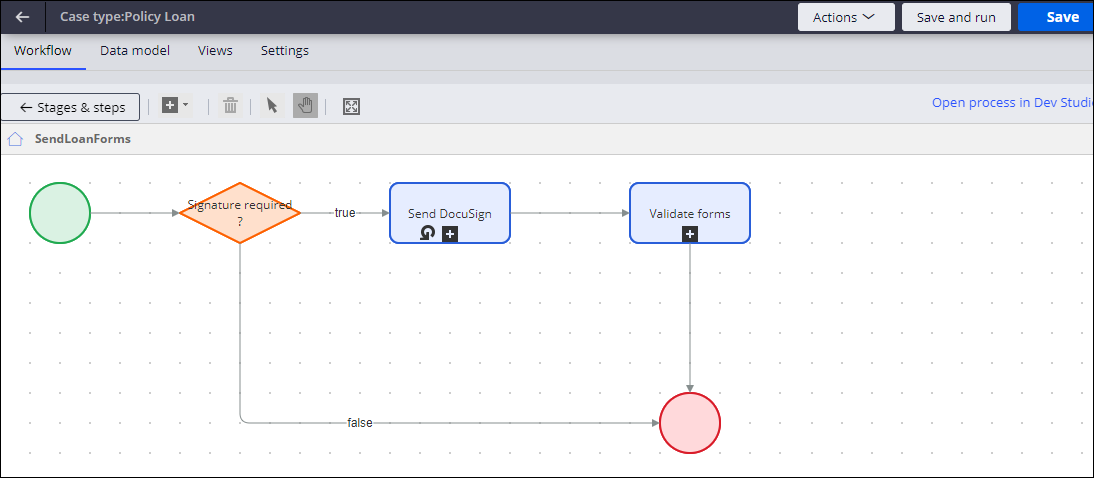
Depending on the requested loan amount, the loan is approved instantly or sent for further processing. If the loan is approved instantly, the CSR closes the interaction. If the loan requires further processing, the required forms are sent to the customer. To modify this process, edit the SendLoanForms flow, seen in the following figure:
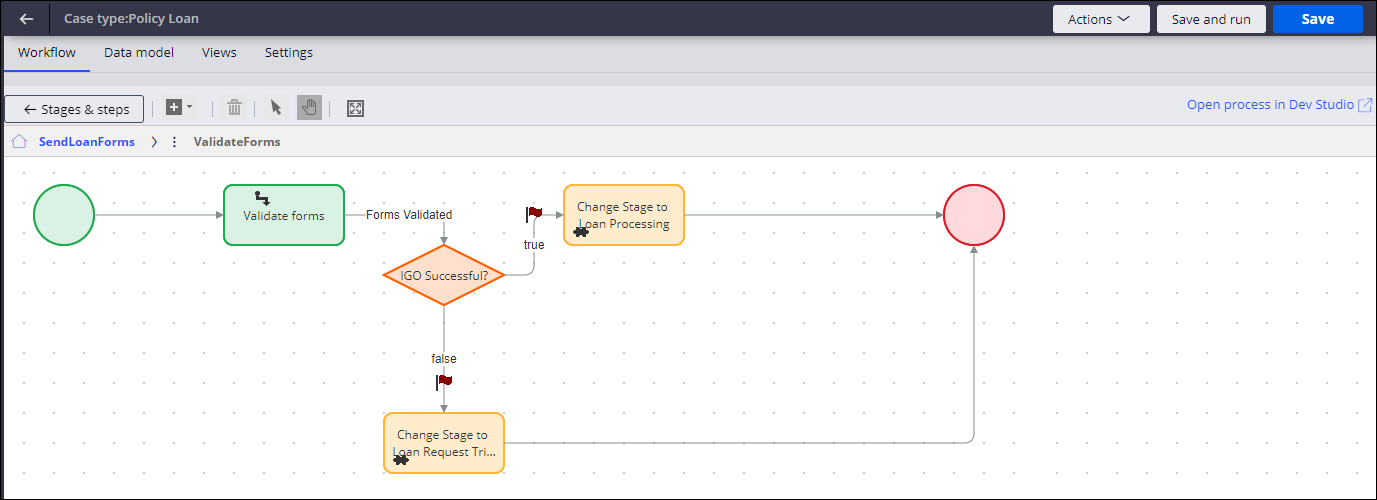
After the forms are uploaded, a back-office representative verifies whether they are in good order, and then submits them for a final review by the back-office manager. To modify this process, edit the ValidateForms flow, seen in the following figure:
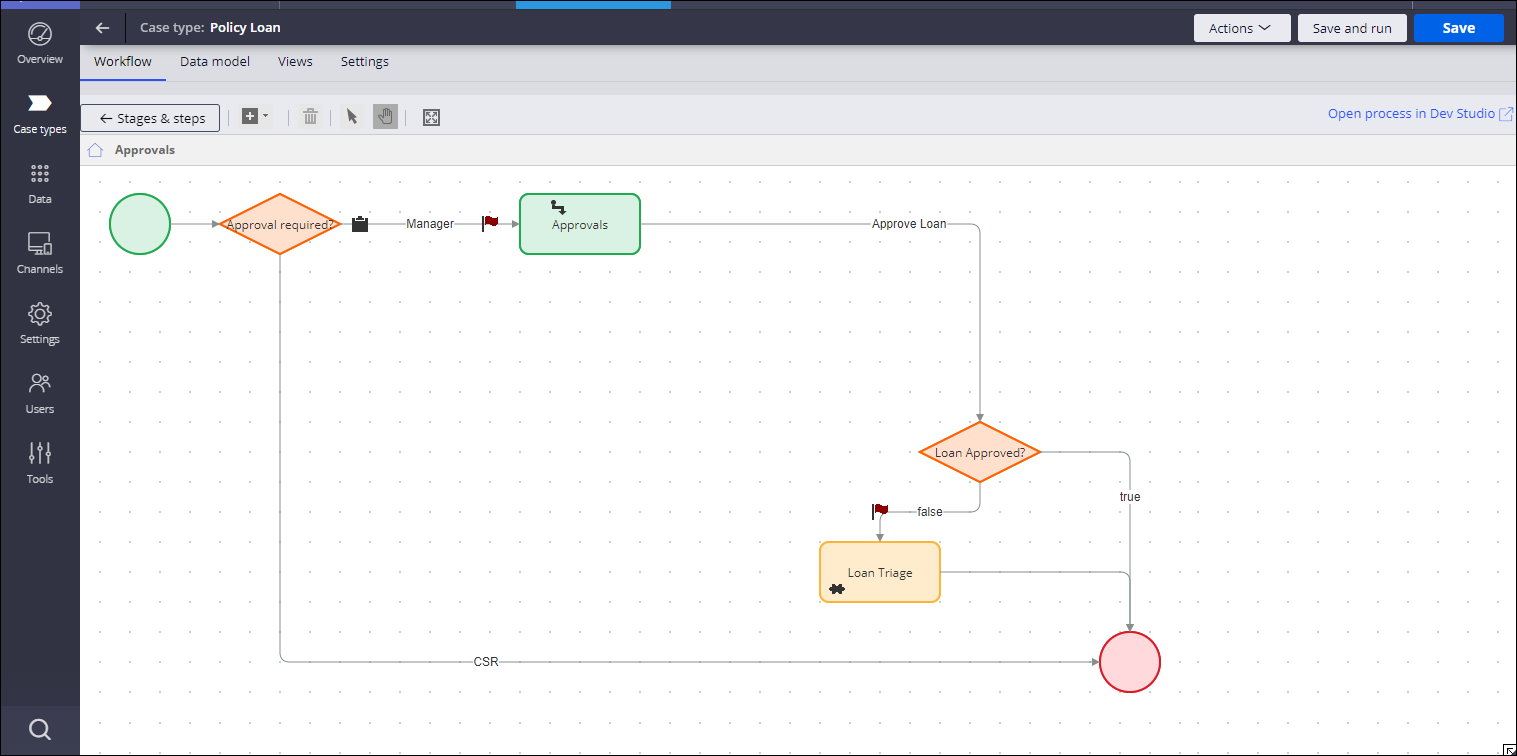
The back-office manager reviews the request, and approves or rejects the loan. To modify this process, edit the Approvals flow, seen in the following figure:
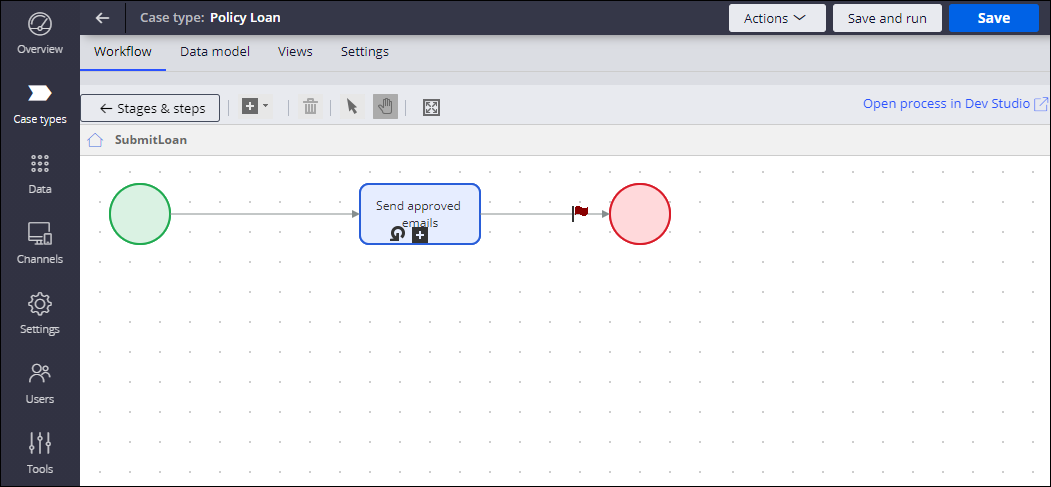
When a loan is approved, either during the initial interaction or after further processing, a confirmation message is sent to the customer. To modify this process, edit the SubmitLoan flow, seen in the following figure:
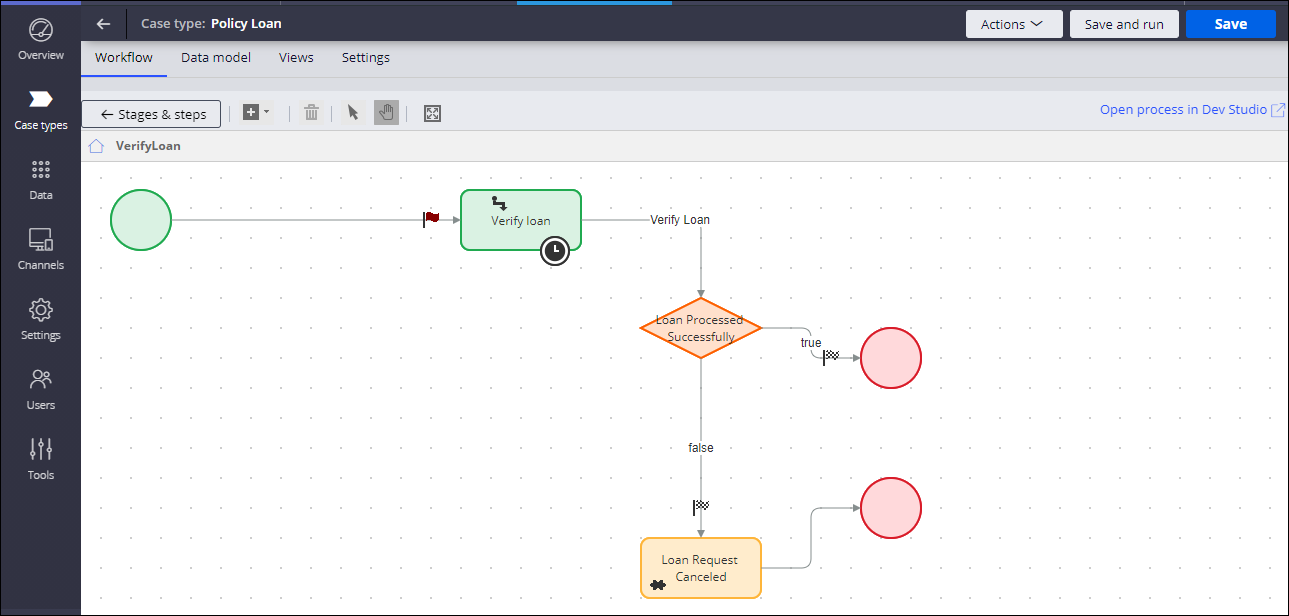
After the back-office team verifies that the policy loan has been processed, the case is closed. To modify this process, edit the VerifyLoan flow, seen in the following figure:
Saving the beneficiary details to an external SOR
After the final approval, the updated policy loan details are stored by using D_SaveLoanDetails data page.
To process the data further and to save the data to a different SOR, replace the data source details for the D_SaveLoanDetails data page:
- In the navigation pane of Dev Studio, go to the Application Explorer, and then search for the PegaIns-Serv-Work-Life-PolicyLoan class.
- Expand the Data Model for the class, and then navigate to the D_SaveLoanDetails data page.
- Optional: In the data page's Definition tab, in the Data Sources section, replace the existing system name with the external SOR that will store the data.
- In the Source field, select the new source, for example, a REST connector that will update the data in the external system.
Previous topic Policy Inquiry Microjourney Next topic Report a Death Claim Microjourney