Enabling Automated Testing
After you enable the Automated Unit Testing feature by assigning the AutomatedTesting privilege to access roles, you can save test data used for certain types of rules as test case rules.
The next time you test that rule you can run the test case rather than manually re-entering the test data.
Suggested Approach
Assign the AutomatedTesting Privilege
The Save as Test Case button in the Run Rule window and the Test Manager option in the Run menu do not appear unless you have the AutomatedTesting privilege associated with your access group.
Before enabling Automated Unit Testing, first determine which access roles will be able to use it. After you have chosen the access roles, complete the following steps to enable Automated Unit Testing:
- From the Rules by Type explorer, select Security > Access of Role to Object.
- For the role you are enabling, select the access rule that applies to the ultimate base class @baseclass.
- Select the Privileges tab. Add the AutomatedTesting privilege to the list. Set the Level to 5.
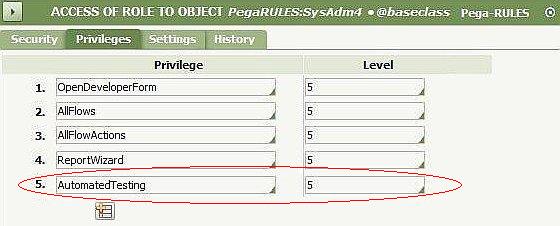
- Save the rule.
Verify that outbound email is configured correctly
The agent activity uses a email account instance named Default to send email messages that contain test suite results. To verify that the default email account is configured correctly for your system, complete the following steps:
- From the home page of the Developer portal, select Integration.
- On the Integration slice, under Accelerators, select Email Accelerator and click New.
- In the Enter Email Processing Information form, select the following options and then click Next:
- Configure outbound email
- Default email account
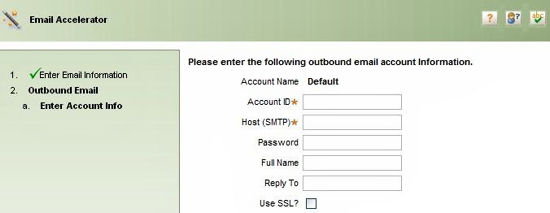
- In the Email Account form, examine the values in the fields and verify that the account is configured correctly.
Configure the URL for the Link from the Results Email Messages
The email messages that contain results from a test suite include a link to a Process Commander report. For the link to work correctly, the value specified for the dynamic system setting named PublicLinkURL must be valid for your system. To verify this, complete the following steps:
- From the Rules by Type explorer, select SysAdmin > Dynamic System Settings.
- From the list of settings, select PublicLinkURL.
- Specify the URL of Process Commander.
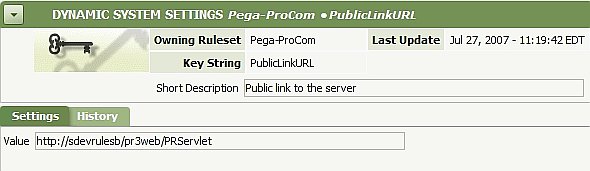
- Save the setting.
Edit the Results Message Text
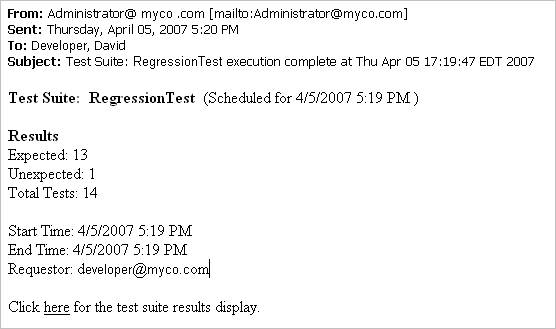
The correspondence rule CompletedTestSuite generates an email message that looks like the one shown below:
To change the text of these messages, locate Data-AutoTest-Result-Suite.CompletedTestSuite. Save this rule into your application’s RuleSets and then edit it according to your requirements.
Enable the Agent Activity
The agent activity that runs test suites, RunTestSuitesFromAgent, is included in the activity list of the Pega-ProCom agent but it is not enabled by default. To enable RunTestSuitesFromAgent, complete the following steps:
- In the Rules by Type explorer, select SysAdmin > Agent Schedule. A list of agents appears.
- Select the first Pega-ProCom agent schedule in the list and open it.
- On the Schedule tab, enable the RunTestSuitesFromAgent activity.
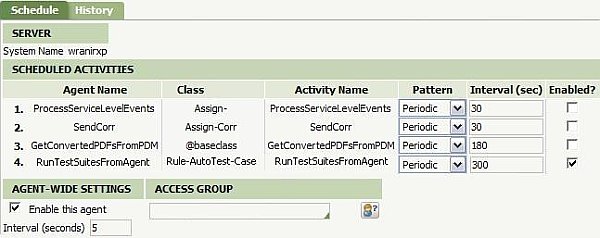
- Set the time interval that determines how frequently the agent activity runs. By default, it is set to run every 300 seconds (five minutes).
- Click Save and close the form.
- If your Process Commander system has more than one node, multiple Pega-ProCom agent instances will appear in the list. Repeat steps 2 through 5 for each Pega-ProCom agent in the list.