How to manage specifications and requirements from the Application Profile landing page
Pega 7 has integrated DCO management throughout Designer Studio enabling development teams to capture and review DCO information where and when its needed. Key to this approach is the Application Profile landing page ( > Application > Profile ), which provides you with an inventory of requirements and specifications available in your application, and gives you instant access to the information and settings that define each item.
The landing page contains three tabs — Requirements, Specifications, and Analysis — that work together to provide complete control of these DCO assets. This article highlights the tabs' features, and describes how you can take advantage of their capabilities.
For more information, see About application specifications and requirements.
Using the Specifications tab
This is the primary tab on the Application Overview landing page. The tab allows you to view, add, delete, or update specifications in a RuleSet in your current application, or in your RuleSet stack (RuleSets that are inherited from built-on applications). The Analysis tab provides additional insight into where and how specifications are being used. The Requirements tab provides access to requirements, including those that are related to your specifications.
To open the Specifications tab, go to > > > .
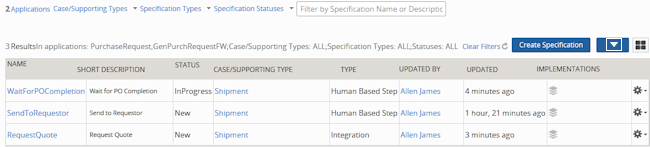
Display the available specifications
A new application, Purchase Request, created with Application Express contains no specifications. The specification table (shown below) is empty:

To see specifications that are in Purchase Request FW, click the Application link on the header to open the pop-up menu. Select the application's checkbox.
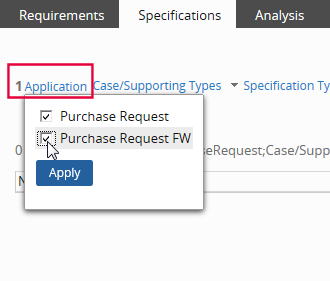
This expands the scope of the page's results list to display Purchase Request FW 's three specifications in the table.
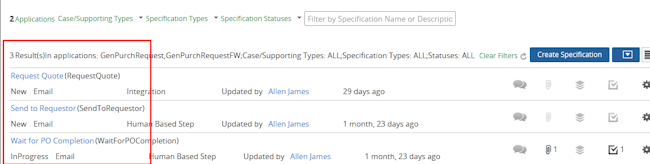
You can also control the items displayed on the table by using the Case/Supporting Types, Specification Types, Specification Status, and Name and Description filters located in the header as shown here:

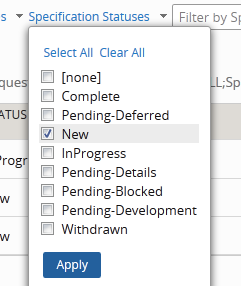
For example, to see only items with a status of New, click the Specification Statuses link to open the selection pop-up menu, then click Clear All, and finally select New.
Here are the results:
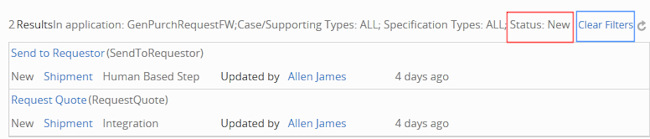
The Status:New label above the table indicates the setting . You can quickly return every filter setting for every filter to the default (ALL) by clicking the Clear Filters link. This is especially useful if you are using multiple filters and settings.
Working with specifications in the table
You can change the table presentation using the spreadsheet view and formatted view icons located on the far right side of the result table header.
To more easily identify the items in a row, click the Switch to spreadsheet view icon to add column headers:

Here is how the table appears in spreadsheet view.
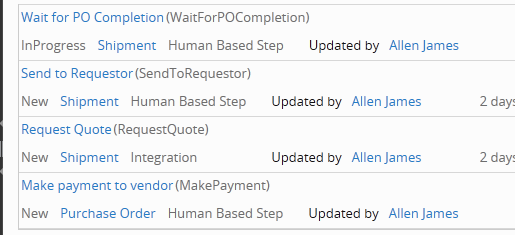
Click the Switch to formatted view icon  to remove the headers and display a complete set of links and icons that allow you to view forms and perform actions related to a selected specification.
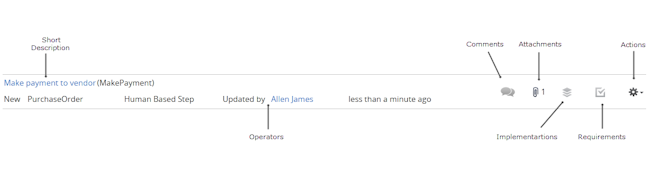
The following links open the following dialogs or forms:
- Short Description — Opens the Add/Edit Specification dialog. You can use it to update settings (some values are read-only), access the specifications rule, comments, attachments, requirements, and implementations. If your PRPC system is integrated with the Project Management Framework (PMF), the PMF Items tab is available. You can use it to create a user story or epic in the PMF system that is associated with the specification
- Operator — Opens the Operator ID record of the individual who last updated the specification.
The following icons provide shortcuts to the following sections or tab in the Add/Edit Specification dialog:
 comments — Comments entered in the Comments sections on the Add/Edit Specification dialog. This section is available only after the specification is created.
 attachments — Documents that are attached to the specification.
 implementations — Specification's associations with the case type's flows, their components, or individual activities that are configured to implement the specification during the development cycle.
 requirements — Opens a dialog displaying the requirements associated with the specification.
The  actions icon presents the following options:
- Copy — Opens the Add/Edit Specifications dialog that contains the original specification's information including its attachments and settings in the Advanced section , which you can edit. (Comments and Requirements are not copied). Enter a Name and Short Description and click OK to create a the specification.
- Delete — Delete the specification rule. Associated requirements are not deleted.
- Document — Generate a Microsoft Word document with specification information. In the Word window, you can save a copy of the generated document to your local system, or print it.
- PMF Work — This option is available if your PRPC system is integrated with a Project Management Framework (PMF) system. Click to create an epic or user story that is associated with the specification.
For more information about the sections and fields on the Add/Edit Specifications dialog, see the Pega 7 Help topics About Application Specifications and Add/Edit Specification dialog — Working with specifications.
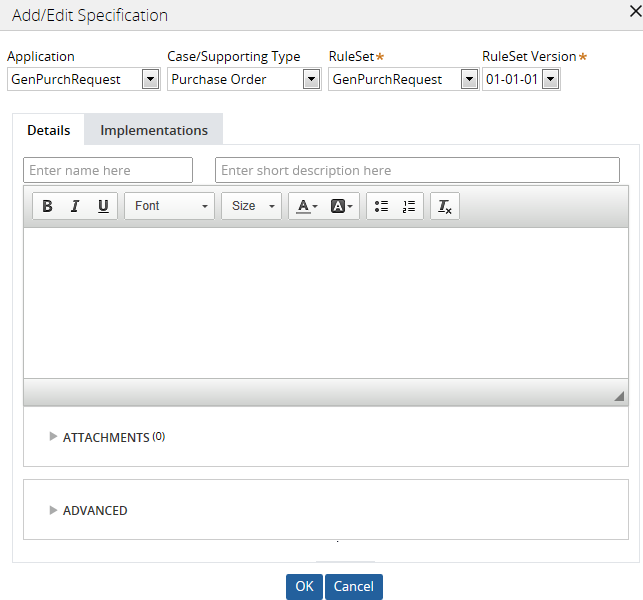
Create a specification
The following example shows how to add a specification to your application from this landing page.
- Click Create Specification. The Add/Edit Specification dialog opens.
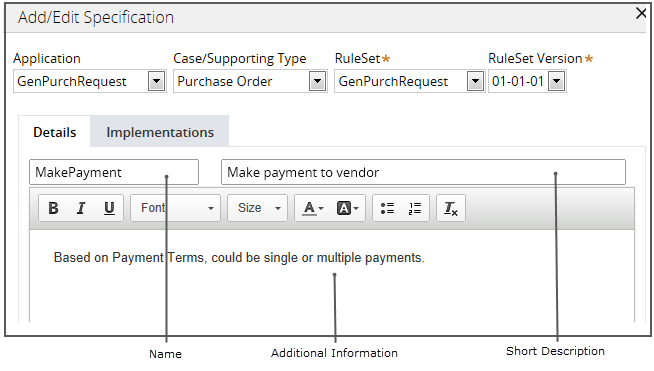
- Enter the name, MakePayment in the first field. The system use the value to identify the rule. Do not include spaces or special characters.
- Enter the short description, Make payment to vendor in the second field. The text should clearly convey the specification's purpose. You can include spaces and special characters. This text appears in a variety of selection menus and labels throughout Designer Studio and Process Modeler; making the information meaningful can help others quickly understand how the specification is used.
- Add additional information using the rich-text editor as shown below.
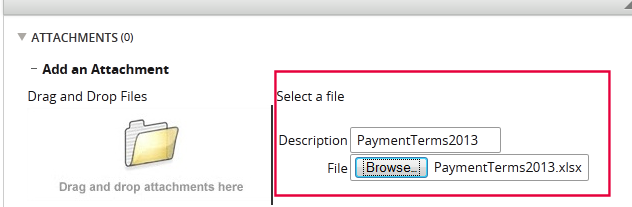
- Expand the Attachments section and use the Select a file area to import and attach a file. In this example, you have attached an Excel spreadsheet that contains the 2013 payment terms:
Starting in PRPC 7.1.7, you can attach multiple files at once to an application, specification, or requirement.
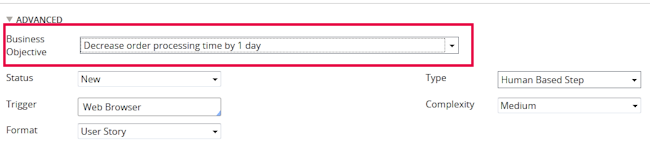
- Expand the Advanced section. In the Business Objective field, select Decrease order processing time by 1 day (you have defined this objective on the Application Overview landing page).
- Expand the Requirements section to associate requirements with the specification. Click the plus sign to add a row and enter REQ101 in the Name field and Payment must be made within 1 day in the Short Description field.
- Click the expand arrow
 to display the panel for defining the requirement. In this example, keep the default values as shown here:
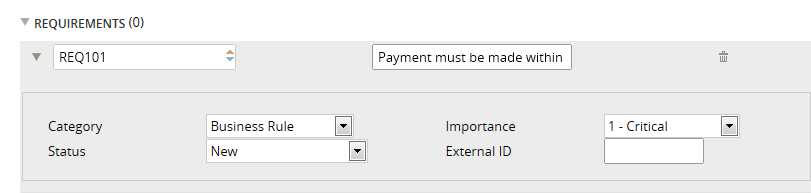
- Click OK at the bottom of the dialog to create the specification. The dialog closes and your new specification appears on the Specifications tab.

If the specification does not appear, verify that filter settings are not preventing it from displaying.
The system also creates the associated requirement you defined in the Requirements section and displays it in the Application Profile landing page Requirements tab.
Exporting and importing specifications
You can download the specifications in your application into a custom Microsoft Excel template, update them (edit, delete, or add) on your local computer using Excel, and upload the specifications to the original or another system.
How to export specifications
To export specifications, do the following:
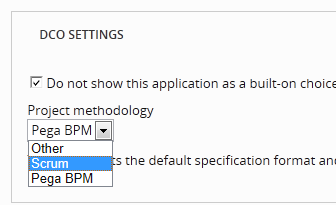
- Open the the Application rule form by selecting from the Application menu. On the Documentation tab, select Scrum in the Project methodology field located in the DCO Settings area and save the rule. This determines the template the system uses in the export process.
- Return to the Application Profile landing page and open the Specifications tab. Filter the array so that only the specifications you want to export appear.
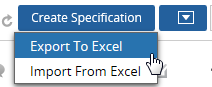
- Click
 and select Export to Excel from the menu.
The system populates the PegaScrum spreadsheet template in.xlsxExcel file format. The default file name is<application name>_UserStories.xlsx - Click the link in the window that appears at the top of your browser to create the file.

- Save the file to a local directory and close the window.
- Open the spreadsheet.

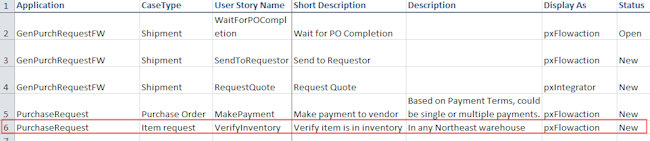
- In the Application column, select PurchaseRequest from the drop-down list.
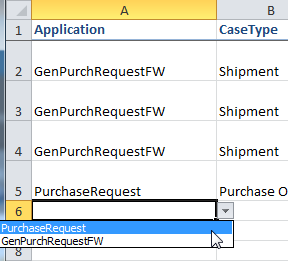
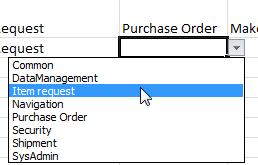
- In the CaseType column, select Item request.
- Enter or select the following values:
- User Story Name — VerifyInventory
- Short Description — Verify item is in inventory
- Description — In any Northeast warehouse
- Display As — pxFlowaction
- Status — New
When complete, the row will look like this:
- Save the spreadsheet.
How to import specifications
To import your updated spreadsheet, do the following:
- On the Specifications array header, click and select
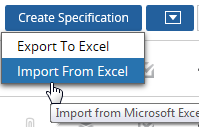
The specification import wizard appears.
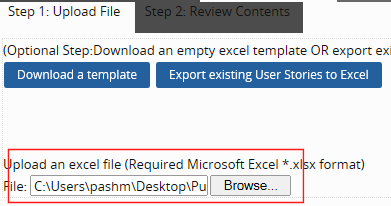
- In Step 1: Upload the File on the wizard, use the Browse button to locate the spreadsheet file on your system and upload it.
- Click Next at the bottom of the panel to open Step 2. The panel displays the contents that will be imported. In this example, you are importing one new specification.
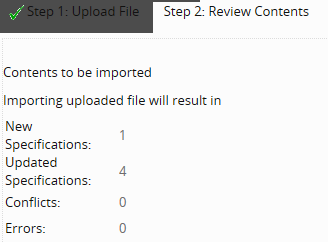
- Click Import at the bottom of the panel to start the process. When complete, a confirmation appears at the top of the panel.
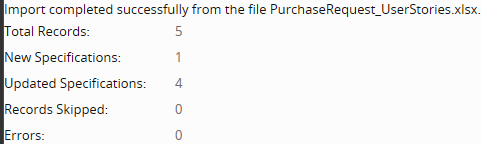
- Click View Specifications to display the Specifications tab.
- Click the refresh icon
 The new specification appears in the array.
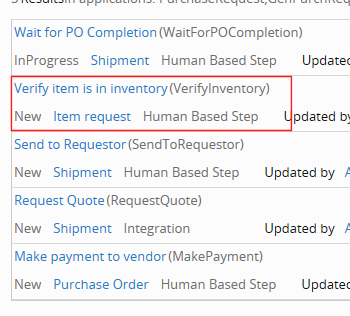
For more information about exporting and importing specifications, see the PRPC Help topic Application category — Application Profile page Requirements, Specifications, and Analysis tabs.
Using the Requirements tab
The Requirements tab displays requirements available in your current application and in your RuleSet stack.
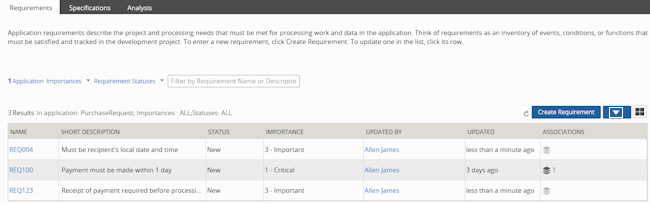
The presentation is similar to that in the Specifications tab. In addition to the Application filter, you can filter requirements by Importance, Status, and by Name or Description.
Click the following links or icons to perform these tasks:
- Name (Requirement ID) — Open the Requirements Add/Edit dialog to review or update the settings.
- Updated By — Open the ID record for the operator who last updated the requirement.
- (Association) — View a list of rule types (applications, flows, and specifications) that are associated with the requirement.
- Create Requirement — Open the Add/Edit dialog and create a requirement in your application. For more information about the sections and fields on the Add/Edit Requirements dialog, see the Pega Help topic About Application Specifications and Add/Edit Specification dialog — Working with specifications.
- — Export or import requirements. See the specifications example in the Exporting and importing specifications section above.
For more information about the fields in the Add/Edit Requirements dialog, see the Pega Help topic Application Requirements —Completing the Definition tab.
Using the Analysis tab
The Analysis tab graphically displays specifications by case type and work status.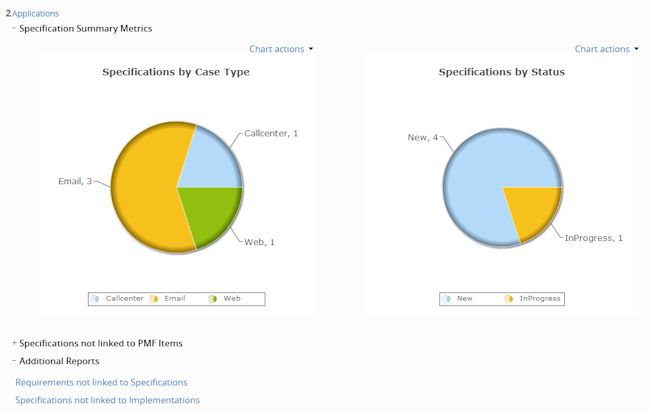
The tab also provides the following controls and reports.
Specification Summary Metrics — Displays two pie charts that illustrate the number of specifications by case type association and by work status. Use the Chart Actions links to:
- Show data — Displays a summary report that presents the underlying data.
- 3D — Displays the graphic in 3D.
- Maximize — Expands the graphic in its own screen.
- Export to PDF — Exports the graphic to a PDF file. When the export process is done, a Save PDF button appears beneath the chart. Click it to save the file to a local directory.
Specifications not linked to PMF Items — A report that shows specifications not linked to PMF items (if you application is integrated with a PMF system).
Additional Reports — Contains links to two reports:
- Requirements not linked to Specifications
You can use these reports to discover and remove specifications or requirements that were defined at the start of a project but are not used in the final implementation.
For PRPC 6.x users
Assumption, Project Participants, and Actors tab functionality on the PRPC 6.3 SP1 Application Profile landing page is now accessed in the Details panel on the Application Overview landing page.
Previous topic Application Overview landing page Next topic Associating project specifications with business impact and complexity