How to configure cascading dynamic select controls
Summary
Dynamic Select user interface controls enable a select box (also called a drop down box), to be dynamically populated with data from an internal or external source. Unlike the static HTML <SELECT> and <OPTION> form elements, in a Dynamic Select control the list of options is computed at runtime, based on the current source data.
This article explains how to create a set of two cascading Dynamic Select controls. The selection of a value in one select control will directly impact the contents of a second select control. For information about how to create a single Dynamic Select control, see How to configure a Dynamic Select control (V5.4).
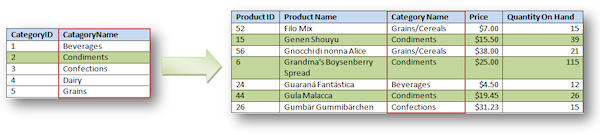
In this example, the data sources are two external database tables. The first table contains a list of product categories. The second table, which contains a Category column, contains a list of products.
After a user makes a selection in the first Dynamic Select control, the contents of the second control are filtered to only display records that match the first selection. The approach presented here can be directly extended to configure three or more controls in one cascade.
Note: This article assumes you are using activities to populate the Dynamic Select controls.
Suggested Approach
Before adding the Dynamic Select controls to a layout, create the activities used to populate the separate Dynamic Select controls.
To configure the first Dynamic Select control:
- Open the DynamicSelect Param Window.
- Complete the Param Window as you would for a any Dynamic Select box that uses an activity, such as the example in the link below.. Enter a single word for the Select ID parameter. Choose a value that uniquely identifies this control on the form.

- Select the Advanced method for generating the Dynamic Select to display additional parameters. In the TargetID field, specify the SelectID of the dependent Dynamic Select. The value you enter here will be the value you use to configure the dependent Dynamic Select later.

To complete the second, or dependent, Dynamic Select control:
- Open the Dynamic Select Param Window.
- Configure using the Activity method for generating the dynamic select. Enter the name of the SelectID of the previous Dynamic Select control in the Param Name and Select ID fields. The output of the control listed in the Select ID field is passed as the parameter listed in the Param Name field to the specified activity. Use the SmartPrompt to select the Param Name from the specified activity.

Note: The activity specified in the Activity Name field must have the parameter defined in the Param Name field on the Parameters tab of the activity rule form.
- Select the Advanced method for generating the Dynamic Select to display additional parameters. Notice how the Source string and ParentID were updated with the values entered in the Param Name and Select ID fields in the previous step.

When run in a process, the contents of the Product Dynamic Select are automatically filtered based on the user's earlier selection for the Category Dynamic Select.