Introduction to the Case Designer
Summary
A case management application facilitates the coordination of work covered by a single case. For example, a single customer loan request case may create three separate subcases, each with its own process handled by case managers in separate departments. Although a subcase may be handled independently of the other, case management users can easily view, consolidate, share and manage the collective work and information that is relevant to the initial case.
Note: This article describes V6.2 Case Designer features. For V6.1SP2, see Introduction to Case Type Design.
Case Management design is governed by the Case Designer gadget on the Case Management landing page. You use it to configure case type covering relationships and process definitions. The gadget lets you:
- Create new case types, which automatically creates a class, case type, starting flow, and work group rule.
- Reconfigure existing case type covering relationships.
- Define many aspects of work processing, including:
- Automatic and conditional instantiation or starting of subcases and processes.
- Case goals and deadlines, work parties, and access role definitions.
- Settings to limit the number of open, unresolved cases, and to indicate whether a subcase must be resolved in order to resolve its parent.
- Attachments categories for controlling read/write access to subcase attachments.
- Automatic data value propagation from cases to new subcases.
- Icon customization that enables users to easily identify the case types to which a cases or subcases belong.
This article describes how to use the Case Designer gadget to extend a single work type application structure into a case management application that employs a case and subcase case type relationship.
Details
In this example, LendCorp has an application for making personal loans that employs a single main process named Apply for Loan as shown below:
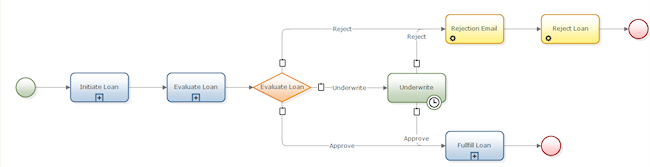
There is one work type named Loan. The application was created with the Application Accelerator.
The loan process will be reconfigured so that the Underwrite assignment is replaced with a new work type (referred to as a case type) named Underwrite, which is covered by the top-level case type Loan. The new case type will have its own main process named Start Underwrite.
Note: Configuration of the added processes are not described in this article.
The application design requirements are as follows:
- The system must automatically create an Underwrite subcase (instantiate the Underwrite case type) when the user creates a Loan top-level case. If the user is a supervisor, he or she must also have the option of manually creating additional Underwrite subcases from a user form or from the Case Manager portal.
- The Underwrite subcase(s) must be resolved before the parent Loan case can be resolved.
- The Underwrite subcase has goal and deadline dates of three days, 12 hours and four days, 12 hours, respectively. The dates are measured from the time the subcase starts, whether automatically or manually.
- A file containing a loan review report can be attached to the Underwrite case if the user has a manager role as defined in a related attachment category.
- Three work parties — Customer, CaseManager, and Loan Officer —must be specified for the Underwrite work type.
- Loan customer work party data, (full name, email, label, and party role) must be available to the Underwrite case when it is created so that the user does not have to re-enter the information.
- The Underwrite process includes a spin-off flow (a supporting process used for out-of-sequence assignments in the overall case process) named Background Check, which starts automatically if the loan value exceeds $100,000. The process can also be started manually by the user who works on the Underwrite subcase.
- The user must be able to easily distinguish Underwrite from Loan cases by way of a distinctive icon that appears in user forms and in the Case Manager portal.
1. Add the Underwrite case type
You will perform almost all of the above configuration tasks using the Case Designer gadget. To access the gadget, go to ![]() > Processes and Rules > Case Management > Case Designer. The Loan work class appears in the Case Designer, and in the Application Explorer as shown here:
> Processes and Rules > Case Management > Case Designer. The Loan work class appears in the Case Designer, and in the Application Explorer as shown here:

- Select the Loan item in the Case Designer tree, right click, and select Add.

- In the Case Designer dialog, select the New radio button and enter
Underwritein the Name field.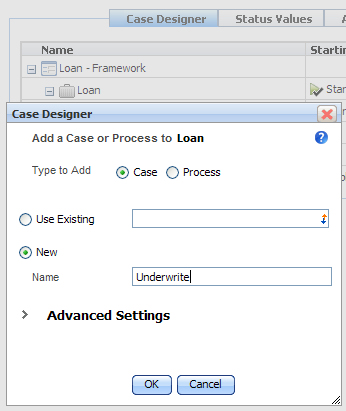
- Click OK. The system creates a new work class named LendCorp-FW-Loan-Work-Underwrite. In the new class, the system creates rules that include a default starter flow named StartUnderwrite, a case type (pyDefault), and work parties (pyCaseManagementDefault). The flow is a copy of Work-.pyStandardCMAssignment. The system creates a Flow Name key part using the last segment of the work class name prefixed by the word "Start." In the Case Designer, the new case type Underwrite appears indented beneath Loan as shown below. This indicates that Underwrite is case type covered by Loan.
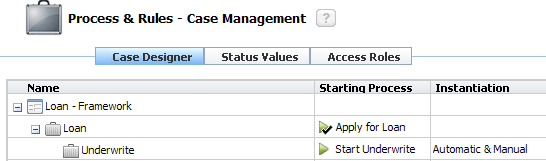
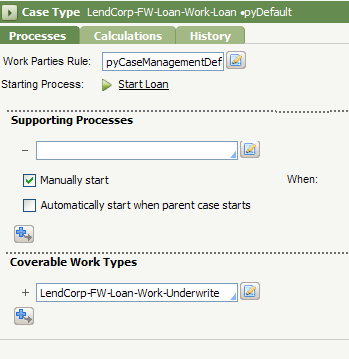
- In the tree, click Loan to open its case type rule. Note that the Underwrite class has been added to the Coverable Work Types list.
2. Define case instantiation and resolution requirements
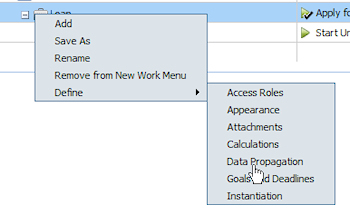
- To define these settings, select Loan, right click, and select Define > Instantiation.

The Instantiation dialog appears.
- Select the Required for resolution of Loan checkbox. Manual and Automatic instantiation are selected by default and do not need to be modified. In the Permitted When field next to the Manual instantiation field, enter the when rule that restricts this method only to operators who belong the the supervisor access group. If the user does not meet this condition, this action does not appear in user forms or in the portal.

- Click OK.
3. Define Underwrite overall case goals and deadlines
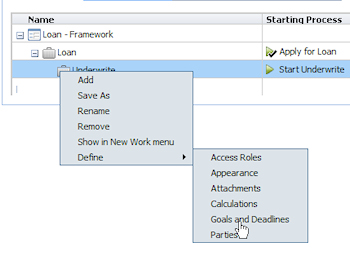
- Select Underwrite, right click, and select Define > Goals and Deadlines.
- In the Goals and Deadlines dialog, select the Me radio button and enter
3Days and4Days in the Goal Time from Start and Deadline From Start fields, respectively.
- Click OK. The first time you use this setting, the system creates in the Underwrite class a data transform rule named .pyDefault and a service level rule (which contains the dialog settings) named .pyCaseTypeDefault .
- From the Application Explorer, open the data transform rule to view the settings. The first row indicates that .pySLAName is set to .pyCaseTypeDefault, which ensures that the .pyOverallSLA flow rule uses this service level rule.
- Optionally, you can add another row, which sets the Underwrite case ID prefix to "UW-" so that the case's case type is easily identified in user forms and in the Case Manager portal.

- Save the rule if you have modified it.
4. Associate Underwrite with an attachment category
This step assumes that you have created an attachment category rule that restricts attachment permission so that a loan review report is automatically attached to the Underwrite case if the user has a manager role.
- Select Underwrite, right click, and select Define > Attachments.

- In the Attachments dialog, add a row and select the attachment category rule in the Category field.
- Select the file type (
File). - Enter a description.
- In the Reference field, click the Browse button to locate the file that will be attached. Select the Auto-Attach checkbox.

- Click OK. Your settings are reflected in the Case Designer as shown here:

5. Define the work parties
- Select Underwrite, right click, and select Define > Parties.

- In the Parties dialog, modify the default Role and Description values as shown here:

- Click OK. This updates the default work parties rule .pyCaseManagementDefault (created when you added the Underwrite case type). This rule is also referenced in the Work Parties Rule field on the Underwrite Case Type rule form. Note that this rule overrides any work parties rule referenced in this case type's starting flows (the Work parties field on the Flow rule form's Processes tab).
6. Define data propagation from Loan to Underwrite
- Select Loan, right click, and select Define > Data Propagation.
- In the Data Propagation dialog, enter the values per the design requirements as shown below. When the subcase Underwrite is created, the work party values on the Loan work page are copied to the Underwrite work page.
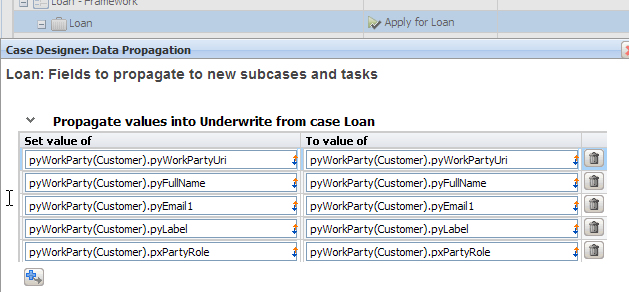
Note that the above settings require that the user enters a Customer party in the New user form.
- Click OK.
7. Add the Background Check process to Underwrite
This step assumes that you have created, in the Underwrite class, the BackgroundCheck process and a when rule that evaluates to true when the loan amount exceeds $100,000.
- In the Case Designer tree, select Underwrite, right click, and select Define > Add.
- In the Add a Case or Process dialog, , select the Process radio button.
- In the Process AutoComplete control, select the BackgroundCheck flow.
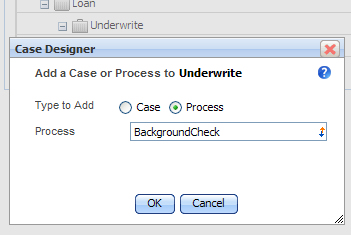
- Click OK. The process appears in the Case Designer as shown here:
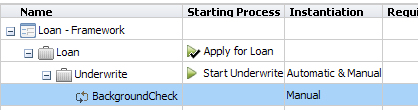
- To specify the when condition, select BackgroundCheck, right click, and select Define > Start.

- In the Supporting Process dialog, select Manually Start and Automatically start when parent case starts.
- In the When field next to the Automatically start... field, select the when rule.

- Click OK.
8. Change the Underwrite case type icon
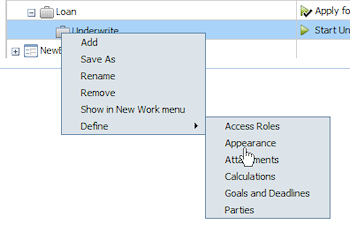
- Select Underwrite, right click, and select Define > Appearance.
- In the Appearance dialog, select Case - Yellow Folder as shown here:
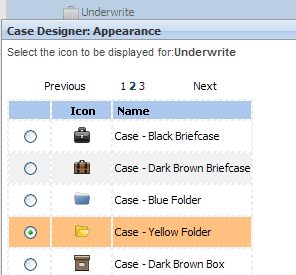
- Click OK.
The new Underwrite icon appears in the Case Designer as shown here:
9. Review your design in the Case Manager portal and user forms
Before you start, make sure that the pyCaseManager portal is specified in your access group.
- Open the Case Manager portal and select Apply for Loan from the New menu.

- In the New harness, add a Customer party. Add name and email information in the fields.
- Click Create to instantiate a loan case and open the perform harness. The system has also instantiated an Underwrite subcase.
- In the Loan perform harness, select the Other Actions menu in the action area header. This opens the Add Work submenu and displays the Underwrite starter process name. Clicking the name enables the user to manually create an Underwrite subcase (in addition to the one automatically created).

- Select the
 My Cases tab on the portal.
 - In the Cases tree grid, click Refresh and select and expand the Loan item you just created.

This displays the Underwrite case the system created. Note that the Underwrite icon in the tree is the yellow folder that you specified in the Appearance dialog. - Double click the Underwrite item to open the Underwrite review harness.
- Click the Actions menu in the Case Contents header to display the Underwrite local
 and connector
  flow actions that you can invoke from this form. Also note that the Goal and Deadline dates conform to values you specified in the Case Designer (rounded to the nearest hour). You can click the breadcrumb link Loan (Loan-76) next to the Loan icon to return to the Loan review harness.
- In the Case Contents section, click the
 Start Underwrite item to open the Underwrite assignment.
 - Select the Other Actions menu in the action area header and expand the Add Work
 submenu. Selecting
  BackgroundCheck enables you to start this process from this assignment.
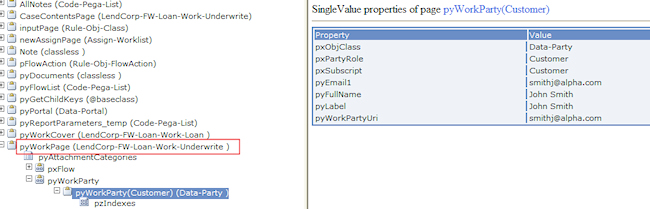
- Open the Underwrite subcase's clipboard. On pyWorkPage, display the pyWorkParty(Customer) embedded page, which contains the properties you selected in the Data Propagation dialog.
Refer to Developer help for details about the above features, and for information about Case Designer capabilities not described here.