Working on a change request
In the Build phase, a user in the NBASpecialist access group makes the changes required to complete the change request.
- To view all your pending change requests, log in as a user in the <your overlay application>:NBASpecialist access group.
- In the To do section of the Pega 1:1 Operations Manager Home page, click Go by the request that you want to review.
- Review the request details and the required Build tasks.

- In the Design treatment task, perform one of the following steps,
depending on the specifications:
- If the business user selected an existing treatment, review it.
- Configure a new treatment.
- In the Configure engagement policy task, configure the
eligibility, applicability, and suitability criteria, as well as the contact policy
details.

- After specifying eligibility details, on the Prepare validation
tab, select the persona to perform unit testing for the eligibility criteria.You can select from existing personas based on how well they match the criteria you configure, or define a new persona for the test.
- On the Run validation tab, for each selected persona, specify
the desired outcome of the action in the Desired outcome column, as
in the following figure:

- Click the Run icon above the list of personas.
- Optional: Click on Export excel file to download the Engagement policy validation report. For more information about how to use this report, see Verifying your configured engagement criteria with Engagement policy validation report.
- On the Peer review tab, enter notes for the peer reviewer, and then complete the task.
- Optional: To get the next task from your work list, click Get next.
Verifying your configured engagement criteria with Engagement policy validation report
Follow these guidelines for interpreting and use of the Engagement policy validation report.
While working on a change request, and configuring the engagement policy you can prepare a validation to perform unit
testing for the eligibility criteria. The following report is generated: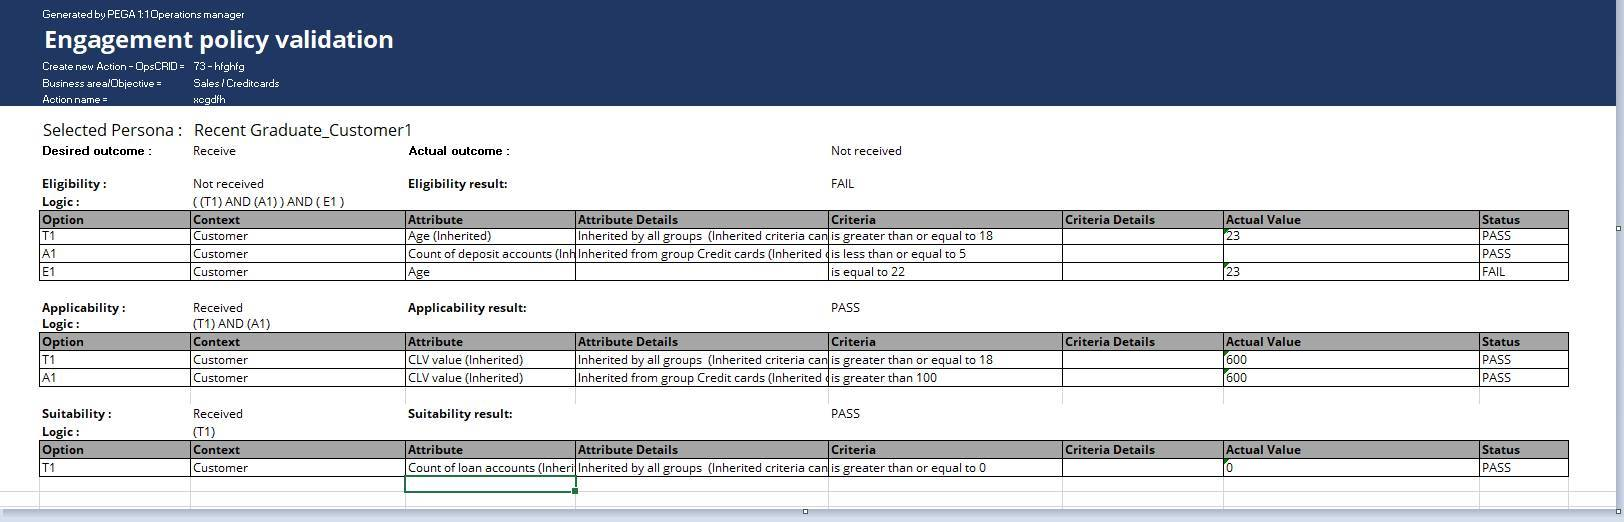
In the report you can see this logic: T+A+E. T and A and E represents the conditions, against which the persona will be validated:
- T represents the criteria defined in the Next-Best-Action Designer at
All Group level. They are applicable to all Business Groups.
In the screenshot, the action is applicable for a persona, whose age is greater or equal to 18. This condition is defined and a top group level and should be inherited by all the actions defined across all the groups.
- A represents the condition which is defined in the Next-Best-Action Designer at the group under which the action is present.
In the example, the action is present under the Credit Card group.
Credit card group criteria states that the count of deposit accounts is less than or equal 5.
- E represents the criteria that are defined in Next-Best-Action Designer at action level.
The action-level criteria in the example are defined as age is equal to 22.
To sum up, each persona gets validated, and to be qualified for the specific action, needs to first pass through the conditions defined at All Groups level (T), and then the action-group level (A), and finally the action-specific condition (E).
In the report, all of the criteria are grouped at 3 levels: eligibility, applicability and suitability. All of them gets evaluated against the values. The values are available on persona (Actual Value column) and then the results are presented (Status column)
In the report we can see, if the Actual outcome was the same as Desired outcome.
Creating a test persona for Pega 1:1 Operations Manager
To validate the engagement policy changes implemented for a change request, NBA Specialists can define test personas with characteristics relevant to the engagement policy.
- Log in to your Pega Customer Decision Hub implementation application as an operator with access to Dev Studio.
- In the left navigation pane, click App.
- In the Classes section, enter Data-Decision-Request-Customer, and then press Enter.
- Click .
- Click an existing persona transform, for example, CustomerPersona.
- Click Save as to save the data transform into your own implementation layer.
- On the Definition tab, adjust the properties as required.
Previous topic Create a new bundle in 1:1 Operations Manager Next topic Verifying and deploying a change request