Configuring case processing options
The case processing options include switches that enable and disable the built-in features of the case, and settings that enable customer verification for this case type. For cases that are not created from a template, only the Use new confirm screen switch can be enabled or disabled.
For case types created in version 8.7 and later, the switches that enable and disable case features are configured in the Case processing options Configuration set in App Studio, but you can override these settings for specific case types. For case types in earlier versions, the switches are configured from the Case processing options page. Cases created from the version 8.7 Customer Service Generic Template inherit the default values from the template.
- In the navigation pane of App Studio, click Case types.
- Click the case type that you want to open, for example, Add New Contact.
- In the Settings tab, click Case processing
options.
Case processing options Configuration set (version 8.7 and later) 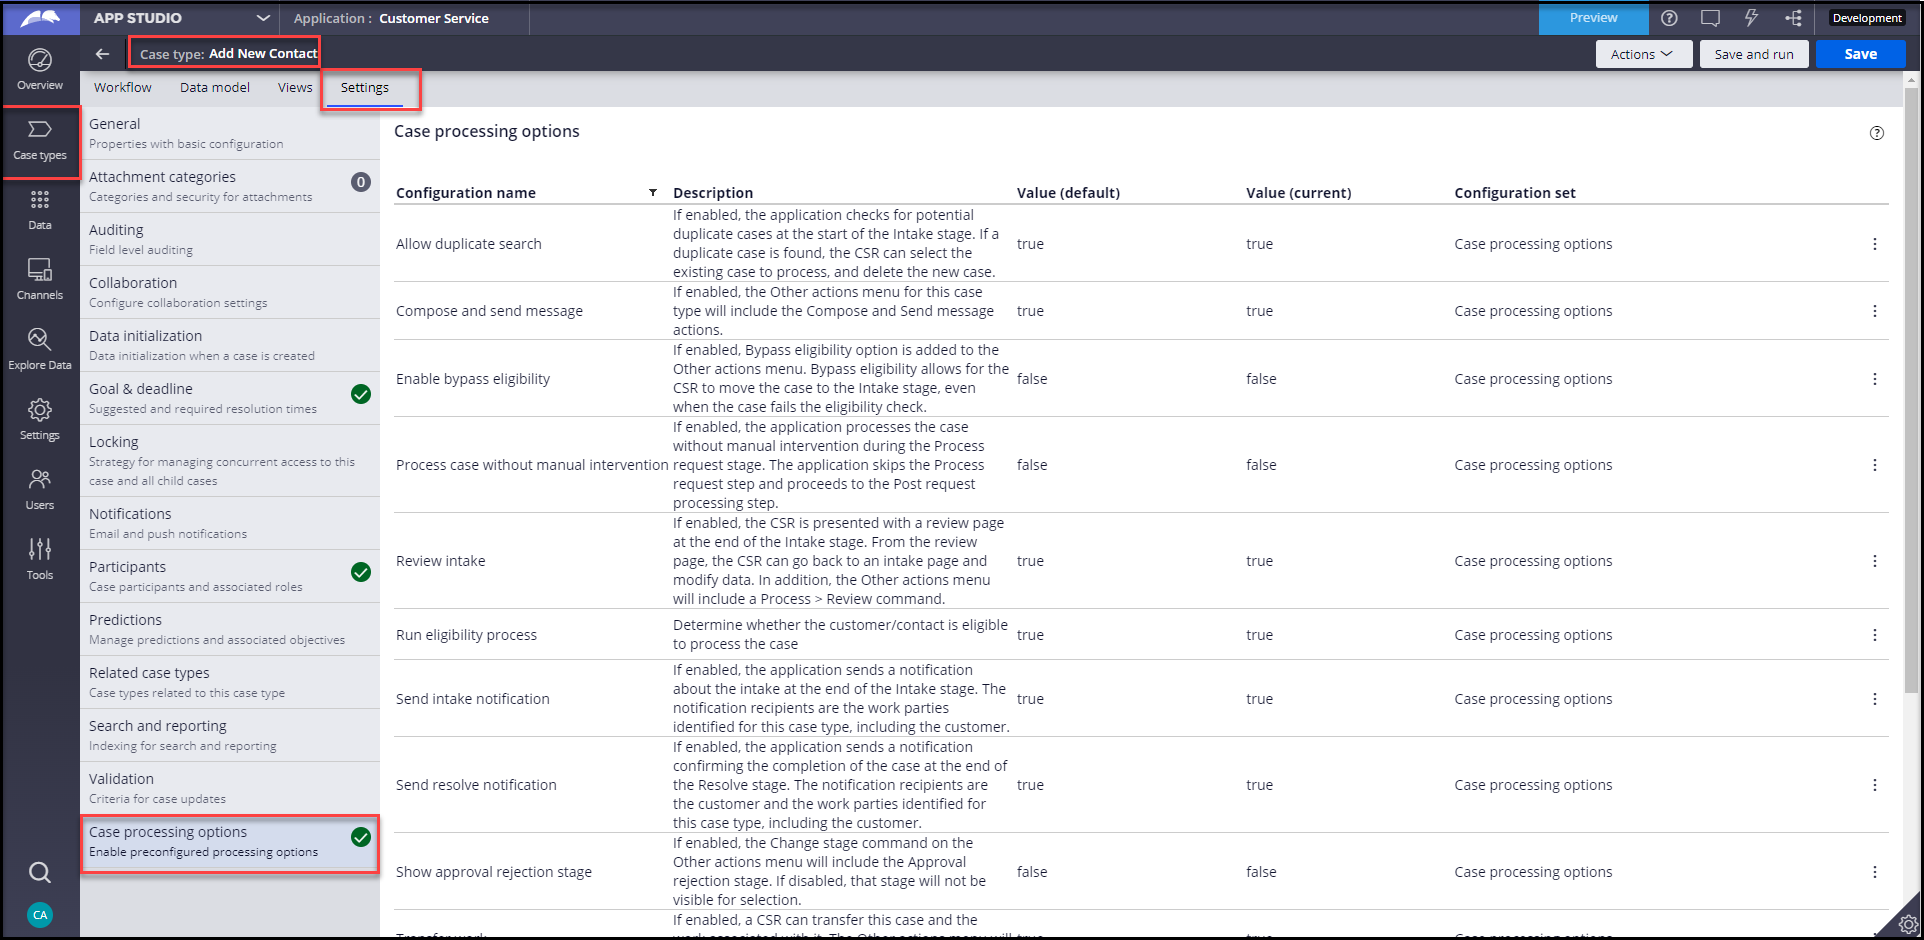
- To change the default value for a setting, click the More icon to the right of the row that contains the setting you want to change, and then click Override default value.
- In the Update setting value dialog box, select or clear the
checkbox, and then click Submit. "OVERRIDDEN" displays next to the
changed value.
The following table describes each switch:
Feature Description Allow duplicate search If enabled, the application checks for potential duplicate cases at the start of the Intake stage. If a duplicate case is found, the CSR can select the existing case to process, and delete the new case. Bypass eligibility If enabled, when a case fails the Eligibility stage and proceeds to the Not eligible alternative stage, the CSR has the option to move the case to the Intake stage, even though it did not pass the eligibility check. Compose and send messages If enabled, the Other actions menu for this case type will include the Compose and Send message actions Review intake If enabled, the CSR is presented with a review page at the end of the Intake stage. From the review page, the CSR can go back to an intake page and modify data. In addition, the Other actions menu will include a command. Run eligibility process If enabled, the application runs the Eligibility stage to determine whether the customer is eligible to proceed with the case. If disabled, the application skips the Eligibility stage. Send intake notification If enabled, the application sends a notification about the intake at the end of the Intake stage. The notification recipients are the work parties identified for this case type, including the customer. Send resolve notification If enabled, the application sends a notification confirming the completion of the case at the end of the Resolve stage. The notification recipients are the customer and the work parties identified for this case type, including the customer. Show Approval rejection stage If enabled, the Change stage command, on the Other actions menu, will include the Approval rejection stage. If disabled, that stage will not be visible for selection. Straight through process If enabled, the application processes the case without manual intervention during the Process request stage. The application skips the Process request step and proceeds to the Post request processing step. Transfer work If enabled, a CSR can transfer this case and the work associated with it. The Other actions menu will include a command. Use new confirm screen If enabled, the application uses the newest confirmation page at the end of the Resolve stage, to confirm that the case is complete. If you require the legacy version of the confirmation page because you have previously customized it to meet your needs, disable this setting. - In the Customer verification section, select a
verification option:
Choices Actions No verification This is the default setting. No customer verification is required for this interaction case type or service case type. Same category for all customers The same customer verification questions are asked for this interaction case type or service case type in all contexts. In the Questions category list, select one category of customer verification questions to ask.
Category is dependent on business condition Different customer verification questions are asked for this interaction case type or service case type, depending on the context. Proceed to the next step.
- If you selected Category is dependent on business
condition, define each possible question category and
condition.
Define the categories in sequence by priority; the first matching condition determines which questions the customer service representative (CSR) asks. The following figure shows a healthcare case type configured to ask different questions based on the customer type, for example, member:
Verification questions vary based on business conditions 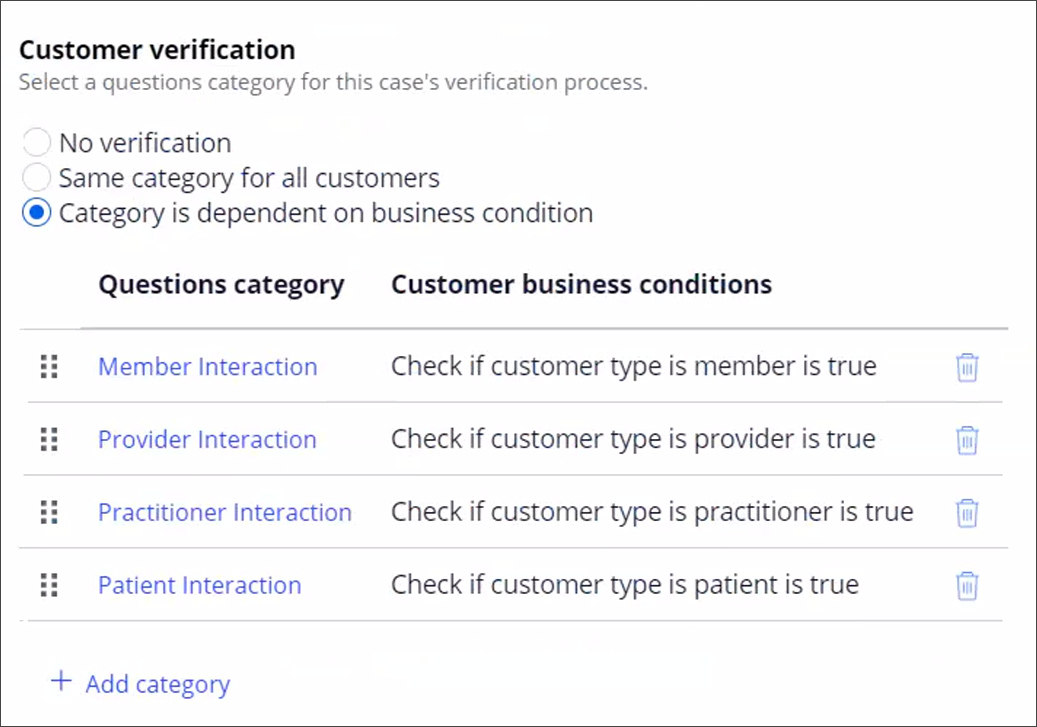
- Click Add category.
- In the Question category list, select a question category.
- In the Trigger when list, select when this
question category is a match:
- Any of the following conditions are met - Call this question category when any of the specified conditions match.
- All of the following conditions are met - Call this question category when all of the specified conditions match.
- Click Add condition.
- From Business conditions list, select a business condition, for example, Account is overdue.
- From the Operator list, select is true or is false, to determine when the condition is a match.
- Click Submit.
- Click Save.
Previous topic Adding a new case type by using the Generic template Next topic Modifying the Send intake and Send resolution notifications