Create and configure a self-service application on the top of Customer Service
self-service application before creating the Digital Messaging and Legacy Webchat bots for
contextual, bot-driven guidance during the initial customer interactions.
Pega Customer Service
Implementation Guide
Pega Customer Service
Implementation Guide
Pega Customer Service
Implementation Guide
Pega Customer Service
Implementation Guide
Pega Customer Service
Implementation Guide
Pega Customer Service
Implementation Guide
Pega Customer Service
Implementation Guide
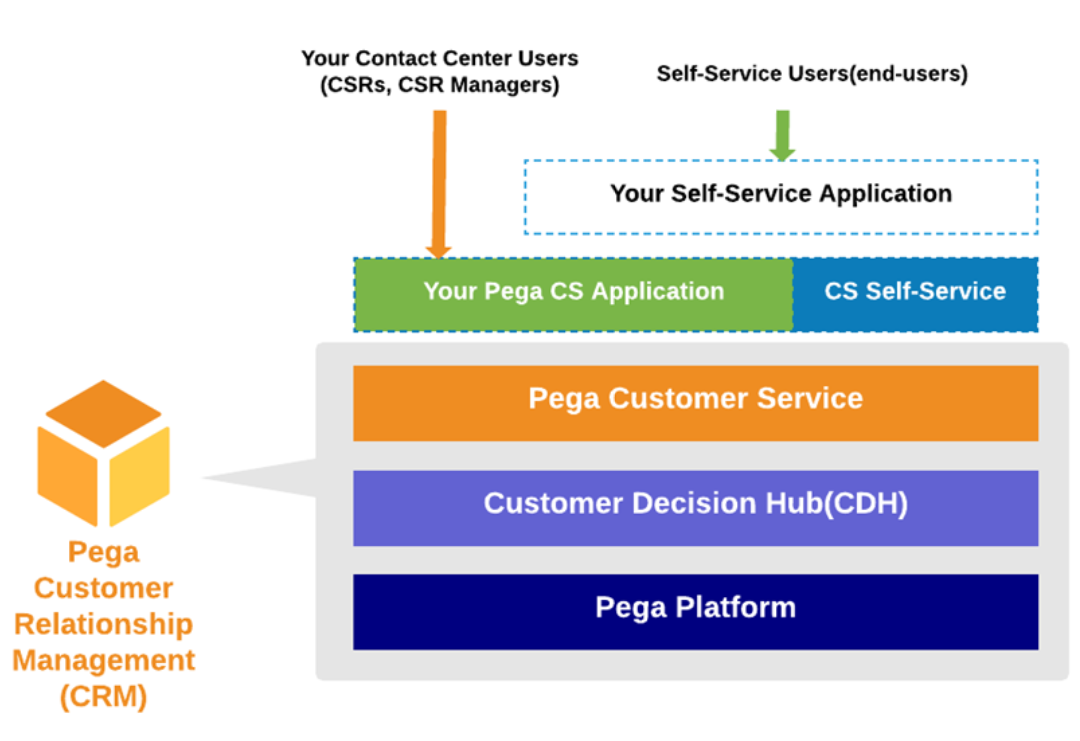
The CS Self-Service application (CSI
Self-Service for the insurance industry), which is the default
self-service application built on the top of the Pega
Customer Service application provides a consolidated platform for the
creation and configuration of multiple self-service channels, such as Legacy Webchat bot
and Digital Messaging in a single application. If you want to use chatbots to
automatically handle your initial customer interaction by providing the contextual,
bot-driven guidance to customers, you must create your customer self-service application
on top of the CS Self-Service application and your implementation
layer of the Pega Customer Service application. Your self-service application leverages
the service cases from your Pega Customer Service and the self-service capabilities such
as bot configurations, conversational flows, and chat window configurations from the
CS Self-Service application. The CS
Self-Service application focuses on helping your customer by providing
the correct information and guiding them to take appropriate action. This approach
reduces the number of escalations to live agents and if an escalation happens, it will
be more focused. You can deploy the Pega Intelligent Virtual Assistant on your website or messaging
channels.
The following figure shows the application stack of your self-service application. It
inherits features from each layer.
CS Self-Service application stack
Application
Users
Description
Components
Your Pega Customer Service application
Contact center users such as CSRs and customer service
managers
Your contact center users such as the CSRs and the contact center
managers process the service cases and get role-based access to
various features in the interaction portal, which is a part of your
Pega Customer Service application.
Case type rules using best practices for the stages
Parallel flows for the chat and messaging channels
Flows including flow action assignments
Flow sections
Your CS Self-Service application
End-users who interact with the chatbot on your website
End users process the service cases from the self-service
application using a conversational UI (question and answers) in the
web chatbot. Both the interaction portal in your Pega Customer
Service application and your self-service application can support
the same service cases with a difference in presentation.
Self-service application supports a slimmed down UI with only
question and answers.
Web chatbot channel configuration
Flows using only the conversational shapes
Trimmed down version of the Flow sections
Ensure that you add the appropriate access group to your administrator operator
record.
Application
Access group
All Pega Customer Service applications except Pega Customer Service for Insurance
For the CustomerService 8.5 application stack:
CSSelfService:Admin
For the CustomerService 8 application stack:
CSSelfService
Pega Customer Service for Insurance
For the CustomerServiceForInsurance 8.5
application stack:
CustomerServiceForIns:CSISelfServiceAdmin
For the CustomerServiceForInsurance 8
application stack: CSISelfServiceAdmin
Pega Customer Service for Financial Services
For the CustomerServiceForFS 8.5 application
stack:
CustomerServiceForFS:PegaCSFSSelfService
For the CustomerServiceForFS 8 application
stack: PegaCSFSSelfService
For more information about adding an access group, see the Configuring access
groups section in this topic.
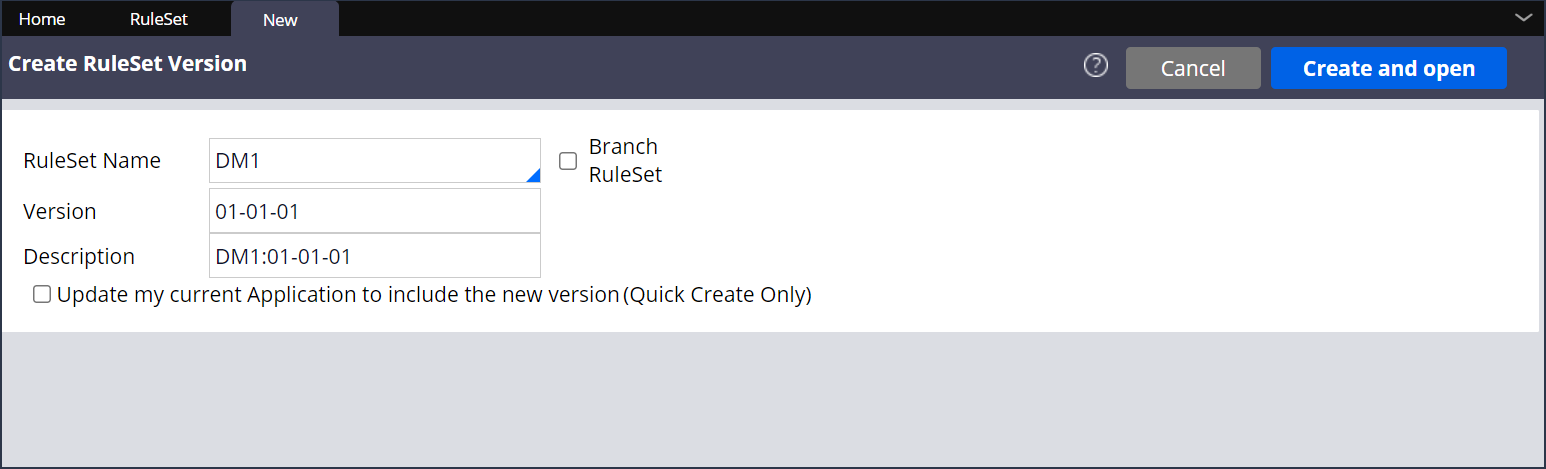
Creating a new ruleset for the self-service application
Create a custom ruleset for the self-service application on the Pega Customer Service
application to customize your self-service application to meet your business needs.
Log in to your Pega Customer Service application with administrator
credentials.
To create a new ruleset for the self-service application, complete the
following steps:
In the navigation pane of Dev Studio, click Records SysAdminRuleSet.
Result: The system displays the Instances of
Ruleset page.
Click Create.
In the Create Ruleset Version page, enter an
appropriate ruleset name in the Ruleset Name
field.
Creating a new rule set in the Pega Customer Service
application
The Version and
Description fields are auto-populated with
default values, which you can edit if necessary.
Click Create and Open.
Result: The system opens a new page Edit Ruleset: <ruleset
name>
Click Save to save the ruleset to the CS
Self-Service application.
Result: The system displays the newly-created ruleset under
RuleSet Name on the Instances of Ruleset page.
What to do next: Build a self-service application on the CS Self-Service
application.
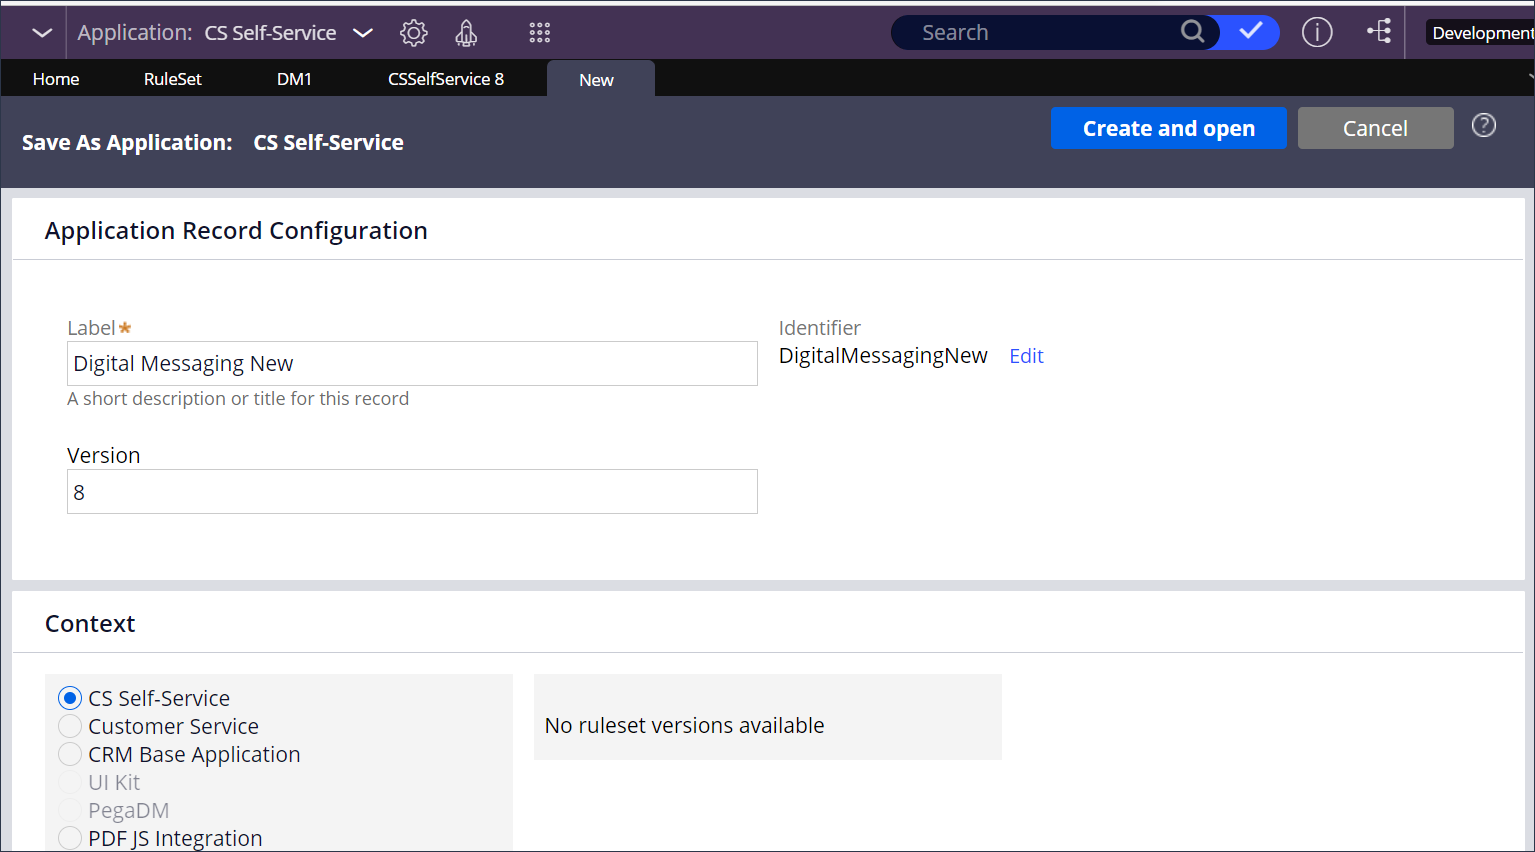
Building a self-service application on CS Self-Service application
Build your self-service application on top of the CS Self-Service application, if you
want chatbots to automatically handle initial customer interaction with contextual,
bot-driven guidance.
After you create a new ruleset for your self-service
application, you then build your self-service application on top of the CS Self-Service
implementation.
Log in to your Pega Customer Service application with administrator
credentials.
Switch to the CS Self-Service application.
On the header of Dev Studio, click
the down arrow beside Application: CS Self-Service and then
click Definition.
Result: The system displays the Edit Application: CS
Self-Service page.
On the Edit Application: CS Self-Service page, click
Save as.
On the Save As Application: CS Self-Service page, in the
Application Record Configuration section, enter the
following fields:
In the Label field, enter a name of the
self-service application that you want to create.
In the Version field, the version number gets
auto-populated based on the selected self-service application.
Ensure that CS Self-Service radio button is selected in
the Context section.
Creating a self-service application
Click Create and open.
Result: The Edit Application page opens for you to
customize the Self-Service application.
On the Edit Application page, on the
Definition tab, perform the following tasks:
In the Name field, replace
CustomerService with
CSSelfService as you are building your
self-service application on top of the default CS Self-Service
application.
In the Application rulesets section, click the
Add ruleset link, and then enter the ruleset
name that you create for the self-service application.
On the header of the page just below Edit application:
<application name >, click Edit
beside the RS field, select the ruleset that you
create for your self-service application, and then click
Ok.
Click Save.
Result: Your self-service application is successfully created on top
of the CS Self-Service application.
Creating access groups for self-service application
When you build a self-service application, you need to create an access group for the
self-service application.
When you create a new access group for a self-service user
operator, ensure that you copy the access roles from appropriate
CSSelfServiceUser access group:
Application
Access group
All Pega Customer Service applications except Pega Customer Service for Insurance
For the CustomerService 8.5 application stack:
CSSelfService:User
For the CustomerService 8 application stack:
CSSelfServiceUser
Pega Customer Service for Insurance
For the CustomerServiceForInsurance 8.5
application stack:
CustomerServiceForIns:CSISelfServiceUser
For the CustomerServiceForInsurance 8
application stack: CSISelfServiceUser
Pega Customer Service for Financial Services
For the CustomerServiceForFS 8.5 application
stack:
CustomerServiceForFS:FSSelfServiceUser
For the CustomerServiceForFS 8 application
stack: PegaCSFSSelfServiceUser
Specifically, you need to include the
PegaCS:SelfServiceUser role to support escalations from the
chatbot to a live agent. In addition, do not reduce the access to the
ChannelServices- and
System-Message-QueueProcessor classes more than what is
included in the PegaCS:SelfServiceUser access role.
Important: Misconfiguration of the Legacy Webchat access group portal could
lead to unintended data exposure! The Pega Customer
Service application's Legacy Webchat provides a blank or empty portal
definition in the CSSelfServiceUser access group. If your
organization has changed or customized the access group portal, ensure that the
activated portal is also blank (that is, ensure that the activated portal contains
no harness or section definitions). For more information, see Pega Security Advisory – B21.
Log in to your Pega Customer Service application with administrator
credentials.
Switch to the CS Self-Service application.
To create an access group for the CS Self-Service application, complete the
following steps:
In the Search bar, search for and click the access group that you will
copy, as specified in the table above.
For example: CSSelfService
On the Edit Access Group: Access Group for CS Self Service
Application page, click Save
as.
In the Save Access Group As section, complete the
following fields:
In the Access Group short description
field, enter a description for your self-service application
access group.
In the Access Group Name field, enter a
name for your self-service application access group.
Click Create and open.
On the Definition tab, in the
Application section, do the following:
In the Name field, select the name of the
self-service application that you create.
In the Version field, specify a version
for the self-service application.
In the Available portals section, add the portals
of your choice, such as Dev Studio or App Studio, by clicking
Add portal.
Note: To switch to App Studio from the Self-Service application, do the
following you must configure App Studio by performing the following
tasks:
In the CSSelfService or CSSelfServiceAdmin access groups,
enable a non-workspace portal (Back Office Portal or B2C
portal) and App Studio (pxExpress).
For the operator, in the Self-Service application, select
CSSelfService or CSSelfServiceAdmin access groups as the
default access group.
For the access group, select App Studio (pxExpress) as the
default portal.
Assign the access group that you create for your self-service application to an
operator for your choice, so that you can you can access your self-service application when
you log in as the assigned operator.
Log in to your Pega Customer Service application with administrator
credentials.
Switch to the CS Self-Service application.
To assign an access group to an existing operator, complete the following
steps:
In the search bar, search for and click the operator for which you want
to assign to the access group.
For example: CASysAdmin
On the Edit Operator ID: <Operator ID> page, on
the Profile tab, in the Application
Access section, add the access group that you create for
your self-service application.
Note: You can also create a new operator for your self-service application by
clicking Save As, and then assign the access group to the new operator. For
more information, Assigning access group to a new operator.
Click Save.
Result: The system displays your self-service application on the
Switch Application menu.
Note: In case, you select App Studio
(pxExpress) as the default portal, the system displays your self-service application
in App Studio when you log in.
Assigning access group to a new operator
Log in to your Pega Customer Service application with administrator
credentials.
Switch to the CS Self-Service application.
To assign an access group to a new operator, complete the following
steps:
In the search bar, search for and click an existing operator.
For example: CASysAdmin
On the Edit Operator ID: <Operator ID> page,
click Save As.
On the Save Operator ID As page, complete the
following fields:
In the Operator ID short description
field, enter a meaningful short description for the Operator
ID.
In the Operator ID field, enter a name
for the Operator ID.
Click Create and open.
On the Edit Operator ID: <Operator ID>
page, in the Contact information section, complete
the Full name and Email
fields.
In the Application Access section, add the access
group that you create for your self-service application.
On the Security tab, click Update
password.
In the Set operator password dialog box, enter the
new password and confirm the new password, and then click
Submit.
Click Save.
Log out of the exiting instance and re-login with the new operator
credentials.
Result: The system displays your self-service application on the
Switch Application menu.
Note: In case, you select App Studio
(pxExpress) as the default portal, the system displays your self-service application
in App Studio when you log in.
Adding case types and work pools
Create a self-service application with required case types, and work pools to build a
consolidated platform for creating and configuring multiple self-service channels, such as
Legacy Webchat and Digital Messaging in a single application.
When you clone the default CS Self-Service application,
the cases and the data of the CS Self-Service application also get cloned to your new
self-service application. To access the cases and data of your self-service
implementation, perform the following tasks:
On the header of Dev Studio, switch
to the self-service application that you create.
Click the down arrow beside Application: <application name
>, and then click Definition.
On the Cases & data tab, you see the cases that are
cloned from the CS Self-Service application.
To escalate a case to a CSR, you must configure the
ChatWithAgent case type, if it doesn't exist already,
by clicking Add item in the Case
types section. Similarly, you can configure other case types
based on your business needs.
Add the same work pools that are in your Customer Service implementation
application, for example, Work,
-Work-Interaction, and
-Work-QualityReview by performing the following
steps:
Open the access group of your self-service application, and then click
the Advanced tab.
Replace the existing work pools with the work pool values of your
Customer Service application access group.
Click Save.
Previous topic
Pega Customer Relationship Management suite of applications