In Customer Service for Communications, an SMS notification to add 2GB of data is
sent to customers who have used more than 80% of their monthly data and have more than 10
days left in their billing cycle. The Add 2GB Data case is
built in the Customer Service for Communications Self-Service application for the purpose of
demonstrating the proactive SMS notification that is sent to a customer. To send proactive
SMS notifications to customers, configure the Add 2GB Data case
type for SMS notification as described in this section.
Pega Customer Service
Implementation Guide
Pega Customer Service
Implementation Guide
Important: Pega does not provide out-of-the-box
capabilities to build the compliance requirements for sending outbound SMS
notifications that are required by local laws and government. Clients must build any
compliance requirements and ensure that customers opt-in before sending them
outbound SMS notifications.
Configuring the Add 2GB Data case type
To configure the Add 2GB Data case type for proactive
SMS notifications, create a CSV file as the input file that contains the list of customers
to whom you want to send an SMS notification. You can structure the CSV file to use the
System of Record (SOR) or integrate with any other systems that are required.
Before you begin:
Note the following:
The server environment should be DMZ-enabled.
Obtain a Twilio account to use for sending the SMS notification.
In the current out-of-the-box implementation, the application creates a case
only when the customer's response is Buy.
The initial SMS notification that is sent using the Twilio API is not saved as
part of the conversation. The subsequent interactions between the customer and
Pega are captured as part of the conversation history only if a case is
created.
Create a CSV file that contains the customer records.
The file should include two columns and a header as shown in the following
figure. The first column has the customer's phone number (including the country
code), and the second column has the customer's account number. A header is
required because the first row is not recognized in the current implementation
of the SMS notification.
CSV file format example
Import the sample DML file from the version 8.7
PegaCRMC.jar file.
In Dev Studio, open the PegaCSCSelfService application
rule.
On the Cases & data tab, add the
PegaComm-FW-CPMCFW-Work-Service-Add2GBData class.
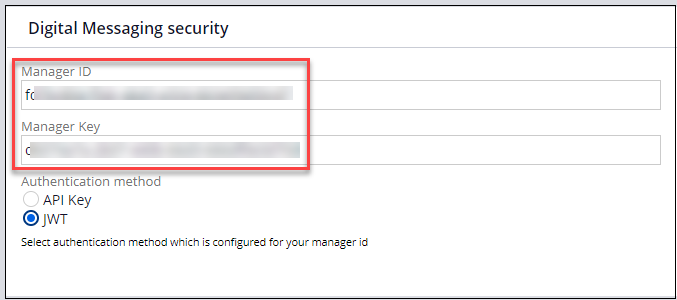
On the Security tab, in the Digital Messaging
security section, enter the Manager ID and Key for your
environment:
Adding the Manager ID and Key for your environment
On the Cases & data tab, enter
Add2GBData in the Name
field:
Adding the Add2GBData case type to the PegaCSCSelfService application
definition
In App Studio, click Settings > Configurations, and then
verify that the Enable outbound SMS notification settings
are correct and meet your business requirements for sending the initial SMS
notification to customers:
Configuration settings for the Enable outbound SMS
notification
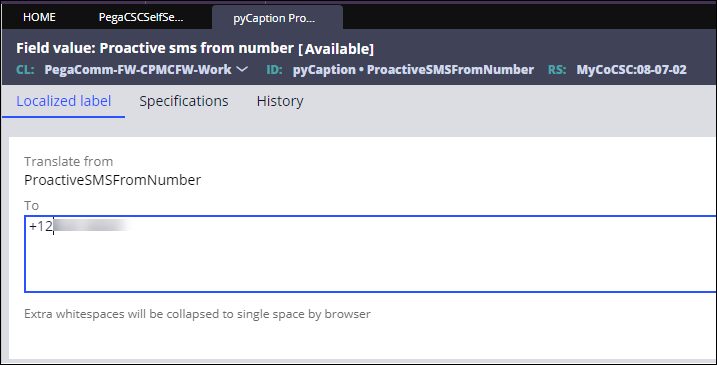
In the header of Dev Studio, search for the
ProactiveSMSFromNumber property, and then enter the
number that you received from Twilio (preceded by the country code):
ProcactiveSMSFromNumber field
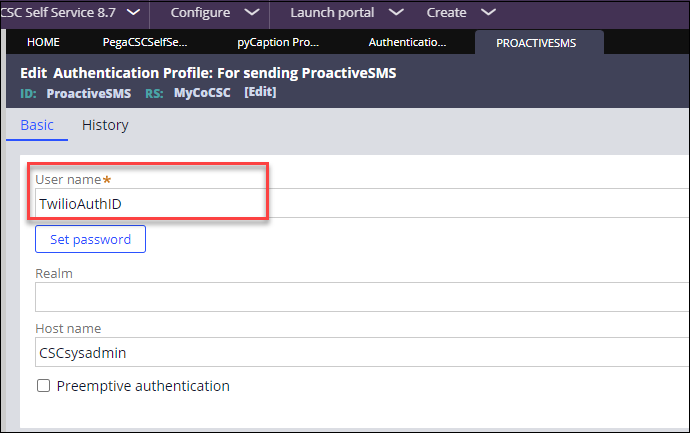
In the header of Dev Studio, search for the ProactiveSMS
Authentication Profile, and then enter the Authentication ID and Key values that
you received from Twilio:
Adding the Twilio Authentication ID and Key values to the
ProactiveSMS Authentication Profile
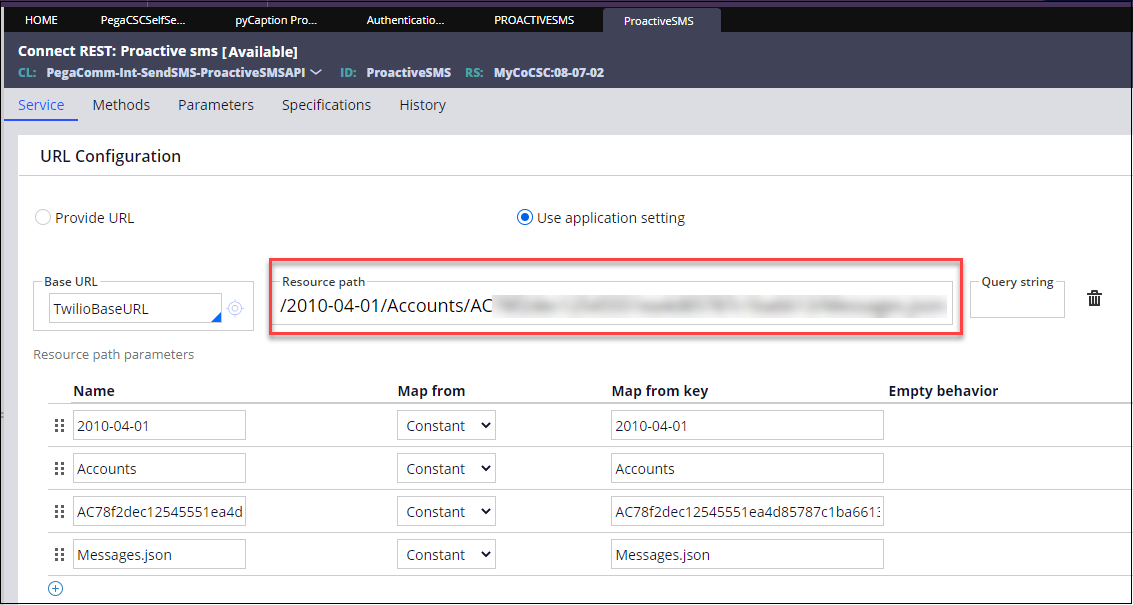
In the header of Dev Studio, search for Proactive sms,
and then open the Connect REST rule type.
In the Resource path field, update the resource path of the Proactive SMS
Connect REST with the authentication ID that you received from Twilio:
Updating the Proactive SMS Connect REST rule resource path
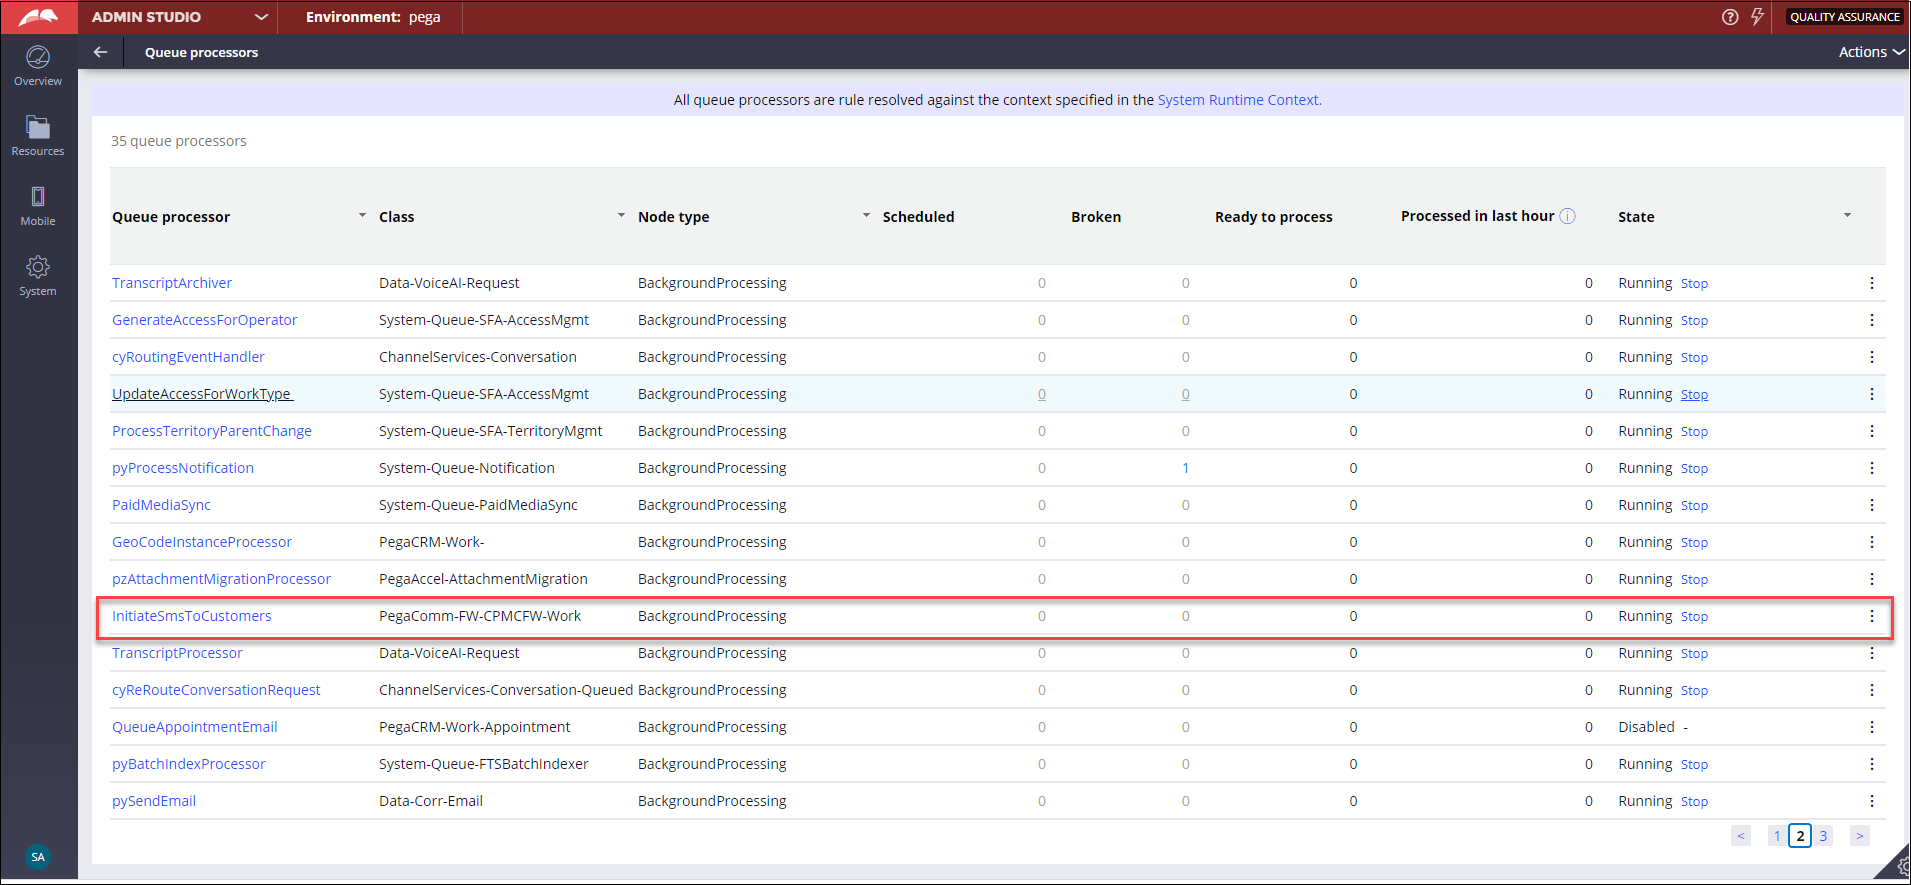
In the navigation pane of Admin Studio, click Resources > Queue
processors, and then verify that the status of the
InitiateSmsToCustomers queue processor is active and
running:
Verifying the status of the InitiateSmsToCustomers Queue
processor
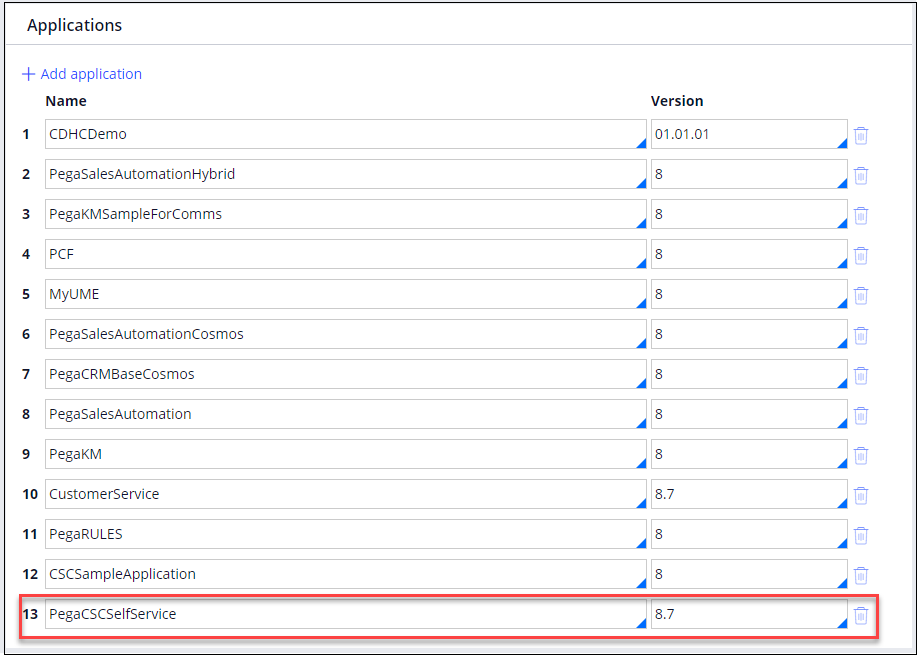
At the top of the Queue processors page, click the
System Runtime Context link to open the
Applications page.
Verify that the Applications page includes version 8.7
of the PegaCSCSelfService application:
Verifying the PegaCSCSelfService application version
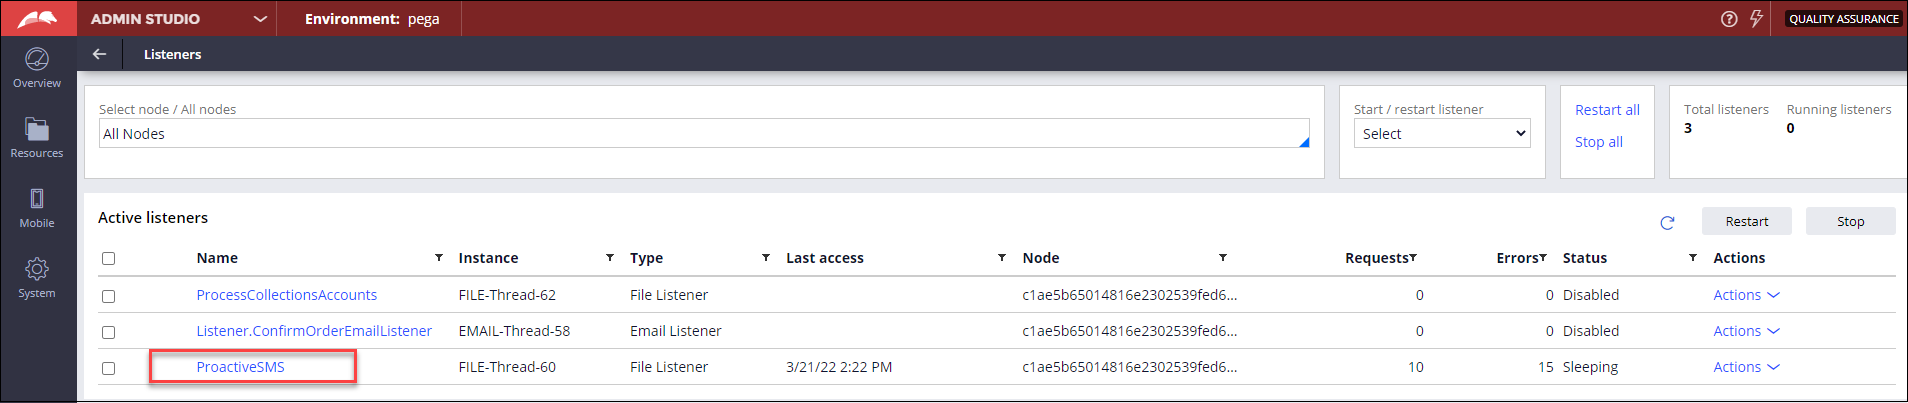
In the left navigation pane, click Resources > Listeners and verify that the status of the ProactiveSMS File listener is
active and running:
Verifying the status of the ProactiveSMS File listener
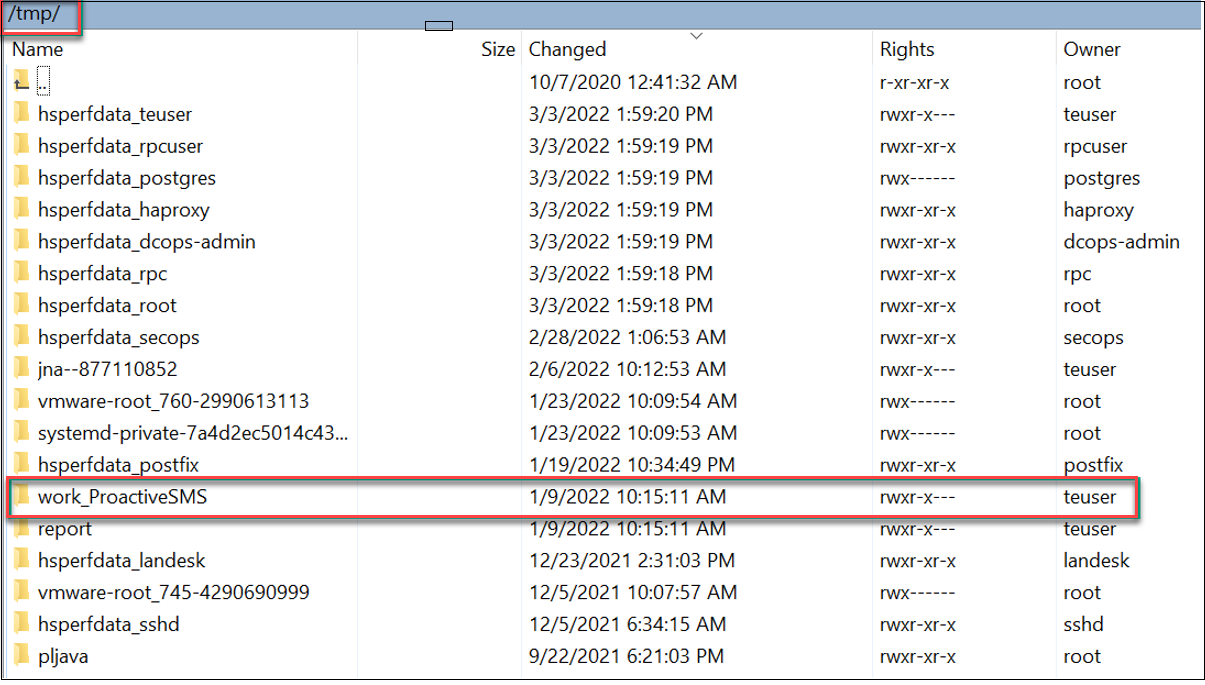
Log in to any file transfer application such as WinSCP or Filezilla.
Open the /tmp/ folder and ensure that the ProactiveSMS
folder name has the same format as the folder shown in the following figure.
This folder is created when the file listener runs and automatically picks the
CSV file to execute.
Proactive SMS folder name format
Note: To allow Pega to access the CSV file, ensure that
the Pega user is the owner of the folder and the file. If the file listener
does not pick the file after making the Pega user the owner, try granting
0777 access to the file and the work_ProactiveSMS
folder.
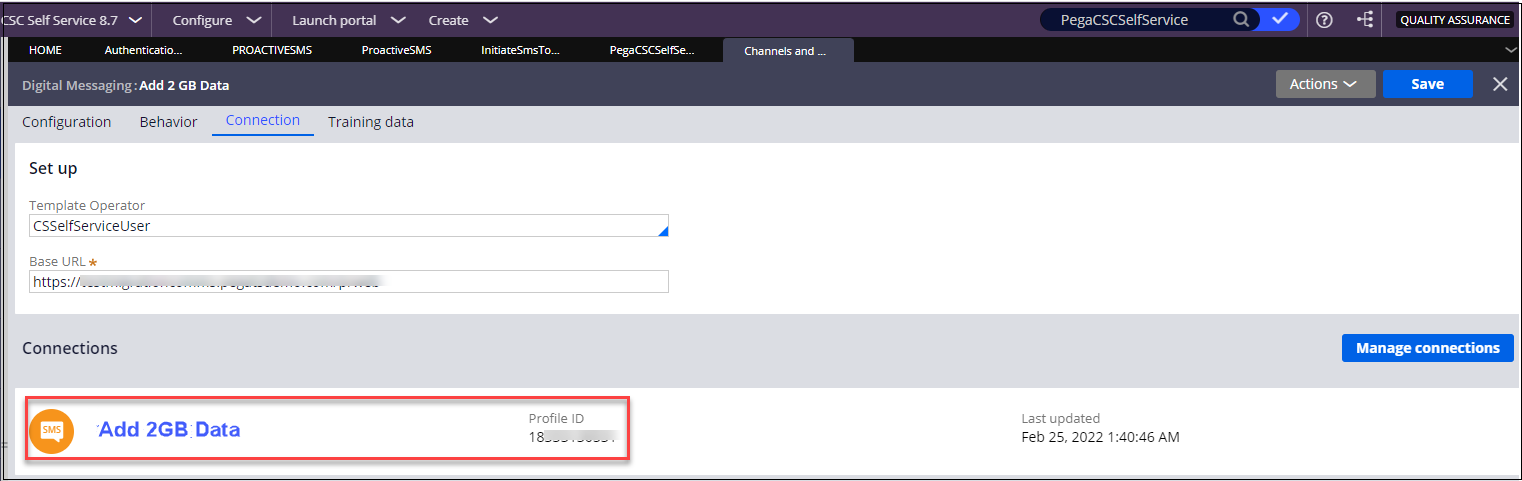
In Dev Studio, open the PegaCSCSelfService application, and then click Configure > Channels and interfaces.
In the Add 2GB Data Messaging Channel, configure the
Twilio setup:
Note: The following images might vary depending on the
version of the Pega Customer Service for Communications application on which
you are implementing the case.
On the Connection tab of the Add 2GB
Digital Messaging page, click Manage
connections.
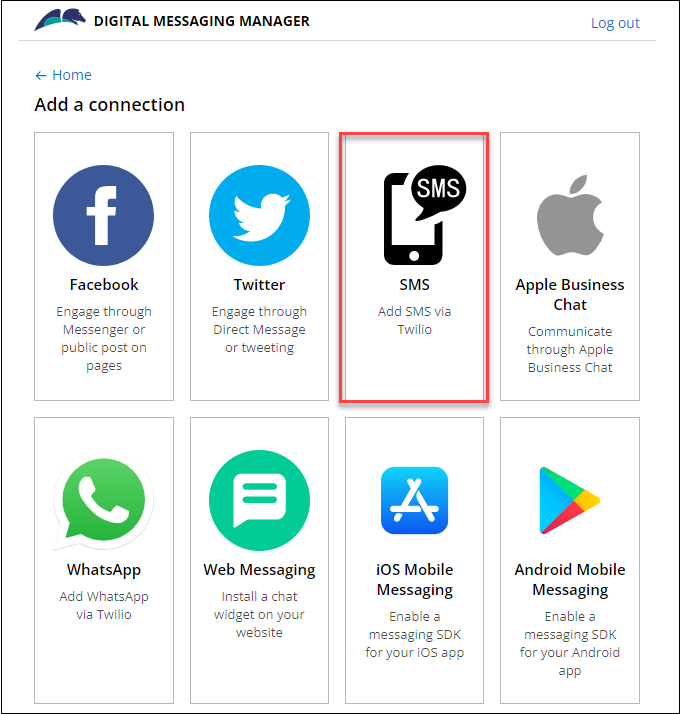
On the DIGITAL MESSAGING MANAGER page, click
Add connection:
Creating a Digital Messaging connection
On the Add a connection page, click
SMS:
Connecting the SMS Messaging channel
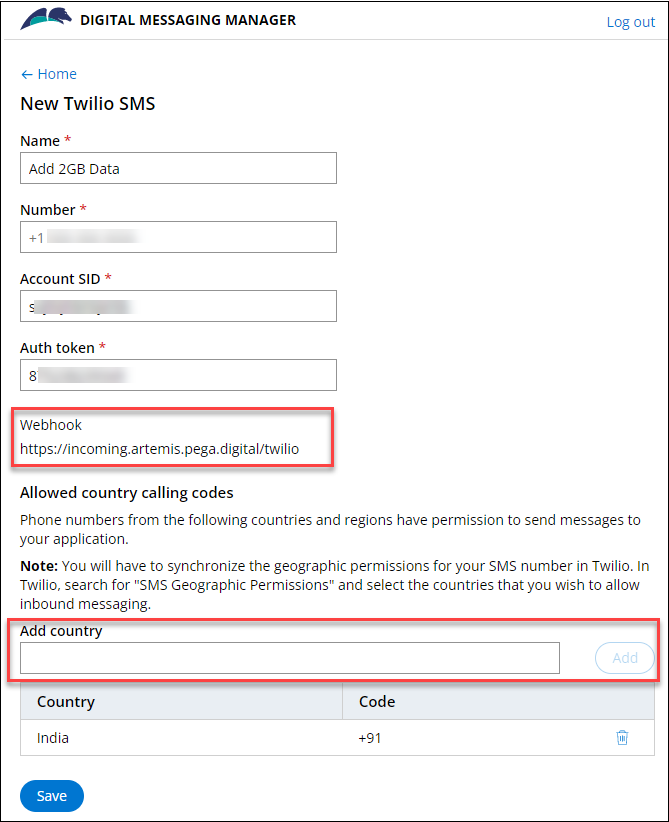
On the New Twilio SMS page, verify that the
Webhook URL is the same as the Manager Key and ID of the
application.
In the Add Country field, select a country and
then click Add to add the supported country code
for receiving the response from customers to the corresponding Twilio
number:
Adding the supported country codes to the Twilio number
When successfully added, the Twilio number is visible on the
Connections tab of the Messaging Channel: Twilio number visible on the Connections tab of the Messaging
Channel
You can view all SMS conversations on the clipboard for the specific
interaction that was created.


 When successfully added, the Twilio number is visible on the Connections tab of the Messaging Channel: