Create a Web Messaging connection in Digital Messaging Manager of your Digital
Messaging interface and configure the general and security settings for the connection. Once
you have configured the settings, install the Web Messaging widget onto the client's website
using the JavaScript code available on the Installation tab in Digital Messaging Manager.
Pega Customer Service
Implementation Guide
Pega Customer Service
Implementation Guide
Pega Customer Service
Implementation Guide
Pega Customer Service
Implementation Guide
Pega Customer Service
Implementation Guide
Pega Customer Service
Implementation Guide
Pega Customer Service
Implementation Guide
Pega Customer Service
Implementation Guide
Pega Customer Service
Implementation Guide
Pega Customer Service
Implementation Guide
Configuring general settings
Set up a Web Messaging connection by performing the following steps:
When you add a new Web Messaging connection, the system
displays a New Web Messaging section on the Digital Messaging Manager page. Configure
different settings available as tabs in the New Web Messaging section to set up Web
Messaging.
Perform the following steps to configure general settings:
On the General tab, in the Name
field, enter the name of the connection.
In the Appearance section, from the Primary
color palette, pick a color for the new chat widget.
Result: The system applies the selected color to the chat header and icons.
In the Chat headings section, perform the following
steps:
In the Language list, select the language of
your choice.
Note: In order to add more languages, select the languages in the
Support languages list on the
Configuration tab of your Digital
Messaging interface.
In the Chat heading field, enter the text that
should display on the chat header.
Click Save. The system displays the message
Chat account successfully created.
Note: When you save the changes, the system displays the connection name above
the settings tabs. The system also shows the Sound
notifications and Company logo sections
and makes the additional tabs available when you click
Save.
Configure sound notifications when messages arrive in the chat window by
performing the following steps:
In the Sound notifications section, in the
Choose when to play list, select
Don't Play Sound Notifications,
Play On Every Message, or Play
Only When Not Visible.
If you selected to play a sound for every message or only when the chat
window is not visible, in the Select sound list,
select one of the predefined sounds.
To hear the audio of the selected predefined
sound, click the Play icon.
In the Company logo section, perform the following steps
for the company logo to appear on the Web Messaging chatbot header:
To display the company logo on the Web Messaging chatbot header, select
the Display company logo check box.
Note: Uncheck the check box if you do not want the company logo to
appear in the Web Messaging chatbot header.
To upload the image of the company logo, click Upload
Image.
Note: The image must be square, with a file size of 500kb maximum.
Supported image types are: jpg,
jpeg, and png.
If an image already exists, uploading a new image replaces the old
image.
Note: To delete the Web Messaging connection, click
Delete connection.
In the Widget configuration section, toggle the settings
of the following features to control their display in the widget:
To display the emoji picker in the Web Messaging, select the Enable
emojis check box.
When disabled, the emoji icon will not appear below the reply box in
the web messaging widget, and customers will be prevented from using it
to choose emoticons to add to their messages.
To control the display of Powered
by Pega in the widget footer, select the
Display Powered by Pega check box.
To display a typing indicator in the chat window
to users before the system sends the chatbot response, select the
Display typing indicator checkbox.
Configure the widget position and button type on the webpage:
In the Widget position list, select the
position on the webpage where you want to display the
widget.
In the Widget button type list, select
the button type for the widget.
If you select a text button type, in the Text
orientation list, select the text
orientation.
If you select a text button type, in the Button
text field, enter a label for the button, and
then click Save.
Channel switching
The Channel switching feature lets you add pre-configured messaging channels, such
as Facebook, WhatsApp, Apple Business Chat, and SMS, so that the customer can transfer the
interaction to those channels from Web Messaging during the live conversation. When you add
messaging channels under the Conversation transfer section of the Channel switching tab in
Digital Messaging Manager, these channels appear in the Channel switching menu in the live
Web Messaging widget. The customer can start interacting in the Web Messaging widget but
later choose to switch the interaction to any configured messaging channels without losing
the interaction.
Note: The czSwitchDestination property used in
czSetConversationData data transform holds the destination
value of digital channels (Facebook, WhatsApp, Apple Business Chat, and SMS) to
which the Web Messaging widget can switch. Optimize this property for the
implementation classes: PegaCA-Work,
PegaCA-Work-Interaction, and
PegaCA-Work-Interaction-Social.
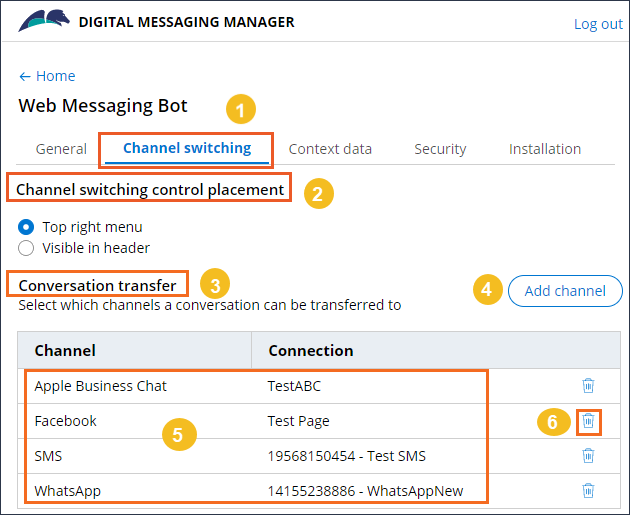
Configuring Channel switching
You can see Channel switching tab and its options in
the following figure: Multiple channels for Channel switching menu
In the Digital Messaging Manager, on the
Channel switching tab (1), place the channel
switching controls in the web messaging widget:
In the Channel switching control placement
section (2), select either of the following options:
Channel switching controls placement
Options
Description
Top-right menu
Displays the channels that you configure in
the top-right menu of the web messaging widget.
Visible in
header
Displays the channels that you configure as
icons in the header of the web messaging widget.
To add a pre-configured channel, in the Conversation
transfer section (3), click Add
channel (4).
In the Add channel dialog box, perform the following
steps:
From the Channel list, select the required
channel.
In the Connection section, select the required
pre-configured channel connection, and then click
Submit.
Result: In the Conversation transfer section,
the system displays the added channel(s)/connection(s) (5).
Optional: To delete a connection, click the delete icon (6) next to the
connection.
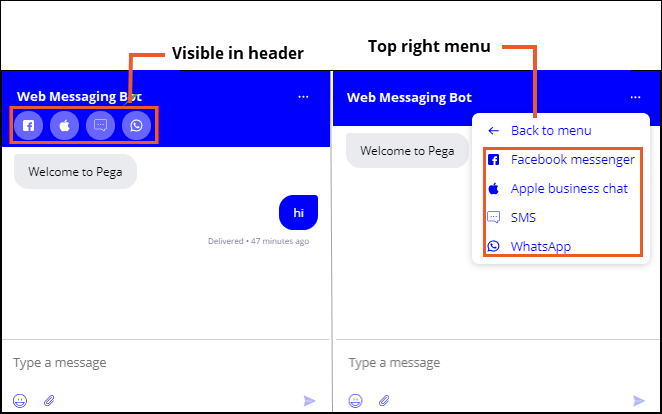
After you enable channel switching, the channel switching menu appears in
the Web Messaging widget:
Channel switching controls placement
Context data for Web Messaging
The Context feature in the chat panel header captures the customer's metadata and
sends that data from Web Messaging as a payload through the messaging API. The system
collects this context data before the live conversation, and presents it to the CSR in an
overlay as valuable insight. This feature gives the CSR the option to deduce the customer's
intent on approaching the contact center, even before interacting with the customer.
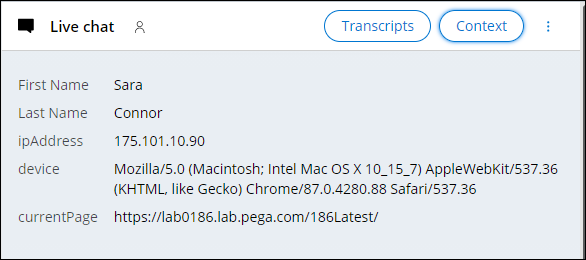
Chat context data overlay
In the above figure, when the CSR clicks the Context button, the system presents the
CSR with the customer's general information in an overlay with fields for their IP
address, device, and the current page. The CSR also receives customized values, such
as First Name and Last Name, which helps the CSR identify the customer. The CSR
admin can also configure customized values such as the Contact reason, so that the
CSR can deduce the reason why the customer approached the contact center before
their conversation. For example, a customer wants to book a flight on an airline
website. In that case, the admin can configure the following fields in context data
to obtain the customer information before any conversations occur:
Departure airport: BOS
Destination airport: HEL
Trip type: Round trip
Reason for chat: Need assistance in booking a ticket
Note: The system captures the customer's first payload and stores it with the
interaction. Once the CSR ends the interaction, the CSR can then view the
interaction's chat context data by opening that interaction in the Interaction
Portal. The system adds the chat context data as an attachment to the interaction,
where the CSR can view the customer's first payload.
Configuring context data
Configure the chat context data (the customer's metadata) to help CSRs analyze
customer intent before starting a conversation. The general chat context data points will
work without any website configuration, but custom tags require implementation on your
website.
Note: Chat context data is only available from the
Pega Customer Service version 8.6.
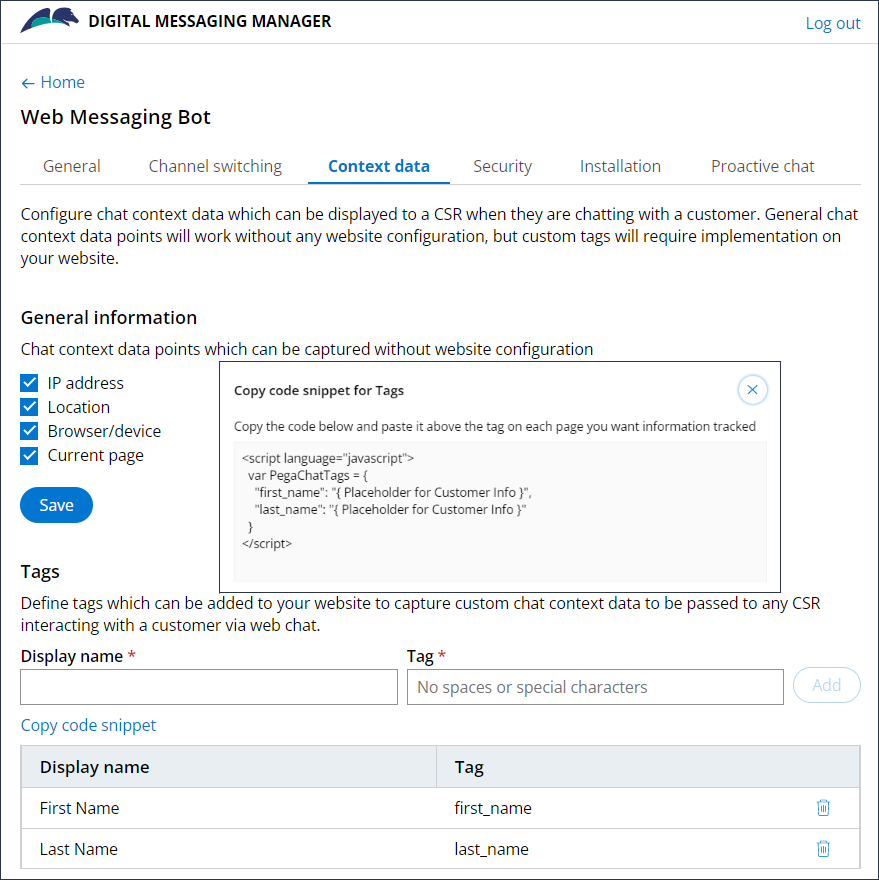
The
following figure illustrates the Context data tab in Digital Messaging Manager. The chat context data tab
To configure the general context data points and the custom chat context data,
perform the following steps in the Digital Messaging Manager:
On the Context data tab configure the following
settings:
In the General information section, select one or
more options from the following chat context data points, which the
system captures without any website configuration:
Context data points
Context data point
Description
IP address
The IP address of the customer's device
Location
The customer's location
Browser/device
The browser or the device from which the customer
is interacting
Current page
The name of the web page in the website from
which the customer is interacting.
Click Save.
Result: The system displays a message General Information
successfully updated.
In the Tags section, perform the following steps to define
the tags that you want to add to your website, to capture the custom chat
context data that is passed to the CSR when interacting with a customer using
web messaging:
In the Display Name field, enter the data point
name.
In the Tag field, enter the tag that corresponds
to the display name field.
Note: The Tag field must have alphanumerical
characters without any spaces and special characters. This field is
embedded in the website code.
Click Add to add the newly entered values under
the Display Name and Tag
fields.
Click Copy code snippet to copy the code with
display names and tags to the web page from where you want the system to
track the customer's information.
When you click Copy code snippet, the system opens a
new pop-up window containing the code that you must copy.
Configuring security settings
Configure security settings by performing the following steps:
In the Allowed domains section, in the New
domain field, enter the URL of the website that is valid to
render the new chat widget, and then click Add. The
system displays the website under Domains.
You can add more than one domain to the Allowed domains
section. Adding the domains here validates that the websites can securely render
the Web Messaging widget on their web pages. The widget will not load on any
websites except for the sites configured in this section. If you do not enter
any domain, or enter "*", the Web Messaging widget renders on any website.
In the Allowed cookies section, in the New
cookie field, add the cookie that allows passing information
between your website and the Pega Customer
Service implementation, and then click Add.
The system displays the newly-added cookie under Cookies.
You can add more than one cookie to the Allowed cookies
section.
In the JWT Secret section, click Show JWT
Secretto view the token.
You can use JWT API token to sign requests while exchanging private data.
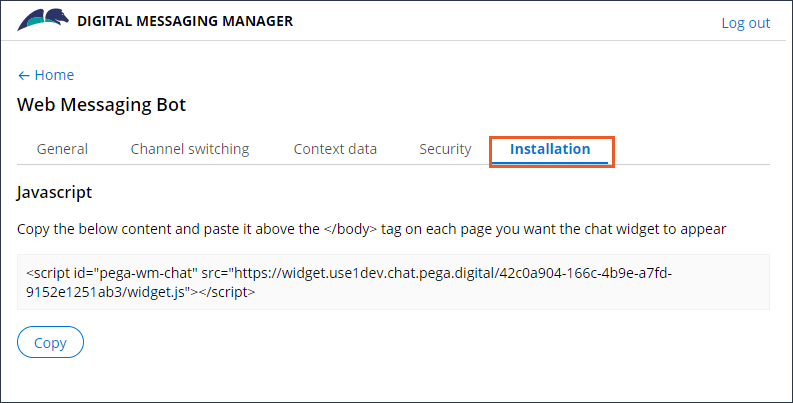
Installing Web Messaging widget
Web Messaging installation is the process of adding the web messaging bot to the
client website pages.
On the Installation tab, in the
JavaScript section, click Copy
to copy the code and paste it above the </body>
tag on each webpage where you want the Web Messaging widget to appear.
Displaying the Web Messaging widget code snippet
Close the window.
Result: The system displays the newly-created Web Messaging
connection in the Connections section in Digital Messaging
Manager.
What to do next: Refer to a sample usecase which shows configuring a web
messaging connection and embedding the code on the customer's website. For more
information, see Configuring a Web Messaging
connection.
Proactive chat for Web Messaging
Add triggers for the Web Messaging widget on your website by using proactive chat,
where the chatbot offers chat to a customer based on the specified conditions. For example,
you can configure a proactive chat that triggers when a customer is on the website for five
or more seconds based on your business requirements.
Configure a chatbot command in your Digital Messaging interface to call when the proactive chat is triggered
by performing the following steps:
On the Configuration tab of your Digital Messaging
interface, click Add response.
For example: proactive_5s
Result: The system opens the Response configuration window.
In the Response configuration window, configure the
Response type, Response
command, and the Response text fields,
and then click Submit.
Note: After you set the response command for the proactive trigger, add the
response command as the chatbot command to the trigger that you create in
the Digital Messaging Manager.
Configuring proactive chat in Digital Messaging Manager
Configure the proactive chat in the Digital Messaging
Manager:
In your Web Messaging connection, click the Proactive
chat tab.
Click Add Trigger.
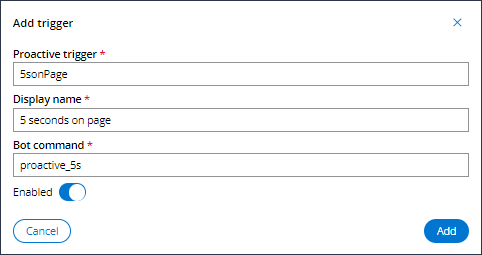
Result: The system displays the Add trigger dialog box.
Add trigger dialog box
In the Add trigger dialog box, configure a trigger:
In the Proactive trigger field, enter the
trigger that you want to add your website in the code snippet.
In the Display name field, enter the label to
identify the trigger.
In the Bot command field, enter the chatbot
response command that you configure to associate it with the proactive
trigger.
Select the Enabled switch to enable the
trigger.
Click Add.
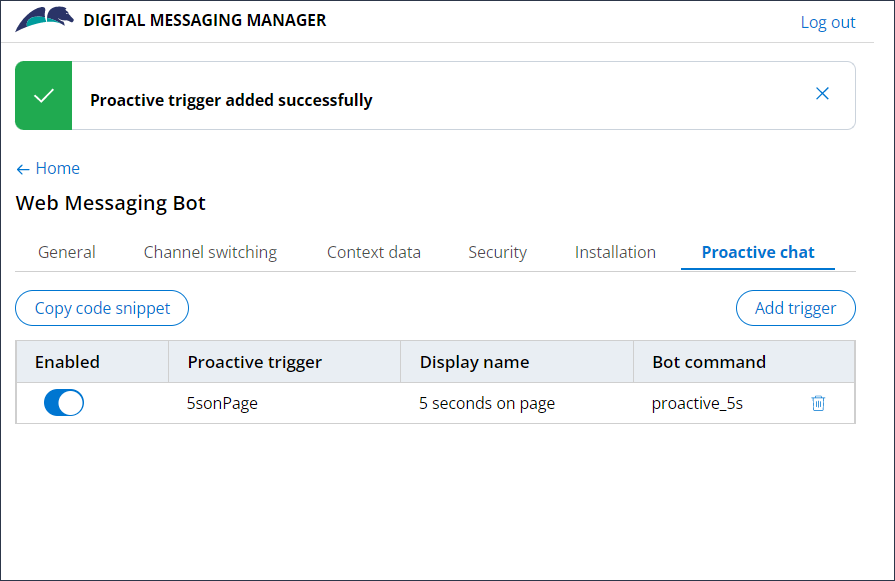
The following figure shows a trigger for the proactive chat:
Proactive chat for Web Messaging in Digital Messaging
Manager
Note: After you add a trigger in Digital Messaging Manager, copy the code
snippet by clicking Copy code snippet, and then embed
the JavaScript code in your website to activate the proactive chat for Web
Messaging.
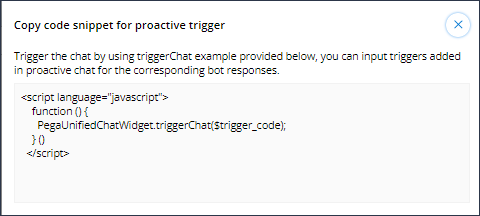
The following JavaScript code shows the snippet to copy and embed in your
website. Replace "$trigger_code" in the code with the proactive trigger. In this
example, it is 5sonPage.Code to trigger proactive chat