Plans
In Pega Product Composer for Healthcare, you configure a plan for a specific customer or to meet a mandated requirement. When you configure a plan, for example, if you have a small number of core products that can result in hundreds of plans for large accounts and thousands of plans for small groups and individuals, using a product facilitates the efficient building of plans.
By using a product to build a plan, the plan inherits the values that are defined in the product. A plan is the most specific level of information which contains networks, benefits, and cost shares. Health insurance organizations sell plans to groups or individuals.
View the default benefit coverage levels and determine if you need to perform tasks in thecreate additional benefit coverage levels section.
For information about how inheritance works, see How values are populated in Pega Product Composer for Healthcare entity fields.
For information about REST APIs, see Product Composer for Healthcare REST APIs.
Entering details for a plan
Configure a new plan by using an approved product or copying an approved plan, which helps you build the plan more quickly because you inherit values from the product. A product outlines the network structure, list of benefits, cost share ranges and defaults, and accumulator design that support the new plan.
- In the header of Dev Studio, click .
- In the left navigation panel of your workspace, click .
- Select the method for creating the plan. If you select Create from product, some fields are filled in because the plan inherits from the product.
- Enter a name. For a new version of a plan, you can keep the same name as the old version but you must change the effective dates. For a new plan, even if you have different effective dates, you cannot have the same name as another plan.
- Complete the basic information that describes your organization such as effective date,
line of business, and coverage levels.
The following figure shows the creation of a plan by copying a product:
Plan- created from product 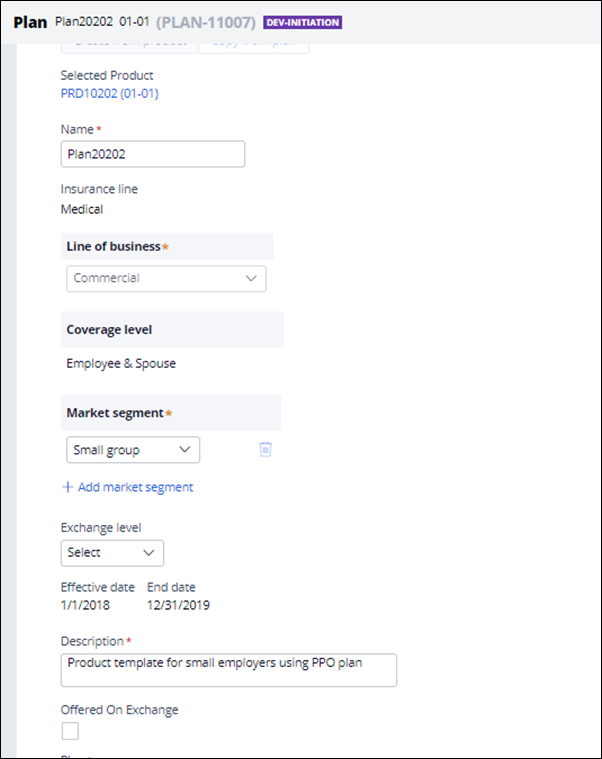
- To populate the Market segment field, click the Add a
row icon to make the field available. Then select an option from the
list.If you select Medicare in the Market segment field, you must select your rating in the Medicare star rating field.
- Complete the remaining fields, and click Save to complete your product at a later time or Continue to configure cost shares and accumulators.
Configuring cost shares for a plan
Configure the custom individual cost shares for your plan by selecting the appropriate cost share types with values. You can keep the current inherited values from an existing product or plan, or you can override them.
In addition to overriding cost shares, you can override the values of the accumulators, the order of applying cost shares during claim adjudication, and information for the coordination of benefits. You can also override the default order of cost shares for a specific benefit.
Existing network guardrails are applied when plans are configured by using a product. For example, you can apply a rule that requires the copayment for in-network expenses to be less than or equal to the copayment for out-of-network expenses. When you build a plan by using a product, this rule is applied during the cost share selection process on the networks screen.
-
To change any of the inherited values, click
Edit.
- In the Configure or modify coverage dialog box, select the
check boxes for the cost shares, accumulators, order of applying cost shares during
claim adjudication, coordination of benefits, and authorization that you want to
change.If you select the Accumulators check box, a Configure the contributions of icon appears on the Plan cost shares page. When you click it, you can select the check boxes to specify how the cost shares accumulate.
- Click Submit.
- Based on your selections, complete all the fields that you selected for editing on the Plan cost shares page.
- Optional: To restore the values to those of the product template, click Restore and clear the check boxes for which you are restoring the inherited values. Click Submit.
- In the Configure or modify coverage dialog box, select the
check boxes for the cost shares, accumulators, order of applying cost shares during
claim adjudication, coordination of benefits, and authorization that you want to
change.
- Click Save to complete your plan at a later time or
Continue.
The following figure shows the cost shares step within the plan wizard:
Plan - cost shares 
Modifying the network cost shares for a plan
Modify the values for the network coverage and guardrails that are defined in the plan and make changes if necessary. For example, you might want to define the cost shares at the network level when several benefits always have a $50 copayment for out-of-network services. Instead of configuring this copayment for each benefit, configure it at the network level of the plan.
Each network line displays the source of the cost share values, as described below:
- If the cost shares for the network are inherited, an abbreviation for product or plan appears in the Inheritance column.
- If the cost shares are not all inherited and you manually entered some of them, a
Click to review the inheritance pattern icon appears in the
Inheritance column. When you click the icon, any cost share value
that has been overridden is displayed with this mark
 to
show that the inheritance has been broken.
to
show that the inheritance has been broken.
Additionally, you can add or modify variations and network details that are specific to the selected network. And you can control accumulation across the networks.
If network guardrails are defined in the product or the plan, they appear in the Guardrail summary section. If the values are outside the defined guardrails when you are configuring network cost shares, validations are triggered.
- In the Network cost shares step of the plan wizard, in the
Networks section on the Configure networks
page, click a network name link to update coverage at the network level.
The following figure shows network configuration within the plan wizard.
Plan - networks 
- To modify covered and required services:
- In the Coverage section, click the Set services required link or the Set services NOT required link, and click OK in the confirmation dialog box.
- In the Coverage section, click the Set services covered link or the Set services NOT covered link, and click OK in the confirmation dialog box.
- Click Submit.
- If you are not making any other changes to the networks, click Continue.
- To modify the coverage values that you set in the product template:
Plan - configure network details 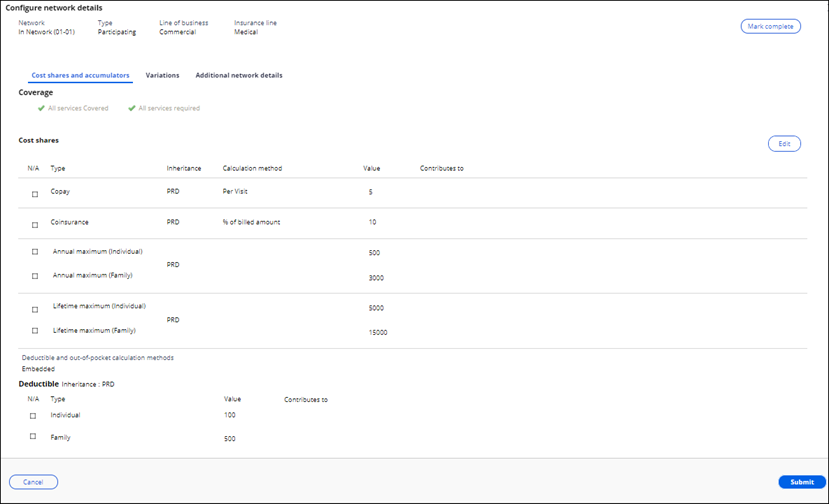
- On the Configure network details page, on the Cost shares and accumulators tab, click Edit.
- In the Configure or modify coverage dialog box, select the check boxes for the values that you want to modify, and then click OK.
- On the Configure network details page, modify the values as needed in the selected sections, click Save, and then click Submit.
- Optional: To restore the original values, click Restore. In the Clear the check boxes to restore values dialog box, clear the check boxes that you previously selected, and click OK.
- On the Configured network page, click Save and Mark complete when you are finished editing the coverage values for networks.
- For each network whose coverage you are modifying, on the Configure networks page, click the network name link and repeat these steps.
- Click Continue if you are not making any other changes to the networks.
- To add variations:
- On the Configured network details page, click the Variations tab and click Edit.
- Click Add variation.
- Name the variation, provide the effective and end dates, select the check box for the type of variation, and select a condition type.
- Complete the corresponding fields that appear, based on your selections, and click OK.
- Repeat steps b through d for each variation that you are adding.
- Click Save, then click Mark complete when you are finished adding or editing the variations for the specified network. Click Submit.
- For each network to which you are adding variations, on the Configure networks page, click the network name link and repeat these steps.
- Click Continue if you are not making any other changes.
- To edit network details:
- On the Configure network details page, click Edit.
- Click the Additional network details tab, and then click Edit.
- Complete the fields, click Save to save the changes, click Mark complete, and then click Submit.
- For each network to which you are adding details, on the Configure networks page, click the network name link and repeat these steps.
- If you have finished making changes, on the Configure networks page, click Mark all as complete, and click Continue.
Configuring benefits for a plan
Although each benefit or grouper inherits the cost share values from the product template or product or from the values that you modified when defining the network, you can modify them at the benefit level. You also define the benefit- or grouper-specific values that are not inherited. In addition, you can add new benefits or benefit groupers.
You can make changes to coverage and policies, provide additional information that is related to benefits, and provide details for compliance, support documentation, and claim instructions.
Additionally, you can set services that are covered and set services that are required.
- To add a benefit or grouper, follow these steps:
- Click Add benefit/grouper.
- Complete the fields in the Add Benefit/Grouper to benefit tree window to add the grouper or benefit and click Submit.
- To modify the coverage of a single benefit, a grouper that contains multiple benefits,
or one benefit within a grouper, follow these steps:
- On the Configure groupers and benefits page, click the Configure item icon to the right of the benefit or grouper name.
- In the Configure details for plan window, click the network for which you are modifying the benefit coverage.
- In the expanded Configure details for plan window, click Edit.
- In the Configure or modify benefit-specific coverage dialog box, in the To edit, select one or more check boxes for corresponding fields section, select the Covered and required check box and click OK.
- Based on the specified benefit or grouper, click Covered
or Not covered. The shaded button shows the current setting.
- Click Mark complete, and then click Submit.
- To modify the requirement for services of a single benefit, a grouper that contains
multiple benefits, or one benefit within a grouper, follow these steps:
- On the Configure groupers and benefits page, click the Configure item icon to the right of the benefit or grouper name.
- In the Configure details for plan window, click the network for which you are modifying the benefit requirement.
- In the expanded Configure details for plan window, click Edit.
- In the Configure or modify benefit-specific coverage dialog box, in the To edit, select one or more check boxes for corresponding fields section, select the Covered and required check box and click OK.
- Based on the specified benefit or grouper, click Required
or Not required. The shaded button shows the current setting.
- Click Mark complete and then click Submit.
- To configure the coverage of a new or an existing item, follow these steps:
- On the Configure groupers and benefits page, click the Configure item icon at the right of the benefit or grouper name in the list.
- In the Configure details for plan window, on the Coverage tab, click the network name.
- In the Configure details for plan expanded window, to update coverage information, click Edit.
- In the Configure or modify benefit-specific coverage dialog box, to update the network coverage values, select the check boxes in the Select the check box to edit the corresponding fields section or the Select the check box to configure the corresponding coverage section that you want to modify and click OK.
- In the corresponding sections in the Configure details for plan window, modify the values, and then click Save or Save across networks. If you select Save across networks, select the network name check boxes that appear in the dialog box, and click Submit.
- To remove one or all changes that you made in steps c through e and restore the original values, click Restore, clear the check boxes in the dialog box, and click OK.
- Repeat step 4 to configure or modify each benefit or grouper.
- To configure the values and network contributions of annual maximum and lifetime
maximum, follow these steps:
- On the Configure groupers and benefits page, click the Configure item icon at the right of the benefit or grouper name in the list.
- In the Configure details for plan window, on the Coverage tab, click the network name.
- In the Configure details for plan expanded window, to update coverage information, click Edit.
- In the Configure or modify benefit-specific coverage dialog box, select the Accumulators check box. Then based on your business needs, select either the Annual maximum or Lifetime maximum check box, or both, and click OK.
- In the Configure details for plan window, in the Annual maximum and Lifetime maximum fields, select the values.
- In each field, click the Cross network for icon, select one or more network name check boxes in the dialog box, and click Submit.
- Repeat step 5 as needed for each benefit.
- To specify that a benefit limit in a plan applies to multiple networks, follow these
steps:
- Configure item Click the icon next to the benefit.
- On the Configure benefit details page, select a network.
- Click Edit.
- In the Configure or modify benefit-specific coverage dialog box, select the Accumulators and Limit check boxes and click OK.
- In the Accumulators section, clear the Limit not applicable check box.
- Enter the limit information in the fields.
- Click the Configure the cross-network for limit icon, select the networks that apply, and click Submit.
- Click Save.
- To create or modify variations of benefits or groupers, follow these steps:
- On the Configure groupers and benefits page, click the Configure item icon next to the benefit or grouper.
- In the Configure details for plan window, click the Variations tab.
- Click the network link and then click Edit.
- Add or edit variations, click Save, and then click Submit.
- Repeat these steps for each benefit or grouper variation that you are creating or modifying.
- To configure additional details for a benefit or grouper, follow these steps:
- On the Configure groupers and benefits page, click the Configure item icon next to the added benefit or grouper.
- In the Configure details for plan window, click Additional details.
- Click the network link
- In the expanded Configure details for plan window, click
Edit. To meet your business needs, you can configure fields for compliance support, documentation support, and claims instructions.
- Click Save and then click Submit.
- Repeat these steps for each new benefit or grouper detail that you are creating or modifying.
- To review the mapping for a benefit, follow these steps:
- On the Configure groupers and benefits page, click the Configure item icon next to the added benefit or grouper.
- In the Configure details for plan window, click the Mapping tab.
- Review the information that you previously entered. Click Mark
Complete and then click Submit. If you need to make changes based on your review of the Mapping tab, you must modify the specific benefit. For additional information, see Configuring a benefit.
- When you are finished configuring benefits and groupers, click Mark all as complete and then click Continue.
Optional: Changing the default benefit
When you create a plan, the plan inherits the default benefit from the product or a copied plan. The default benefit best represents the cost share for the benefit category. The cost share, such as copay or coinsurance, on the benefit category displays in a Summary of Benefits and Coverage (SBC) document or in a sales application when using the Plan API. However, you can also change the default benefit for the plan.
In this wizard step, you can also change and add benefit categories. However, if you add a benefit category, there is no default benefit.
- In the Configure benefit categories step of the wizard, in the Benefit category column, click a tab to expand it.
- For the benefit that you are setting as default, click the Gear icon and click Set as default display benefit.
- Click Finish.
Changing or adding a benefit category
When you create a plan, you can change the benefit category assignments. For example, you might change the benefit category for the Office visit benefit from Inpatient services as defined during benefit creation to Outpatient services. You can also add a benefit category. However, if you add a benefit category, there is no default benefit.
In this wizard step, you can also change the default benefit.
- In the Configure benefit categories step of the wizard, in the Benefit category column, click a tab to expand it.
- Click the Gear icon to the right of the benefit that you are modifying.
- Click Change benefit categories.
- In the Change benefit categories dialog box, click Add benefit category and then enter and click a category from the list.
- Click Submit.
- When you have completed your changes, click Finish.
Selecting SBC metadata
In this step, you select the template that you want to use as the base for the SBC document in your plan. Select the required networks from the product that you want to display in the SBC document. You must select at least 1 network; the maximum number of network selection is 3. The first network is considered In-network. You can provide names for the networks and order them as you want them displayed in the SBC document.
- In the Select SBC metadata step, in the SBC template field, enter and click the specified template.
- In the Select network order section, select the appropriate networks.
- In the Network name field, enter a descriptive name that corresponds to the network to the left.
- If you do not want to generate the SBC document in PDF format, select the
Skip SBC PDF Generation check box. This means that no SBC document in PDF format will be attached to the product.
- Click Continue to display the document.
Editing SBC data
In the last step of the product wizard, the SBC document that is part of the product displays. You can edit the document and preview it.
- To preview the document, click Preview document.
- To edit the document by overriding values that were in the SBC template, follow the steps to edit a specific tab in the SBC template section.
- When you have finished editing the template, return to the product to complete the step.
- To restore all changed values to the values in the product, click Restore.
- Click Finish.
Previous topic Products Next topic Automatic update of plan bundles