Integration with Microsoft Power BI
Microsoft Power BI (business intelligence) is a business analytics solution that lets you visualize your data and share insights across your organization or embed them in your app or website. You can connect to numerous data sources and visualize your data with live dashboards and reports.
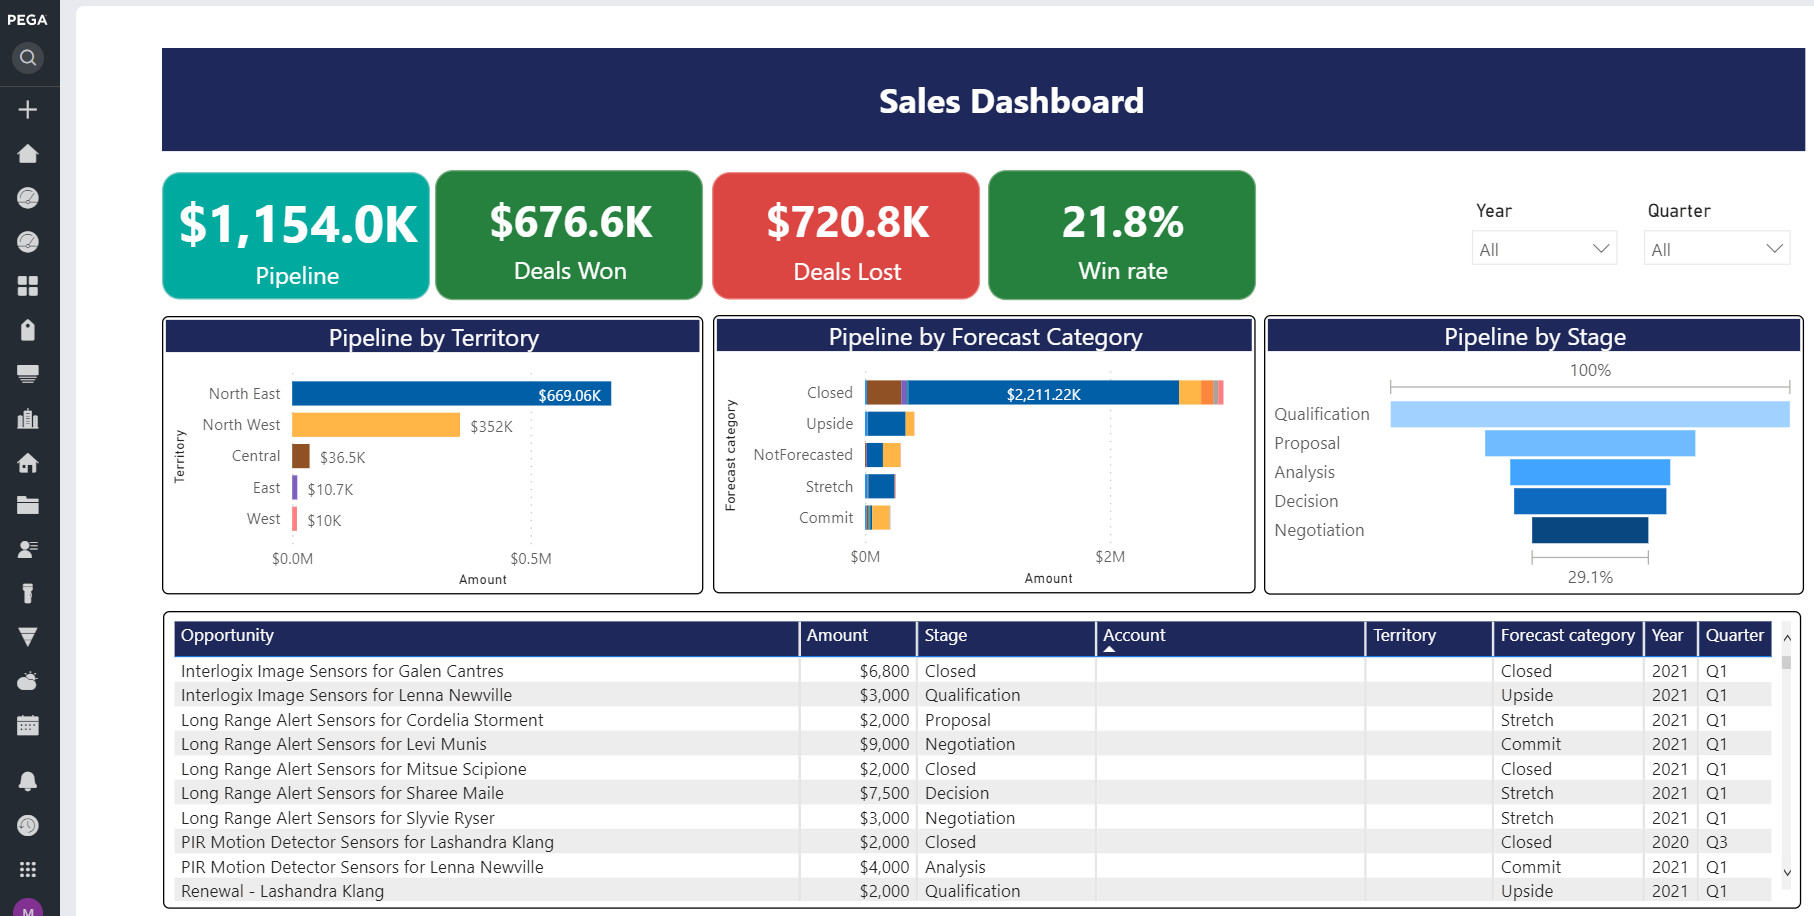
The integration of Microsoft Power BI with the Pega Sales Automation application provides a set of standard dashboard widgets that capture your sales data to give you a real-time view of the state of your business.
Personas for Reporting
- Pega Sales Automation application users - consumers of the embedded
Power BI analytics (reports or widgets)
- Sales Ops, Sales Rep, Sales Manager
- Consumers of Operational reports or widgets for their data
- Pega Sales Automation application developers – low-code citizen
developers whose key role is to configure dashboards and link them to an
appropriate Power BI report or widget.
- Pega developers
- Configure Pega Sales Automation dashboards and link them to appropriate Power BI workspaces
- Extend data models to implementation layers
- Report/widget developers – business analysts that have knowledge of developing
visualizations with Power BI
- Business analysts
- Create Power BI widgets using published Pega Sales Automation data models and the Power BI desktop tool
- M language developers – developers that build a custom connector to establish
the connection between Power BI and Pega Sales Automation
- Custom connector developers
- Provide custom connectors so that users of the Power BI desktop can create dashboards by using Pega Sales Automation objects.
Prerequisites
- Obtain a Power BI pro license for preparing, publishing, and embedding widgets.
- Download and publish a Power BI report with corresponding settings in the Power BI workspace.
- Map the operator accounts in Pega Sales Automation to the Power BI account with a common email address.
Out of scope
The process of creating the Power BI workspace and reports, configuring DAX expressions, configuring strategies, and all Power BI-related implementations are out of scope of this document. For details about creating reports, go to https://docs.microsoft.com and search for "Power BI fundamentals."
Limitations and recommendations
- Only basic authentication is supported to connect to Pega through a custom connector.
- It is recommended to retrieve smaller chunks of data as this is not an ETL (extract, transform, and load) tool. It is up to the implementer how to extend the provided services to retrieve filtered data (for example, Last 6 months data, Last 3 months data).
- It is recommended to extend the services to retrieve the required fields based on your dashboard needs.
- It is recommended to use Admin operator to connect to the custom connector as Pega already added DAX expressions at the dashboard level.
- If implementers have their own ABAC policies then implementers need to add corresponding DAX expressions in their dashboards.
Registering Pega Sales Automation with Power BI
Register your Pega Sales Automation application with Microsoft Power BI to receive the credentials required in the Power BI integration process.
- In your web browser, go to https://dev.powerbi.com/apps and sign into the Power BI Account with Power BI Administrator privileges.
- Register the Pega Sales Automation application:
- Enter the application name.
- Enter the application type as a Server-Side Web application.
- Enter the home page URL.
- Enter the redirect URL in the following format (SSL must be enabled
because it is an OAuth redirect URL):https://<MachineName>/prweb/PRRestService/oauth2/v1/redirect
- Select the Select All check box for the API access.
- Click Register.
- Save the Client ID and Client Secret to use it for authentication setup in the Pega instance.
- Open the Azure Active Directory Admin center by using the following link: https://aad.portal.azure.com/#blade/Microsoft_AAD_RegisteredApps/ApplicationMenuBlade/Overview/.
- Save this Tenant ID for use in authentication setup in the Pega instance.
Configuring Power BI authentication
Perform this next step in the Power BI integration.
- In Dev Studio, open the PowerBIAuthenticationProfile authentication instance.
- Enter the Client identifier and Client secret that you received from the Power BI portal in the Registering Pega Sales Automation with Power BI procedure.
- Generate a tenant ID on the Azure Active Directory Admin portal and use it to update the Authorization code endpoint and the Access token endpoint.
- Update the Redirect URI endpoint with the endpoint that you provide in the Registering Pega Sales Automation with Power BI procedure.
Publishing dashboards in the Power BI workspace
The Microsoft Power BI developer publishes the dashboards so that all related reports and datasets are available in Power BI.
- In your Pega instance API service package, in the Service access
group field, enter the name of an administrator access
group.
The API service package edit screen 
- In your web browser, go to https://app.powerbi.com/home
- Create a workspace.
- From the Microsoft site, download the Power BI Desktop.
- In your local system, create a folder with the name
Microsoft Power BI desktop. - In the
Microsoft Power BI desktopfolder, create a subfolder with the nameCustom Connectors. - In your web browser, go to the following Pega Marketplace page: https://community.pega.com/marketplace/components/enhance-data-visualization-through-microsoft-power-bi-sales-automation and download the PBIX files and the MEZ file (custom connector) for Power BI.
- Copy the MEZ file into the
Custom Connectorfolder. - Open all three PBIX files (
Sales Ops,Sales Rep,Sales Manager) in the Power BI desktop. - Locate the Pega Sales Automation object in the left-hand side of the Power BI desktop, right-click the Pega Sales Automation object, and then select Edit Query.
- In the APPLIED STEPS list, select Source.
- Update the Pega server details with your Pega server, and then click the Edit Credentials button.
- Enter your admin operator details.These operator credentials are required for synchronizing data.
- Perform steps 10 through 14 for the remaining objects in the left-hand side of the Power BI desktop.
- Publish the PBIX file by performing the following steps:
Configuring Power BI application settings
Configure the applications settings to enable the Microsoft Power BI integration in your Pega Sales Automation application.
- In App Studio, select .
- Select the Microsoft Power BI Integration check box.
- In the Power BI Workspace field, enter the name of the workspace that you created in the Publishing dashboards in Power BI workspace procedure.
Using Power BI
After integrating Microsoft Power BI with your Pega Sales Automation application, you can start using the Power BI visualizations.
- Launch the Pega Sales Automation user portal.
- In the navigation pane, click Analytics.If you have not yet established the authorization between the Pega server and the Power BI account, the system displays the following message: Power BI access has not been authorized. Click on Connect button to grant authorization to Power BI account.To resolve this issue, click Connect.
Additional Power BI information
Extend the Power BI visualizations to additional data objects, and customize the Power BI dashboard selection, to give you more insight into your data.
Extension of Power BI integration to other data objects
When you provide credentials in the Power BI desktop, you call a GetCaseTypes REST service, which retrieves the primary objects in the Pega Sales Automation instance along with corresponding access permission objects.
All the default object information is placed in the GetCaseTypes
data transform, which contains the Pega Sales Automation object names as
well as the corresponding dataset name (data page name).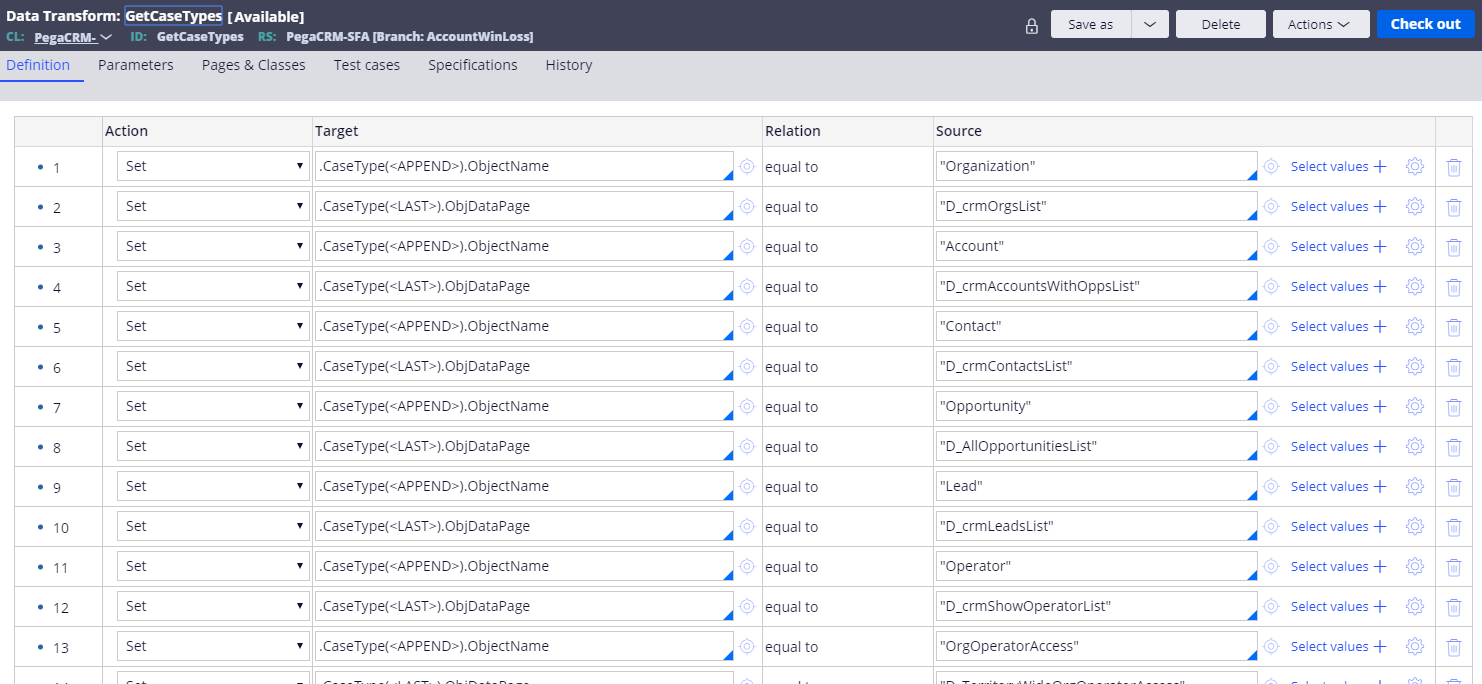
Provide an extension data transform to extend the Power BI integration to other
objects. Any implementation applications can override this data transform in their
layer and can provide their objects along with the dataset.
Implement the dataset (data page) in the above data transform using, for example, Report definitions or activities. This allows you to retrieve the required data during the REST service execution.
Customization of dashboard selection
By default, there are three access groups and three corresponding dashboards. The
appropriate dashboard loads according to who logs in. As the implementer, you can
modify this behavior by modifying the following extension in your layer.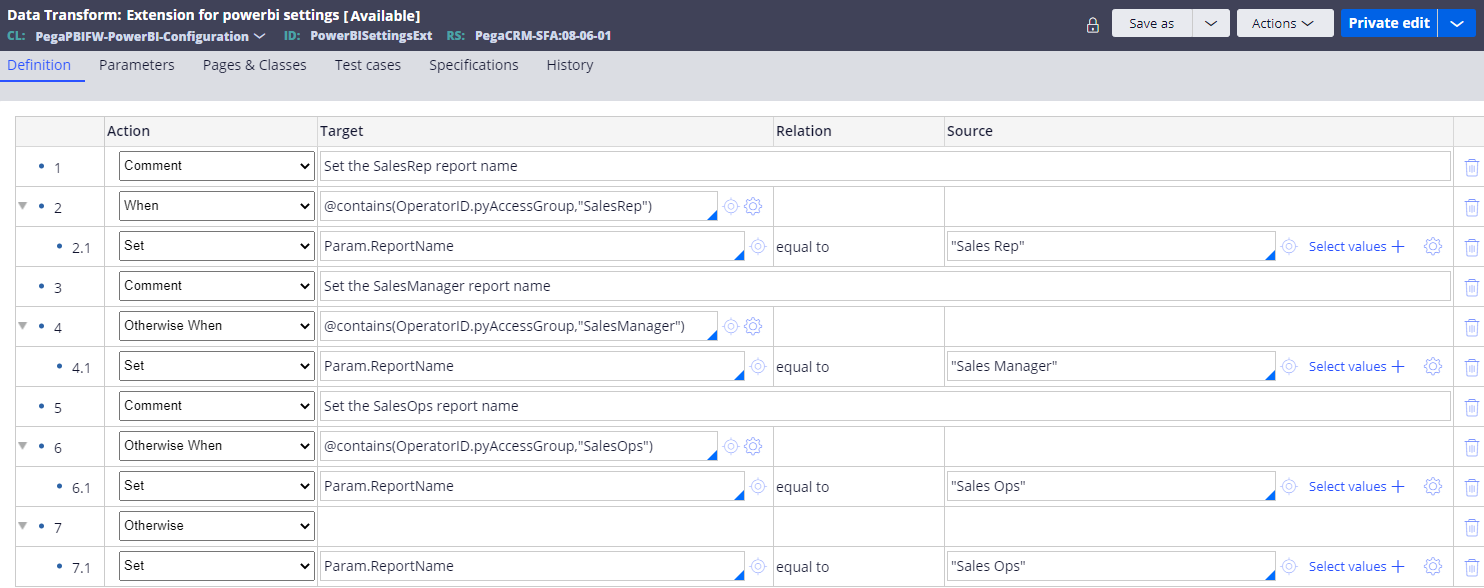
Previous topic Cross-team collaboration with Cisco Productivity Tools Next topic Connecting to Zoom