

         This documentation site is for previous versions. Visit our new documentation site for current releases.      
 

Storing product information

Updated on May 7, 2021

Use either an external Product Designer for Financial Services product catalog or an internal product catalog to store product data in Pega Sales Automation for Financial Services. Using a product catalog allows you to bring your products to market faster. By default, Pega Sales Automation for Financial Services uses the external Product Designer for Financial Services product catalog. Change this default setting to use an external product catalog, if needed, in your implementation layer.

Pega Sales Automation retrieves product information from either an external or internal Pega Sales Automation-maintained product catalog. In contrast, Pega Sales Automation uses the internal product catalog by default.

Pega Sales Automation Implementation Guide Pega Sales Automation Implementation Guide Pega Sales Automation Implementation Guide Pega Sales Automation Implementation Guide

Pega Sales Automation for Financial Services uses a four-tiered product model:

Tier numberProduct model hierarchyExample
1CategoryRetail banking
2FamilyLending
3GroupAuto loan
4Product24-month auto loan

For more information, see Product Designer for Financial Services documentation on the Pega Foundation for Financial Services product page.

Building product information by using the Product Designer for Financial Services workflow

Build your product information by using the external, Product Designer for Financial Services product catalog, to bring your products to market faster.

Before you begin: Before starting the procedure, identify the operational structure for your organization. For more information, see Set up your sales team structure.
  1. Create products and bundles in the product catalog with the Product Studio tool.
    For more information, see the Product Designer for Financial Services Implementation Guide on the Pega Foundation for Financial Services product page.
  2. Indicate which products are available for sale in which territories by editing the inclusion and exclusion tables in the Pega Foundation for Financial Services application.
    For more information, see the Product Designer for Financial Services Implementation Guide on the Pega Foundation for Financial Services product page.
  3. Map the Product Designer for Financial Services product structure to the Pega Sales Automation product structure by using the OpenMapForSAFSProductStructure data transform. This mapping populates the product data in the D_ProductsForSAFS and D_InterfaceProductListFromExternal data pages.
  4. Optional: Create additional product information in the Product Designer for Financial Services application.

Configuring an external product data source

If your products are maintained in an external system of record, you must update the crmAppExtModel data transform and the D_InterfaceProductListFromExternal data page for your implementation.

  1. In the header of Dev Studio, search for and select the crmAppExtModel data transform.
  2. Locate the .IsProductSORExternalTarget and in the Source field for the target, enter true.
  3. Click Save.
  4. In the header of Dev Studio, search for and select the D_InterfaceProductListFromExternal data page.
  5. In the Data sources section, configure the external system of record for your products.
    To see a sample interface data model, review the crmBuildSampleInterfaceData and ConstructSampleProductInstance data transforms. For more information about data page rules, see Data page rules - Using the Usage tab.
  6. Click Save.

Using Product Designer for Financial Services product catalog to store product data

Use Product Designer for Financial Services to create and manage financial products in a financial institution's product catalog, and to quickly bring those products to market. If you plan to use a Product Designer for Financial Services 
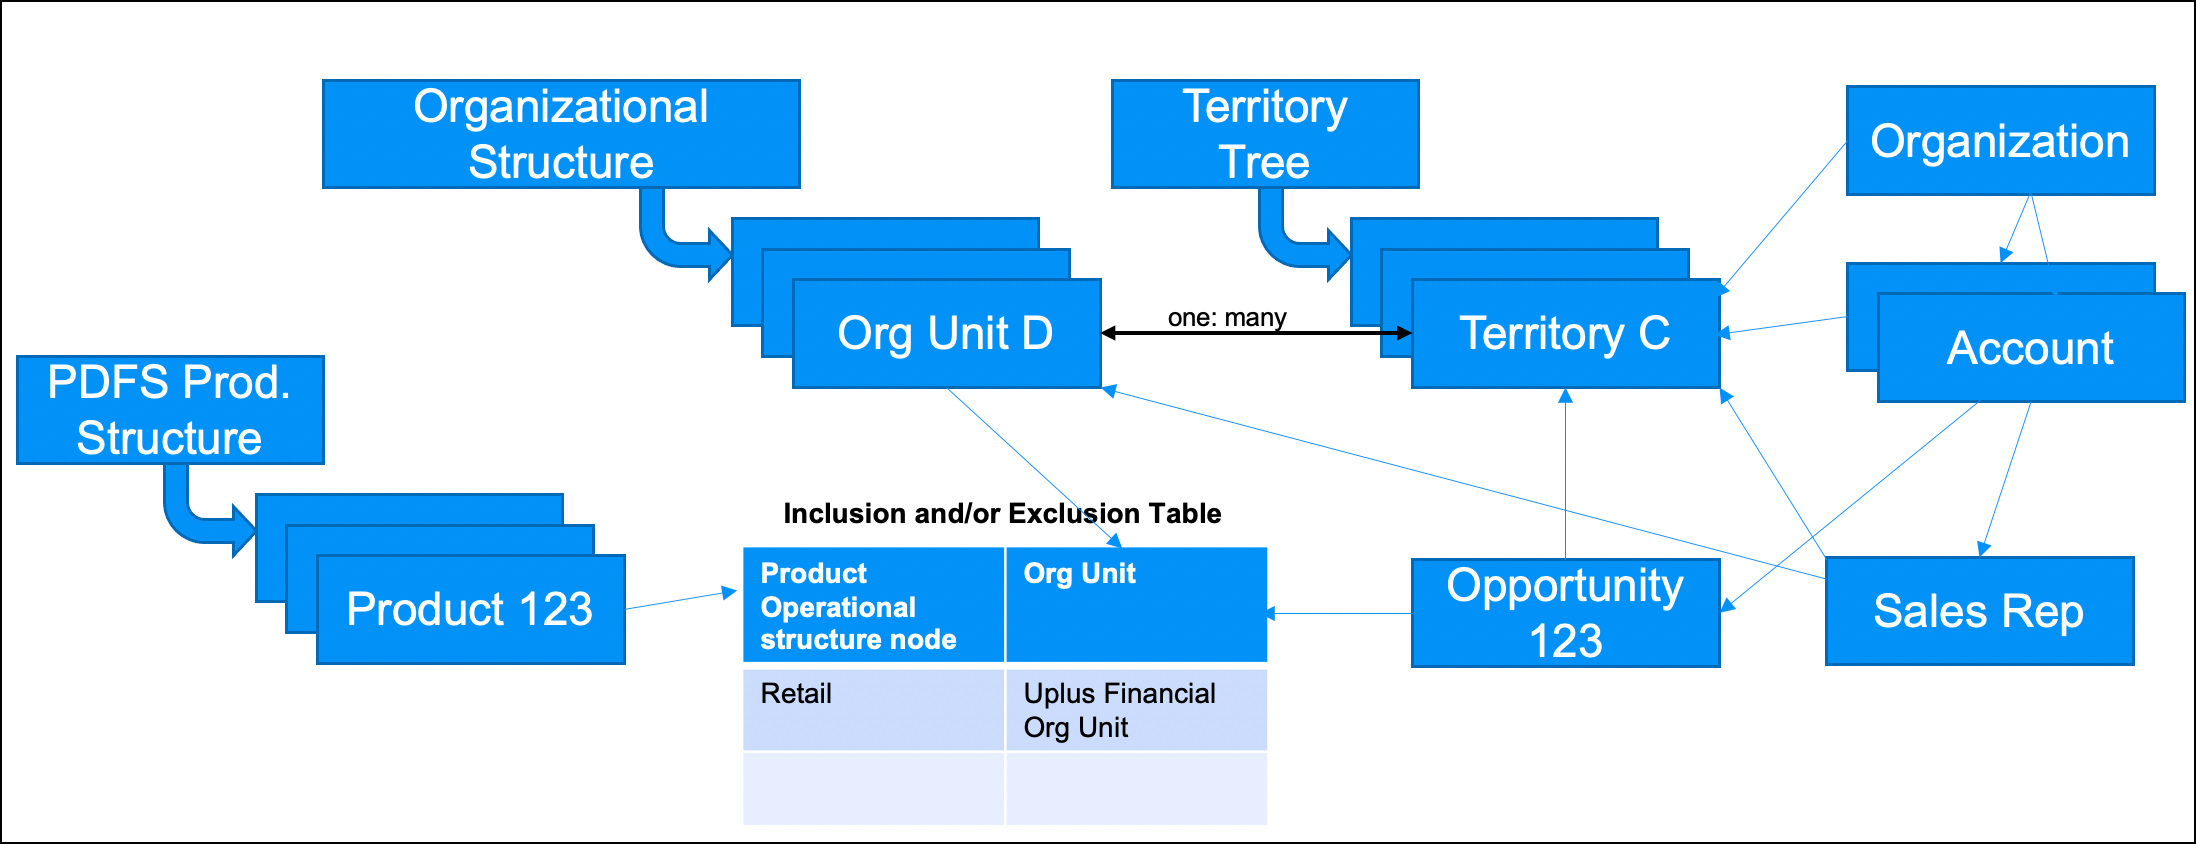
product catalog, it is helpful to understand how a product is modeled in both Pega Foundation for Financial Services and Pega Sales Automation for Financial Services.

When creating a territory in Pega Sales Automation for Financial Services, you must associate it with a parent territory and an organization unit. Territories are used to organize the sales team into groups, for example, geographic location. In Pega Sales Automation for Financial Services, organization units are classified based on market segments. By associating territories with organizations, the system displays only products related to a particular sales ops.

Understanding how Pega Sales Automation for Financial Services uses the product catalog

  1. Log into the application as an operator with the Sales Ops persona.
  2. In the navigation pane, click Territories.
  3. Click Create territory.
  4. In the Name field, enter your territory name.
  5. In the Parent Territory field, select your territory.
    For example: Select Massachusetts-Small Business.
  6. In the Organizational unit field, add a related organization, for example UPFS-GBB-US-Boston.
    Note: Each organization unit is mapped to a market segment path in the fsf_pminclusionxref table, which determines types of products the system fetches for an opportunity created in the corresponding territory. The UPFS-GBB-US-Boston organization unit is located in the fsf_pminclusionxref table, which is mapped to the UPFSPD-PDOP-SMB territory. You can only map one organization to one territory. For different market segments, you can use the following example mappings:
    • United States Retail > UPFS-GCB-US > UPFSPD-PDOP-RET
    • United States SMB > UPFS-GBB-US > UPFSPD-PDOP-SMB
  7. Click OK.
Result: The SMB sales rep sees only SMB-related products, and retail sales ops sees only retail-related products.

Have a question? Get answers now.

Visit the Support Center to ask questions, engage in discussions, share ideas, and help others.

Did you find this content helpful?

Want to help us improve this content?

We'd prefer it if you saw us at our best.

Pega.com is not optimized for Internet Explorer. For the optimal experience, please use:

Close Deprecation Notice
Contact us