Importing ISO ratebooks into Pega Underwriting for Insurance
You can extend your Insurance Services Office (ISO) integration to include your own rating definitions (or deviations) and additional state ratebooks for the Business Owner Policy (BOP) line of business.
To extend the ISO integration in Pega Underwriting for Insurance, complete the following tasks:
- Exporting domain tables from ISO
- Importing domain tables into Pega Underwriting for Insurance
- Importing ratebooks into Pega Underwriting for Insurance
- Additional configurations
Exporting domain tables from ISO
Before you import domain tables into Pega Underwriting for Insurance, you must export them from ISO as an XML file. In your ISO application, on the Print Ratebook page, ensure that you select the following fields:
- Under Report Type, select Full.
- Under Report Output Options, select Export Report As XML.
- Under Report Contents, select the Ratebook Properties and Domain Tables check boxes.
- Under Domain Tables, select the Domain Table Properties, Domain Table Key Columns, and Domain Table Entries check boxes.
Importing domain tables into Pega Underwriting for Insurance
Prerequisites
Before importing the domain tables XML file, create a new ruleset version for the DomainTables ruleset. Alternatively, you can edit the DSS setting, PrefRulesetToSaveISORules, to point to a ruleset of your choice.
Use the wizard provided in Pega Underwriting for Insurance to import the domain tables XML file.The wizard creates the rules that are required to query the tables from the ISO database, and then creates the classes and other rules that are required to store these values in the clipboard.
Importing ratebooks into Pega Underwriting for Insurance
You publish ratebooks in ISO that include your organization’s deviations. You can import your ratebooks into Pega Underwriting for Insurance to rate your submissions and receive the latest premium calculations directly in your application. Based on the fields in the ratebook, the wizard provided in Pega Underwriting for Insurance creates the rules that are required to populate the screens and fields in your application.
To import a ratebook, complete the following steps:
- Export your ratebook from ISO as a .xls file. Prior to exporting your ratebook, ensure that you read the instructions on the ISO Ratebook Upload landing page in your Pega Underwriting for Insurance application.
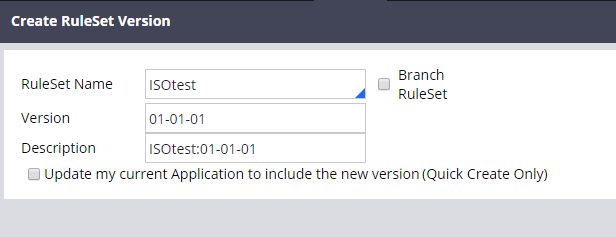
- To ensure that the wizard creates the rules in the appropriate classes, create a new ruleset version of the ISOProcessEngine ruleset. Ensure that you select the Update my current Application to include the new version check box to add this ruleset to the top of the Application Rulesets list in the application rule. The following screenshot provides an example:
- In ISO, the default pages for the BOP line of business are Policy, Location, and Classification. The wizard in Pega Underwriting for Insurance automatically defines the rules for these pages. To include additional pages from your ratebook, modify the DetermineClassName map value as part of the @baseclass. This map value is useful for determining the corresponding classes for each additional page in the ratebook.
- Optional: The wizard defines the rules in the PegaIns-Data-ISO class. If you want to use a different class structure to meet your organization’s needs, modify the pyDefault data transform defined in the ISO-Data-AppExtension class. The new data class that you create must use PegaIns-Data-ISO as its directed parent class so that it can access the rules that were created from in the ratebook import.
- Import the ratebook that you exported in step 1:
- In Dev Studio, click Configure > Framework Management > Tools > ISO Ratebook Import.
- On the Ratebook Upload page, in the Upload ratebook as xls file section, complete the required fields.
- Click Upload ratebook.
- In the ISO Upload window, click Choose File and select the .xls file that you printed from ISO.
- Click Submit.
Additional configurations
The wizard automatically populates the screens in your application with the fields in the ratebook that you imported. However, your ratebook might contain fields that require certain conditions. To set these conditions in Pega Underwriting for Insurance, configure the section of the field that you want to modify.
- For all Mandatory page fields, update the Required field in the section.
- For the page fields with conditions specified in the Condition and Required Condition columns of the ratebook, apply visible when conditions in the section.
- Some page fields require passing the value of another field as a parameter when querying from the data page that contains the domain table values. Specify these parameters in the section.
Previous topic Extending the ISO integration in Pega Underwriting for Insurance Next topic Installing the Pega Underwriting for Commercial Insurance Decision Strategy Manager application