Improve the usability of your mobile app by configuring and enabling the search
functionality. You can guarantee more meaningful search results and increase search
speed by limiting the scope of searches to specific case types.
For example, in your Expenses app, apart from the expense reporting case type, you have a
case type in which users submit requests for a per diem allowance. You can add both case
types to the search configuration, and provide users with search results that the app
displays in categories. After configuring the search categories, you can add the Search
action to the menu bar of your app, to provide a convenient method of initiating the
search.
Before you begin: Prepare the framework for the search gadget:
Ensure that you have case types and instances that the app can use as search
categories. For example, create a case type that handles expense reporting and a
case type that handles requests for per diem allowances. For more information,
see Case types.
If you do not define any search categories, the app
searches all content and displays it as uncategorized results on one tab.
Open your mobile channel:
In the navigation pane of
App Studio, click Channels.
In the Current channel interfaces section, click
the tile that represents a mobile channel for your app.
On the mobile channel page, on the Content tab, click
the Search category.
In the Search categories section, click Add
category, and then select the case type that you want to use as
a search category.
In the search category configuration window, in the Name
field, enter the label for the search category that the app uses to group search
results at run time.
In the Data view field, enter the data page that you
want to use as the source for the search category.
Note: Offline-enabled mobile apps download all data for search categories during
the first startup after installation. Avoid adding data sources with a large
amount of data, to decrease the startup time of an offline-enabled
app.
Optional: To change the default icon of a search category, next to the current icon,
click the Change button, and then select the icon that
you want to use:
In the icon selection modal dialog box, click the Show image
viewer icon.
In the Image catalog window, enter an image name,
and then click Find.
Select the image that you want to use as the default icon for the
search category, click OK, and then click
Submit.
Important: Search category icons only support .png image
types.
In the search case type configuration window, in the List item
information section, configure how the app page displays the
search results:
In the Primary field, enter the property that
you want to use to populate the label of the search result at run
time.
In the Secondary field, enter the property that
you want to use to populate the secondary text of the search result at
run time.
You can add up to three secondary fields with information to display
in search results.
For example: Use the following field and property configuration to display the search
results for expense reports:
For the Primary field, add the
Label property that defines the expense
report name.
For the Secondary field, add the
Amount property that defines the total amount
of the expense.
Click Submit.
Note: Changes to the search configuration apply to all mobile channels in your
application.
Optional: To add more categories, repeat steps 3
through 8.
Note: When you add two or more categories, the app also displays the
All category when users perform a search.
This category displays all search results in a single tab.
Click Save.
Add the search action to the menu bar of your app:
On the mobile channel page, on the Content tab,
click the Navigation category.
In the Navigation section, click Add items > Actions > Search.
Click Save.
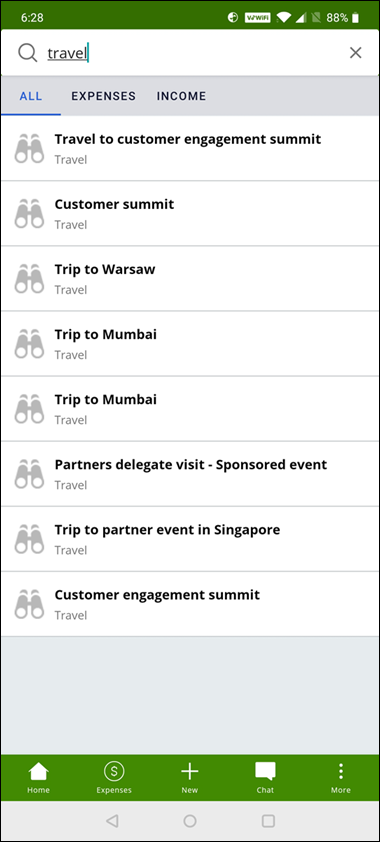
Result: At run time, your app now has a search icon on the menu bar
that users can tap to start looking for information. The app groups search results by
the categories that you defined. Each result has a label and secondary text that help
users choose the best search result. When a user taps a search result, the app opens the
relevant work item.
Example:
Figure: Run-time search results of travel expenses