Configuring the case page
Set up an intuitive case page that provides users with the information that they need to successfully process cases. Whenever you create a new case type, the application automatically adds a case page that represents the visual framework for processing case information.
- In the navigation pane of App Studio, click Case types, and then click the case type that you want to open.
- On the User interface tab, in the Views pane on the left side of the window, click Case page.
- Define the header for the page:
- In the Header list, select the field whose content you want to display as the main header.
- In the Subheader list, select the field whose content you want to display as the secondary header.
- Optional: To remove the default case icon from the header, clear the Show icon in header check box.
The preview on the right side of the work area reflects the changes that you make to the page. - In the Tabs section, manage the tabs in the pane on the
left side of the case page:The application sets up the Details and Pulse tabs by default.
- To create a new tab, click Add, and then enter the name for the tab.
- To remove a tab, click the Remove icon.
- To change the position of a tab, drag the tab into place.
- Optional: To edit the content of each tab, click the Drill in icon
for that tab, and then make the updates that you need:
- To change the tab template, click Edit, and then click the template that you want to apply to the tab.
- To change the name of the tab, in the Tab name field, enter a new name.
- To add a widget, view, field, or an insight to the tab, click Add, and then select the item that you want to add.
- To change the position of a field or a view on the page, drag the component into place.
- To remove a field or a view from the page, click the Remove icon.
- In the Utilities section, manage the widgets that appear
in the expandable pane on the right side of the case page:The application sets up the Files and documents and Followers widgets by default.
- To add a new widget, click Add, and select the widget that you want to use.
- To change the name of a widget, click the Configure icon, and then provide the new widget name.
- To remove a widget, click the Remove icon.
- To change the position of a widget, drag the component into place.
- Click Save.
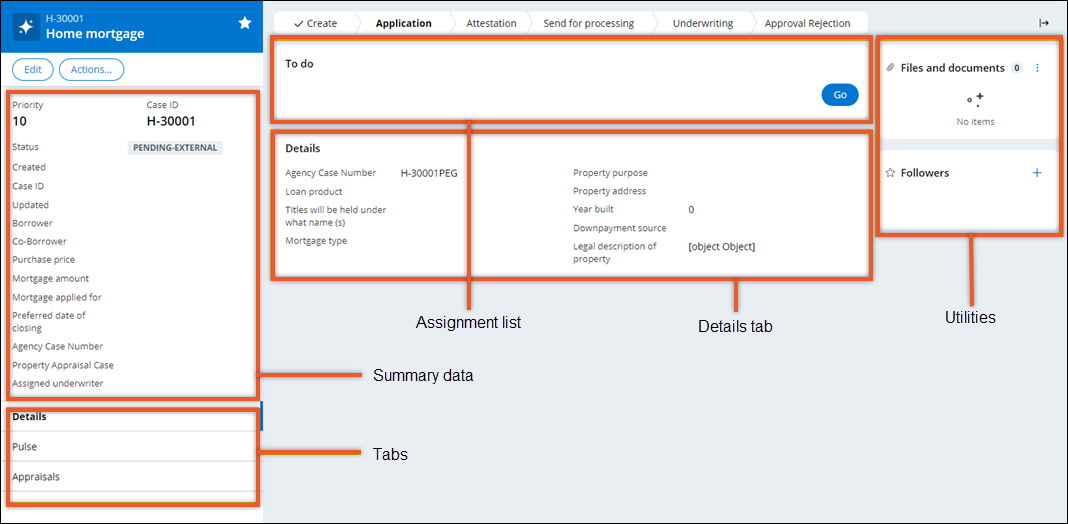
The assignment list is where the case page displays the form for each step.
Previous topic Configuring forms and views Next topic Creating views in Cosmos React