

         This documentation site is for previous versions. Visit our new documentation site for current releases.      
 

Configuring fields associated with case and data objects

Updated on December 14, 2021

Applicable to Cosmos React applications

A data object is a template for describing an entity through fields, such as name and address. Depending on your business needs, data objects can reference a list or a single record, and source their information from internal or external databases. This flexibility of approach ensures optimal reuse and better data management.

Case and data objects produce the following fields:

Case reference
Single or multiple records from a selected case type. Case references can refer to other cases or data objects. For example, in a mortgage request case, you can use a case reference to call an Appraisal case. Alternatively, you can use a case reference to refer to the borrower, a data object. At run time, case references are displayed as a contextual link.
Data reference
Single or multiple records from a selected data page. In a mortgage request case, you can use a data reference provide the user with a list of available mortgage types. At run time, data references are displayed as a contextual link.
Embedded data
User-supplied data such as a name and address that is stored and sourced from inside a case instance or a work object. For example, in a mortgage request case, you can use embedded data to store the borrower's monthly income or employment history. Supports single and multiple records.
Query
A data page or view that is not sourced from inside the case type. The data page defines parameters that the Query data relationship is configured to use. Unlike a data reference, the query field does not require a key. A loan application might use a query field to source information on the current prime mortgage rate.

For more information on data objects, see the Pega Academy article Data relationships.

Configuring a single-record reference field

Simplify the structure of your application by reusing data in different contexts. Case and data reference fields help you efficiently reuse resources without detailed knowledge about how the system stores data.

For example, in a mortgage application, a Get appraisal case reference can fetch data about the house appraisal if the user enters the ID of the related case.

Before you begin: Add a single-record data or case reference field to a view. For more information, see Creating fields for capturing data and Configuring details views.
  1. In the navigation pane of App Studio, click Case types, and then click the case type that you want to open.
  2. On the User interface tab, click the column-based view that you want to edit.
  3. In the Edit view section, click the Drill in icon next to the case or data reference field that you want to edit.
  4. In the Edit field pane, in the Mode list, select how you want to display the field:
    • To restrict the user's choice to a single item, select Single-select.
    • To prevent users from editing the field, select Read-only.
    Important: Read-only fields support fewer configuration options.
  5. For Single-select fields, in the Display as list, select the control that you want to use with the field:
    ChoicesActions
    Autocomplete
    Tip: Useful for a large number of options.
    1. Select Autocomplete.
    2. In the Display field list, select the name of the field that you want to display in the control.
      For example: Select Case ID to source appraisal data by case number.
    3. Optional: To display additional fields from the case, in the Show details (optional) section, click Add, and then apply additional views to the field.
      Tip: See the live preview on the right side of the screen to observe how the additional details impact the field.
    Dropdown
    Tip: Useful for a limited number of options.
    1. Click Dropdown.
    2. In the Display field list, select the name of the field that you want to display in the control.
      For example: Select Case ID to source appraisal data by case number.
    3. Optional: To display additional fields from the case, in the Show details (optional) section, click Add, and then apply additional views to the field.
      See the live preview on the right side of the screen to observe how the additional details impact the field.
    Table
    Tip: Useful for listing options with additional contextual information in columns.
    1. Click Table.
    2. In the Columns section, click Add, and then, from the list of fields, select the columns for your table.
    3. Configure the new fields by clicking the Configure icon and defining field settings.
      For more information, see Configuring field behavior.
    4. Optional: To allow search at run time, select the Enable search check box, and then click Add to select searchable fields.
    5. In the Column to take up remaining width list, select the column which you want to expand to fill the remaining space on the screen.
    6. Optional: To apply filtering, in the Filter by list, select Custom, click the Gear icon, and then build a logical expression.
    7. Optional: To apply sorting, in the Sort by section, click Add, and then select the column and determine its sorting mode.
  6. Optional: To allow users to edit the field in read-only views, perform the following actions:
    1. Select the Show as picker and persist changes in review mode checkbox.
    2. Ensure that the Edit details step is a case-wide action. For more information, see Adding optional actions to cases.
    3. Add the key of the reference field to the Edit view of your application. For more information, see Configuring forms.
    Note: This setting is available for Autocomplete and Dropdown displays.
  7. In the Conditions section, define additional properties for your field, for example, visibility.
For example:

In this scenario, the single-select field is displayed as a table and users can select only one product from the list.

Sample single-select table
A single-select list that features multiple products, their prices and product IDs

Configuring a list of records reference field

Help users access complex data in a convenient way. Case and data reference lists help you source data from your application and display that information in a table where every row represents a field in a record, or a combo-box.

For example, in a credit card fraud investigation app, a Transactions data reference can produce a list of all the transactions that are recorded for a given credit card. The customer can study the details of each transaction, such as their time and location, in the table columns, and mark the transactions that are fraudulent for further investigation.

Before you begin: Add a data or case reference field that uses a list of records to a view. For more information, see Creating fields for capturing data and Configuring details views.
  1. In the navigation pane of App Studio, click Case types, and then click the case type that you want to open.
  2. On the User interface tab, click the column-based view that you want to edit.
  3. In the Edit view section, click the Drill in icon next to the case or data reference field that you want to edit.
  4. In the Edit field pane, in the Mode list, select how you want to display the field:
    • To provide users with choice of multiple items from the list, select Multi-select.
    • To prevent users from editing the field, select Read-only.
    Important: Read-only fields support fewer configuration options.
  5. For Multi-select fields, in the Display as list, select the control type that you want to use with the field:
    ChoicesActions
    Table
    Tip: Useful for listing options with additional contextual information in columns.
    1. Click Table.
    2. In the Display field list, select the name of the field that you want to display in the control.
      For example: Select Vendor to source data by the vendor name.
    3. In the Columns section, click Add, and then select the columns for your table from the list of fields.
    4. Configure the new fields by clicking the Configure icon and defining field settings.
      For more information, see Configuring field behavior.
    5. Optional: To allow search at run time, select the Enable search check box, and then click Add to select searchable fields.
    6. In the Column to take up remaining width, select the column which you want to expand to fill the remaining space on the screen.
    7. Optional: To apply filtering, in the Filter by list, select Custom, click the Gear icon, and then build a logical expression.
    8. Optional: To apply sorting, in the Sort by section, click Add, and then select the column and determine its sorting mode.
    Combo-box
    Tip: A combination of a list and an autocomplete field. Useful for a large number of straightforward options.
    1. Select Combo-box.
    2. In the Display field list, select the name of the field that you want to display in the control.
  6. Optional: To allow users to edit the field in read-only views in the Combo-box mode, perform the following actions:
    1. Select the Show as picker and persist changes in review mode checkbox.
    2. Ensure that the Edit details step is a case-wide action. For more information, see Adding optional actions to cases.
    3. Add the key of the reference field to the Edit view of your application. For more information, see Configuring forms.
    Note: This setting is available for Combo-box.
  7. In the Conditions section, define additional settings for your field, for example, visibility.
For example:

In this scenario, the multi-select field is displayed as a table and users can select multiple products from the list.

Sample multi-select table
A multi-select list that features multiple products, their prices and product IDs

Configuring an embedded data field

Create a UI that helps you gather and store case-related data in reusable lists. Embedded data fields are best suited for a list of records that the user enters manually. For example, in a loan application, you can use a list-based embedded data field to collect the user's employment history.

Before you begin: Add an embedded data field to a view. For more information, see Embedding data in a case and Configuring details views.
  1. In the navigation pane of App Studio, click Case types, and then click the case type that you want to open.
  2. On the User interface tab, click the column-based view that you want to edit.
  3. In the Edit view section, click the Drill in icon next to the embedded data field whose view you want to edit, and then check the type of your field:
    • If the embedded data field is a single-record field, follow standard form configuration. For more information, see Configuring forms.
    • If the embedded data field is a list of records, continue to step 4.
  4. In the Mode list, select how you want to display the field:
    • To make the field restrict the user's choice to a single item, select Editable.
    • To prevent users from editing the field, select Read-only.
    Important: Read-only fields support fewer configuration options.
  5. In the Display as list, select the look of your view:
    ChoicesActions
    Table
    1. Select Table.
    2. In the Columns section, click Add, and then select the columns for your table from the list of fields.
    3. Configure the new fields by clicking the Configure icon and defining field settings.
      For more information, see Configuring field behavior.
    4. In the Column to take up remaining width list, select the column that you want to expand to fill the remaining space on the screen.
    Field group
    1. Select Field group.
    2. In the Select view item list, select the data object view that you want to display on the tab.
      Note: The embedded data field group only supports editable views and forms. Consequently, details views are not supported.
    3. In the Item label field, define the text that appears as the header for each field group.
      For example: When you set the Item label field to Job, the system displays Job 1, Job 2 etc, over each iteration of the field group.
  6. In the Conditions section, define additional properties for your field.
    For example: Set Allow adding, deleting, and reordering records to Never to prevent users from changing records displayed by the embedded data field.
For example:

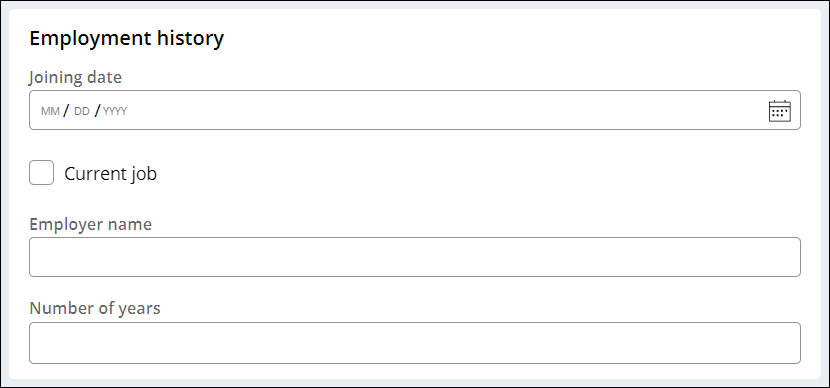
In this scenario, the list-based embedded data field is displayed as a table and a field group. Users fill in the employment information or add new rows to the table, and the system converts that information into records in the embedded data object.

List-based embedded data field in table form
A table with editable fields for employer name, joining date, and number of years worked. A button below the table reads Add.
List-based embedded data field in field group form
A view with editable fields for employer name, joining date, and number of years worked.

Configuring query fields

Obtain data from other applications or systems by configuring query fields. A query field references a data page that retrieves data from a specified data source and caches that data in memory. This approach allows citizen developers to benefit from external data without detailed knowledge of database architecture.

For example, you can use a query field to display information about current interbank rates in a loan application.
Before you begin: Add a query field to a view. For more information, see Creating fields for capturing data and Configuring details views.
  1. In the navigation pane of App Studio, click Case types, and then click the case type that you want to open.
  2. On the User interface tab, click the column-based view that you want to edit.
  3. In the Edit view section, click the Drill in icon next to the embedded data field whose view you want to edit, and then check the type of your field:
  4. In the Edit view section, click the Drill in icon next to the field that you want to edit.
  5. In the Edit field pane, in the Display as list, choose the control type that you want to use with the field:
    ChoicesActions
    Table
    1. Select Table.
    2. In the Columns section, click Add, and then select the columns for your table from the list of fields.
    3. Configure the new fields by clicking the Configure icon and defining field settings.
      For more information, see Configuring field behavior.
    4. In the Column to take up remaining width list, select the column that you want to expand to fill the remaining space on the screen.
    Field group
    1. Select Field group.
    2. In the Select view item list, select the data object view that you want to display on the tab.
    3. In the Item label field, define the text that appears as the header for each field group.
      For example: When you set the Item label field to Currency, the system displays Currency 1, Currency 2, and so on, above each iteration of the field group.
  6. In the Conditions section, define additional settings for your field, for example, visibility.
For example:
Sample list of records query field
A table that lists inter-bank rates
Sample single-record query field
A single field that displays the interest rate.

Have a question? Get answers now.

Visit the Support Center to ask questions, engage in discussions, share ideas, and help others.

Did you find this content helpful?

Want to help us improve this content?

We'd prefer it if you saw us at our best.

Pega.com is not optimized for Internet Explorer. For the optimal experience, please use:

Close Deprecation Notice
Contact us