Localizing your application
Localizing your application helps users work in their preferred language, which improves their experience and ensures a better understanding of the product. By localizing an application, you can expand your operations to new markets regardless of language barriers.
Localization adapts your application for a specific language or region. During the localization process, the text in your application is translated into the target language, and imported back into Pega Platform. Text that you can localize includes labels, captions, tooltips, and instructions that appear in user-facing components, such as views and portals.
Localization limitations
Localization in Cosmos React applications is an expanding feature. Consequently, it includes certain use case limitations. By understanding the scope of localization support in Pega Platform version 8.7, you can plan your application better.
In Cosmos React applications, you cannot localize the following rules:
- Decision tables and decision trees.
- Case statuses.
- Radio buttons and drop-down controls in a table.
In addition, localization has the following limitations:
- If you save a view manually through Dev Studio, and not in the App Studio authoring environment, the system does not update the localization file.
- The translation package does not automatically include the text from radio buttons and drop-down controls that use data pages. For more information about adding that text manually, see Localizing controls that rely on data pages.
- The translation package does not automatically include the text from properties with prompt lists. For more information about adding that text manually, see Localizing properties with more than one value.
- Deleted views are not deleted from the translation package.
- You cannot delete localization rules.
Creating a translation package in Cosmos React
Expand the user base of your application by translating it into different languages. By creating a translation package, you bundle all the text in your application into a single JSON or Microsoft Excel file, which translators can then process more conveniently.
- In the navigation pane of App Studio, click .
- On the Localization landing page, on the
Translation packs tab, click
New.
The New button on the Localization page 
- In the New translation dialog box, click Add language.
- In the language list, select the language to which you want to localize the application.
- Optional: To overwrite a previous translation, select the Re-translate existing translations checkbox.
- Click Next.
- Click Download, and then select the format of the translation package.
- Click Done.
Importing a translation package in Cosmos React
Create multiple language versions of your application by localizing translation packages and then importing the packages into your application. You can upload a newly translated package on the Localization landing page, which offers a convenient way to manage the language versions of your application.
In addition, you can use the Localization page to import Pega language packs, which provide a translated ruleset with values of fields that typically appear in every application, such as button labels or prompts.- In the navigation pane of App Studio, click .
- On the Translation packs tab, in the row that represents
the language of your translation, in the Status column,
click the More icon.
The More icon on the Translation packs tab 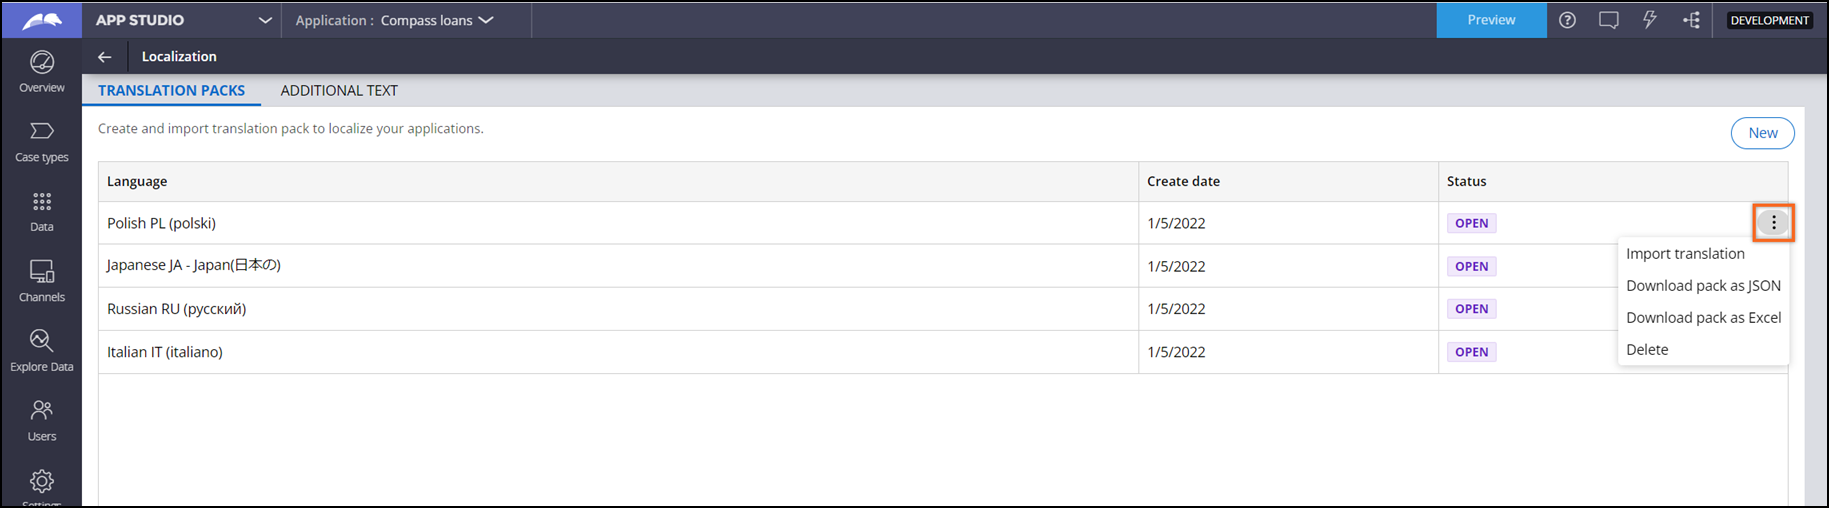
- Click Import translation.
- In the Import translation modal dialog box, upload the file with the translation.
- Click Next.
- When the import completes, click Done.
Creating localization rules in Dev Studio
Gain a more granular level of control over the localization process by generating localization rules in Dev Studio. For example, you can use localization rules to manually add properties to a translation package, even when the system omits them.
- In the header of Dev Studio, click .
- In the Upgrade section, in the Upgrade branch name list, select the branch where you work.
- Click Upgrade views.
Localizing controls that rely on data pages
Ensure that your interface does not include untranslated picklists and radio buttons by adding controls that source entries from data pages to the translation package. Because data pages are empty when the system generates the translation package, you must add their content manually.
- In the navigation pane of App Studio, click .
- On the Additional text tab, find the data page related
to the control that you want to localize, and then click the icon.
The More icon on the Additional text tab 
- In the Edit record modal dialog box, populate the data page with the values that you want to localize by entering each value in a separate row.
- Click Submit.
Localizing properties with more than one value
Provide your localization team with access to all properties and ensure that no element of your interface remains untranslated. When generating a translation package, the system omits local properties that have multiple values, such as properties associated with picklists. You can add these properties to the translation package manually by editing their localization file in Dev Studio.
- In the navigation pane of Dev Studio, click App.
- Click Branches.
- In the application node, expand the branch where you work, and then expand the
Localization node.Result: The node displays a list of localization rules for the application.
Localization node in a sample application 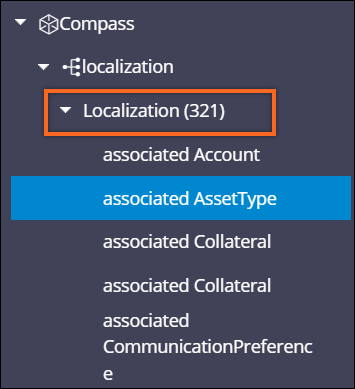
- On the localization rule list, select the rule associated with the property that you want to include in the translation package.
- On the rule form, click Check out.
- On the Default tab, select the Mark as editable checkbox.
- In the Locale Json field, enter the values that you want to translate in a JSON form.
- On the rule form, click Save, and then click Check in.
- In the Check in modal dialog box, in the Check-in comments field, enter a comment that describes your changes to the rule.
- Click Check in.
Creating localization Rules manually
Create localization Rules for components that are not yet referenced in your application to ensure that they too are covered by the localization effort. For example, if a Data Page is not referenced by any View, you can create a localization Rule for that Data Page manually.
- In the navigation pane of Dev Studio, click App.
- In the pane on the left-side of your window, click Classes.
- Search for and open the Rule-UI-Localization Class.
- On the Localization tab, click Create.
- On the New tab, enter the configuration information for
the new localization Rule:
- In the Label field, enter the name of the component that you want to localize.
- In the Context field, enter the type of a component that you want to localize.
- In the Apply to (Class) field, enter @baseclass.
- Click Create and open.
- Click Save.
Previous topic Internationalization and localization Next topic Converting your UI for right-to-left languages