Configuring URLs to open as standalone Assignments
Enable your users to directly access their Assignments through a URL that you can deliver in a message, such as an email. By using this feature, you can keep users informed about the actions that they need to perform in the system, and provide them with a convenient interface for operations.
For example, an insurance vendor might send an email with a link to an Assignment to a customer, and ask for claim information. The customer opens the Assignment by clicking the link, and authenticates to complete the work.- Create a new Activity:
- In the header of Dev Studio, click .
- In the Label field, enter the name of the Activity.
- In the Context section, set the current application as context.
- In the Apply to (Class) field, enter Work-.
- Click Create and open.
- On the Edit Activity form, on the
Parameters tab, define the following parameters for
the Activity:
Parameters in the Activity
Name Data type Required WorkID String No WorkPool String No - On the Pages and Classes tab, define the following pages
for the Activity:
Pages for the Activity
Page name Class pxThread Code-Pega-Thread newTabTempPage Work - On the Security tab, in the Restrict
access section, define the following access conditions:
- Select the Allow invocation from browser checkbox.
- Select the Require authentication to run checkbox, and then, in the fields below, define the Privilege setting.
- On the Steps tab, click Add a
step, and then configure the newly added step:
- In the Method field, enter Property-Set.
- In the Step page field, enter pxThread.
- Expand the step node by clicking the arrow next to the
Method field, and then define the following
parameters:
Parameters in the Step
PropertiesName PropertiesValue param.ThreadName .pxThreadName Property-Set configuration 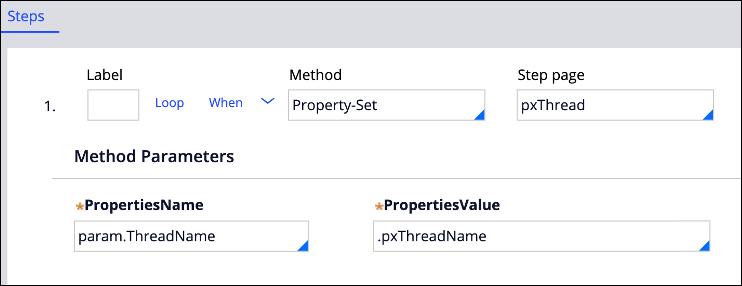
- Add a second step by clicking Add a step:
- In the Method field, enter Property-Set.
- Expand the step node by clicking the arrow next to the
Method field, and then define the following
parameters:
Parameters in the Step
PropertiesName PropertiesValue param.insHandle Param.WorkPool +" "+Param.WorkID param.PortalName "UserPortal" param.actionName openWorkByHandle Second step Property-Set configuration 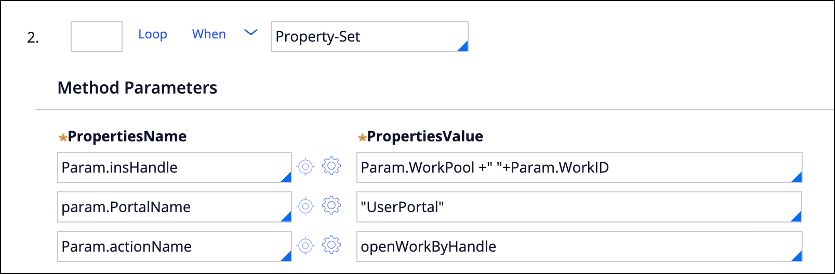
- Add a third step by clicking Add a step:
- In the Method field, enter Call pxOpenWorkItemNewTab.
- Expand the step node by clicking the arrow next to the Method field, and then, select the Pass current parameter page checkbox.
Third step Call configuration 
- Click Save.
- In Dev Studio, search for and open the pyIsAutoGenThread When rule.
- Open the rule for private edit.For more information, see .
- On the Advanced tab, remove the existing condition by clicking the Delete this row icon.
- On the Conditions tab, in the list on the right side of the window, select Advanced logic.
- In the Logic string field, enter @String.contains(@toUpperCase(pxThread.pxThreadName),@toUpperCase("autothread")).
- On the Rule form, click .
- On the New tab, ensure that the context points to the application Ruleset and the @baseclass, and then click Create and open.
Configuring the Activity that is called when the URL is mapped
Override the pyIsAutoGenThread When rule
Previous topic Salesforce Lightning Integration Next topic Hybrid mode