Using a robotic automation as a source for a data page
Robotic process automations (RPAs) are automations that run in the back office. You can use a robotic process automation (RPA) as a source for a data page by using Pega® 7.4 with Pega Robot Manager 5. For example, you can use an RPA to obtain a credit score from a legacy system that you can then display on a Pega Customer Service application account overview dashboard.
Robot Manager is required for using an RPA to source a data page. Use Pega Exchange to determine which version of Robot Manager is compatible with your Pega Platform version, then download it from Pega Exchange.
At run time, the data page invokes a REST endpoint that is hosted in Robot Manager. Using the data input from the data page, Robot Manager queues a request to be executed by an RPA robot. The RPA robot returns the result to Robot Manager, which in turn passes the result to the data page as a REST response. The run-time architecture is shown in the following diagram.
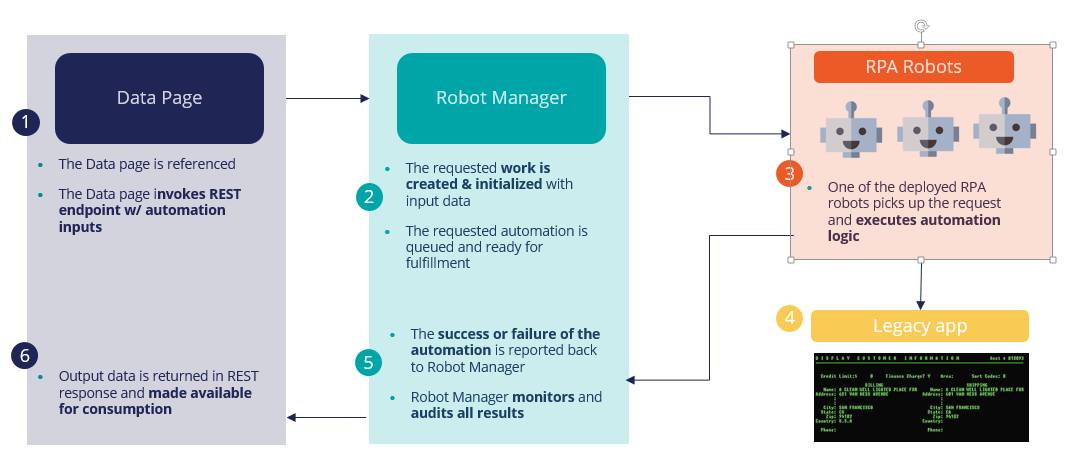 Run-time architecture
Automation status and error handling
Robot Manager enforces two levels of validation and error handling to ensure that the RPA robot returns valid data. When an RPA robot completes an automation, it returns a status message to Robot Manager that summarizes the success or failure of the recently executed automation. The status message contains one of the following values: Completed, Completed with errors, or Did not complete.
When Robot Manager receives an automation status of "Completed with errors" or "Did not complete", the assignment is treated as a failed automation. The original assignment is completed, and a new assignment is opened and routed to the Failed Robot Automations workbasket. The Failed Robot Automations workbasket can be changed to suit your business needs. Because the original assignment is considered complete, any data returned by the robot is also returned to the data page. For this reason, map the pyAutomationStatus property to the data page so that you are aware of the automation status.
If the robot returns data to Robot Manager that violates the validation criteria specified on the original assignment, the original assignment remains open, and Robot Manager returns an HTTP response code of 500 that indicates that the data cannot be populated on the data page.
Configuring an RPA as a data page source
The high-level tasks for using an RPA as a data page source are as follows:
- In Pega Express or Designer Studio, build a simple case type to model the overall robotic automation. Include the input fields that you want to pass to the RPA robot in the case data model, for example, customer ID, mailing address, or account number. In addition, include the output data fields that you want the robot to pass back to your Pega application, for example, credit score, account balance, or claim number.
- In Pega Express or Designer Studio, build a simple case life cycle. The case life cycle must include the Route to robot smart shape. The smart shape queues the automation request to the RPA robot. This is the case that will be referenced on the data page. (Link to help for RPA smart shape).
- In Pega Robotic Automation Studio, build the automation logic for the robot to execute. Once your automation is completed, reference the robot activity name in the Queue for robot smart shape.
- Configure the location of the Robot Manager host server and the authentication profile to use when connecting to it.
- Configure the data page.
Configuring the Robot Manager host server and authentication profile
Configure the location of the Robot Manager host server and the authentication profile to use when connecting to it in the application that uses the data page.
- From the Records explorer, click SysAdmin > Dynamic System Settings.
- Search for the pegarobotics/RoboticAutomationRequestorProfile setting.
- In the Value field, enter the name of the authentication profile that the REST connector will use to connect to the REST service.
- Click Save.
- Search for the pegarobotics/RobotManagerHostDomain setting.
- In the Value field, enter the domain details and the HTTP scheme of the Robot Manager host server, for example, https://localhost:8443.
For Pega 8.1.6 and 8.2.2 and later, enter the HTTP scheme including prweb, if applicable, for example, https://localhost:8443/prweb.
- Click Save.
Configuring the data page
When your automation is built and your case type is configured, you can configure the data page.
- From the Data Type Explorer, expand the data type, and click the data page that you want to source with an RPA.
- In the Source field, click Robotic automation.
- In the Robotic automation field, enter the name of the case type that you created.
- In the Timeout(s) field, enter the length of time that the data page will wait for data to be returned before timing out.
- In the Request Data Transform field, enter the request data transform to use to provide input data to the robot.
- In the Response Data Transform field, enter the response data transform to use to convert the results returned from the robot to the logical model used by the data page.
Example
The following example shows the case type data model, data page, request data transform, and response data transform for a data page that is sourced by an RPA that gets a customer's credit score. The data model for the Get credit score case type has two fields, Account idand Credit score. This information is used to configure the data transforms.
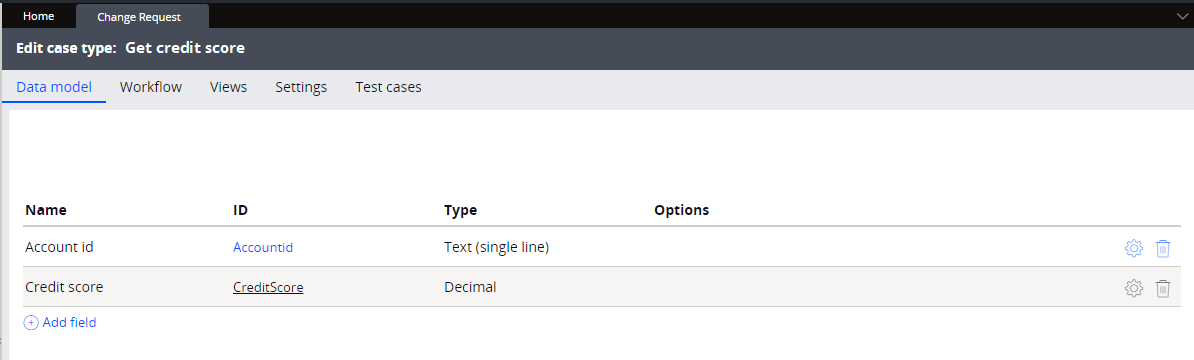 Case type data model
The following screen shows the data page configuration.
 Data page configuration
The request data transform passes in the customer ID and puts it into the Account idfield that is defined in the case type.
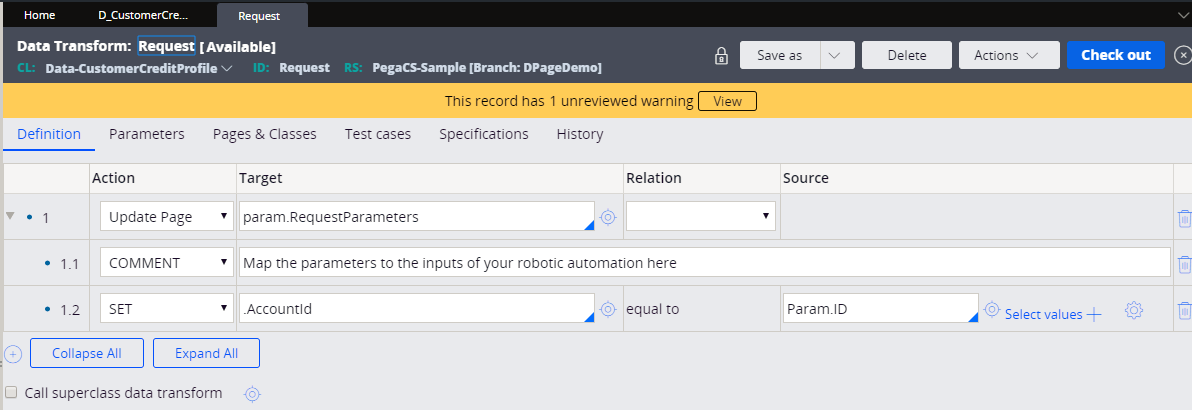 Request data transform
The response data transform takes the credit score from the physical data model and puts it into the CustomerCreditScorefield in the logical data model.
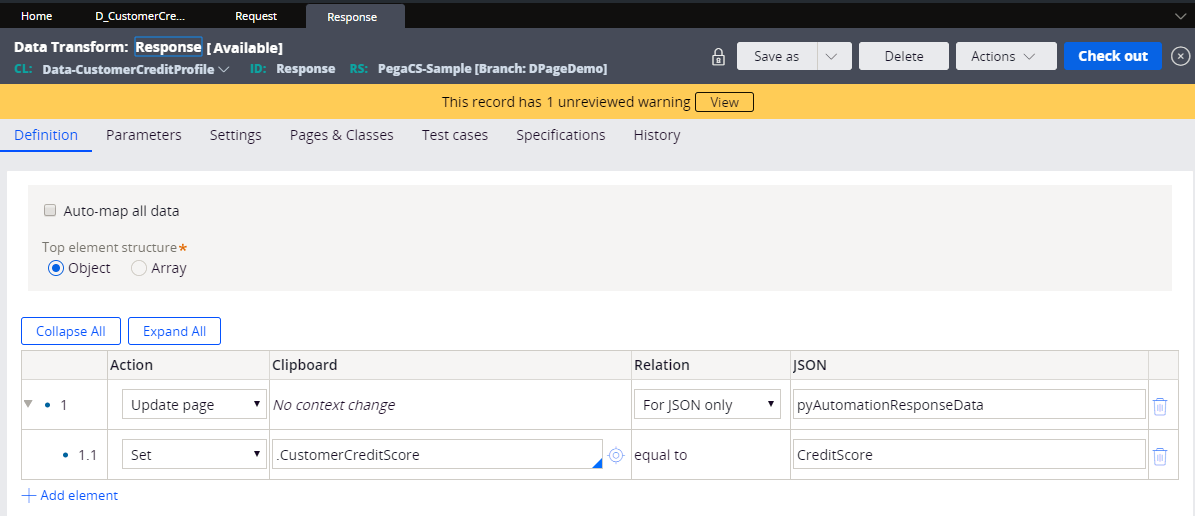 Response data transform