Creating a data flow
Create a data flow to process and move data between data sources. Customize your data flow by adding data flow shapes and by referencing other business rules to do more complex data operations. For example, a simple data flow can move data from a single data set, apply a filter, and save the results in a different data set. More complex data flows can be sourced by other data flows, can apply strategies for data processing, and open a case or trigger an activity as the final outcome of the data flow.
- In the header of Dev Studio, click .
- In the Create Data Flow tab, create the rule that stores the data
flow:
- In the Label field, describe the purpose of the data flow.
- Optional: To change the default identifier for the data flow, click Edit, enter a meaningful name, and then click OK.
- In the Apply to field, press the Down arrow key, and then
select the class that defines the scope of the flow. The class controls which rules the data flow can use. It also controls which rules can call the data flow.
- In the Add to ruleset field, select the name and version of a ruleset that stores the data flow.
- Click Create and open.
- In the Edit Data flow tab, double-click the Source shape.
- In the Source configurations window, in the
Source list, define a primary data source for the data flow by
selecting one of the following options:
- To receive data from an activity or from a data flow with a destination that refers to your data flow, select Abstract.
- To receive data from a different data flow, select Data flow. Ensure that the data flow that you select has an abstract destination defined.
- To receive data from a data set, select Data set. If you
select a streaming data set, such as Kafka, Kinesis, or Stream, in the Read
options section, define a read option for the data flow:
- To start reading any records that exist in the data set, select Read existing and new records.
- To discard any existing records and only read records that appear after the run is in the In-progress status, select Only read new records.
For more information on data set types, see Data set rule types.
For more information on the correlation between Read options and data flow run management for streaming data sets, see The use of streaming data sets in data flows.
- To retrieve and sort information from the PegaRULES database, an external database, or an Elasticsearch index, select Report definition.
- In the Source configurations window, click Submit.
- Optional: To facilitate data processing, transform data that comes from the data source by performing one or more of the following procedures:
- Optional: To apply advanced data processing on data that comes from the data source, call other rule types from the data flow by performing one or more of the following procedures:
- In the Edit Data flow tab, double-click the Destination shape.
- In the Destination configurations window, define the output point
of the data flow by selecting one of the following options:
Choices Options If you want other data flows to use your data flow as their source - In the Destination drop-down list, select Abstract.
- Go to step 13.
If you want an activity to use the output data from your data flow - In the Destination drop-down list, select Activity.
- Select the activity in which you want to use the output data.
- Fill in the parameters.
- Go to step 13.
If you want to start a case as the result of a completed data flow - In the Destination drop-down list, select Case.
- In the Case field, select one of the available options.
- In the Map source to case properties section, map the properties in the output data to the case properties.
- Go to step 13.
If you want to send output data to a different data flow - In the Destination drop-down list, select Data flow.
- In the Data flow field, select the data flow to which
you want to save the output data.Ensure that the data flow that you select has an abstract source defined.
- Go to step 13.
If you want to save the output data into a data set - In the Destination drop-down list, select
Data set.Do not save data into Monte Carlo or social media data sets.
- In the Data set field, select the data set to which you want to save the output data.
- If you selected a Database Table data set, in the Save options
section, choose how you want to save records into the data set:
- To insert new records without updating any existing records, select Only insert new records.
- To insert new records and update existing records, select Insert new and overwrite existing records.
A Database Table data set configured as a data flow destination 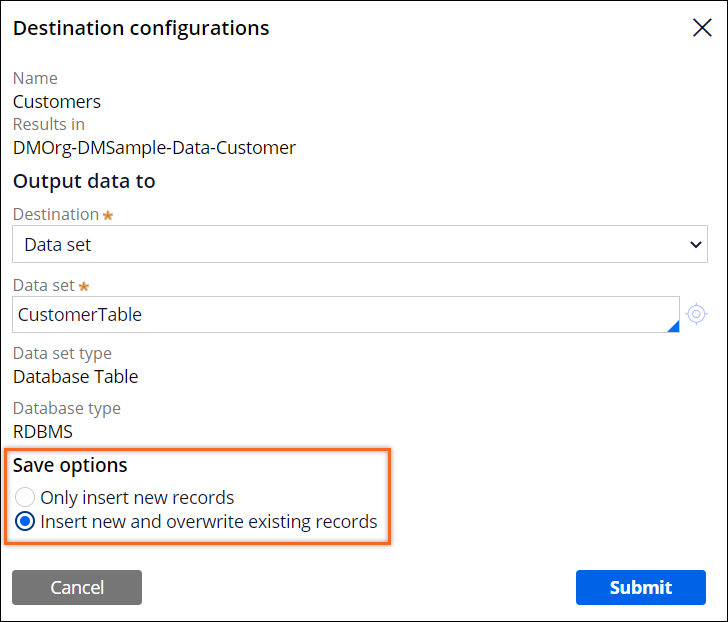
- If you selected a file data set as the destination, in the File creation
options section, select one of the following options:
- To ensure data resiliency, select Multiple files per
partition.
When this option is selected, the system creates multiple files in batch and real-time runs based on the processing time or the number of records per file as specified in the snapshot management section in the data flow run resilience settings. This option is recommended. For more information, see Creating a batch run for data flows and Creating a real-time run for data flows.
- To ensure backward compatibility with earlier versions of the file data set,
select One file per partition (backward compatible).
When this option is selected, the data flow creates one file per partition, and ignores the resilience settings of the data flow run.
A file data set configured as a data flow destination 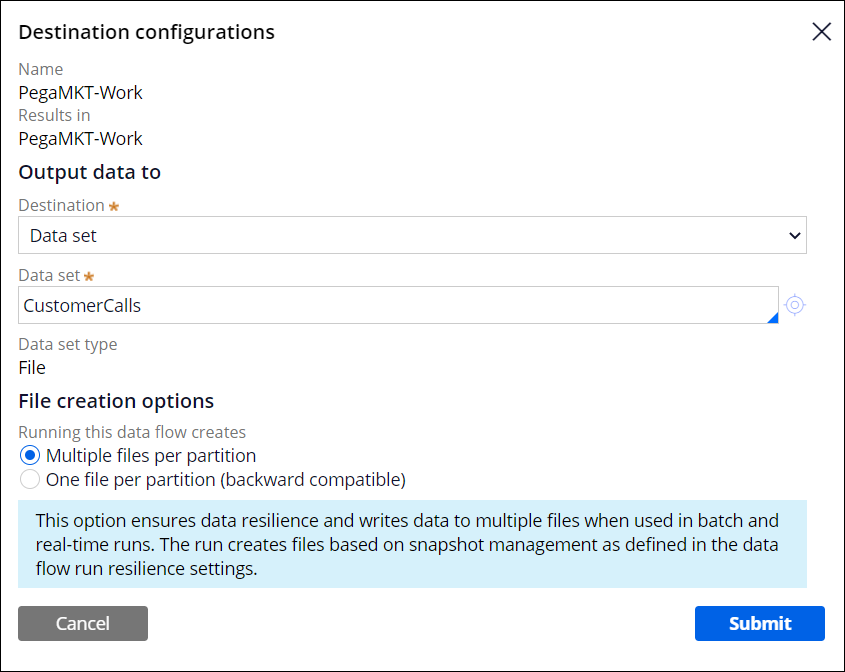
- To ensure data resiliency, select Multiple files per
partition.
- If you selected a Stream data set as the destination, and if you want to enable the
asynchronous processing of records, select the Save in background
checkbox.
A Stream data set configured as a data flow destination 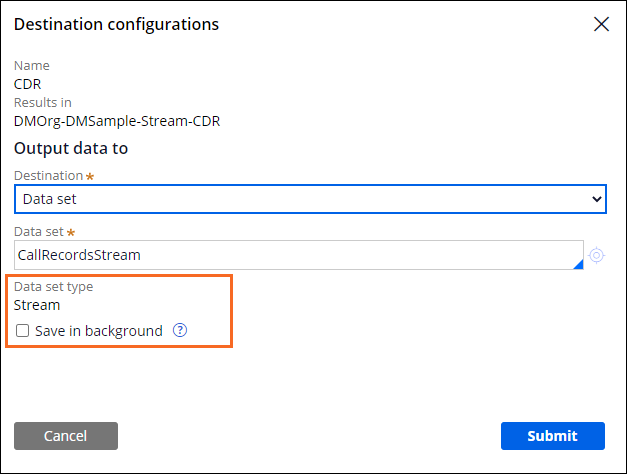
- In the Destination configurations window, click Submit.
- In the Edit data flow tab, click Save.
Previous topic Processing data with data flows Next topic Filtering incoming data