How to build a screenshot catalog in the Application Document Wizard
For guidance on the Application Document Wizard in previous releases, see:
- DCO 6.2 and 6.3 - Using the Application Document Wizard
- DCO 6.1 - Using the Application Document Wizard
By completing the fields in Step 3 of the Application Document Wizard, you can build a catalog of screenshots to include in your generated document.
Before you attempt to follow the guidance in this article, you need to select at least one case type to document in Step 1 and define screenshot data for each case type in Step 2.
For guidance on completing all steps in the Application Document Wizard, refer to the Related content section of this article.
Capturing screenshots
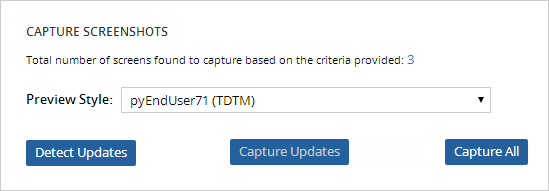
Use the options in the Capture Screenshots section to build the screenshot catalog.
The catalog is empty the first time you run the wizard.
To create the initial screenshot catalog:
- Review the list of screens to capture by clicking the number in the message: Total number of screens found to capture based on the criteria provided: [number].
- Select a skin name in the Preview Style field. The value that you select applies style and formatting to your application when each screen is captured.
- Click .
- Wait for the progress bar to complete.
You can now review or customize your images by following instructions in the Working with the screenshot catalog section below.
Working with the screenshot catalog
Use the available actions in the Screenshot Catalog table to review or override an image in the catalog.

Each row represents a screenshot of a step in a starting flow. Screenshots are stored in the system as instances of Data-Content-Image with an attached *.jpg file.
To review an image:
- Click a label in the Name column to open the Data-Content-Image instance.
- Inspect the contents of theImage Preview on the Main tab.
In this example, the screenshot captured for the EnterEvent flow action illustrates how the application prompts the user for event details such as title, location, and date. You can see in the image the values that were entered in each field during Step 2.
Once you generate the document, each screenshot appears as a labeled image in the section for the associated case type.
- Click .
To modify or override an existing screenshot in the Application Document Wizard, refer to the Working with screenshots help topic.
Related content
Using the Application Document Wizard
How to add application details in the Application Document Wizard
How to add Entity Relationship diagrams and screenshots an Application Document
Previous topic How to add application details in the Application Document Wizard Next topic How to order content in the Application Document Wizard