Complete the procedures in this section to adopt features after an update to Pega Customer Service version 8.7.
Pega Customer Relationship Management for Insurance 8.7 Post-update Tasks for Pega Cloud services
Environments
Pega Customer Relationship Management for Insurance 8.7 Post-update Tasks for Pega Cloud services
Environments
Pega Customer Relationship Management for Insurance 8.7 Post-update Tasks for Pega Cloud services
Environments
Pega Customer Relationship Management for Insurance 8.7 Post-update Tasks for Pega Cloud services
Environments
Pega Customer Relationship Management for Insurance 8.7 Post-update Tasks for Pega Cloud services
Environments
Pega Customer Relationship Management for Insurance 8.7 Post-update Tasks for Pega Cloud services
Environments
Pega Customer Relationship Management for Insurance 8.7 Post-update Tasks for Pega Cloud services
Environments
Pega Customer Relationship Management for Insurance 8.7 Post-update Tasks for Pega Cloud services
Environments
Pega Customer Relationship Management for Insurance 8.7 Post-update Tasks for Pega Cloud services
Environments
Pega Customer Relationship Management for Insurance 8.7 Post-update Tasks for Pega Cloud services
Environments
Adopting new settings (Pega Customer Service)
Pega Customer Service uses a requestor-scoped
Declare_CAApplicationSettings data page to store feature
settings that are referenced extensively in the application. The data page is sourced
from a series of cascading data transforms that originate in the
ApplicationSettings data transform. After an update, it is
strongly recommended that you compare data transforms in your implementation application
with data transforms in the built-on application to ensure that your implementation
application has the latest feature settings.
When a new version of the application is released, the
Declare_CAApplicationSettings data page in the built-on
application is updated with any new settings, but the copy of the data page in your
implementation application does not include the new settings. Missing settings in the
implementation application can lead to errors or unexpected behaviors in the
application.
Note: If you are using an industry version of Pega Customer Service,
run this tool from the industry application, and not from the base application.
Check whether your implementation application is missing any of the data
transforms that contain application settings.
In the header of Dev Studio, search for and open these two data
transforms:
The ApplicationSettings data transform for
your implementation layer.
The ApplicationSettings data transform for
the locked PegaAppCA class in the built-on
application.
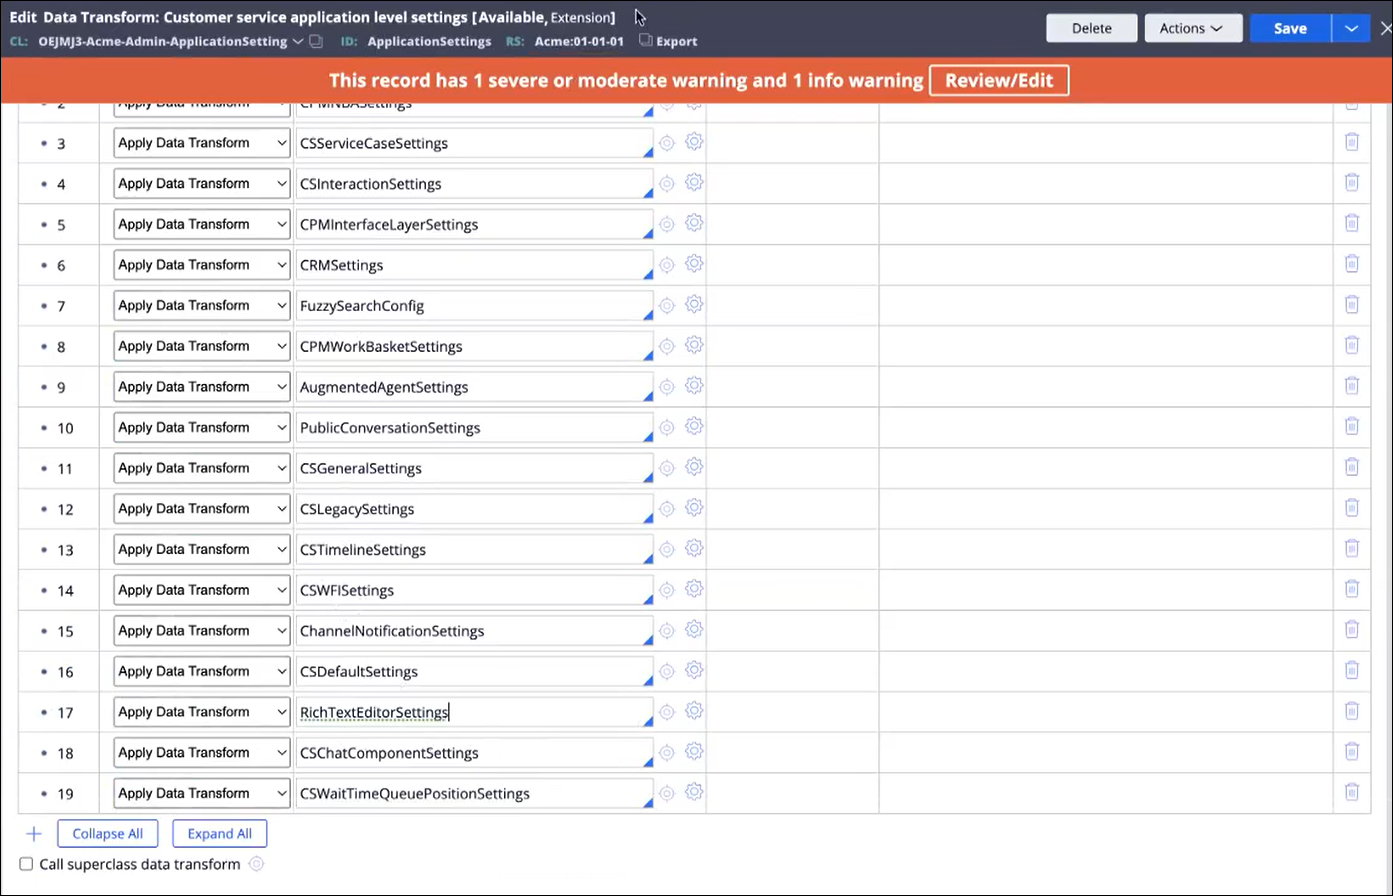
Compare the the number of rows in each of the open data transforms.
Each row in the ApplicationSettings data
transform identifies a data transform that contain the settings for the
application. If your implementation data transform contains less rows
than the PegaAppCA data transform, then copy the
missing data transforms to your implementation layer.
The following
figure shows the ApplicationSettings data
transform with 19 rows:ApplicationSettings data transform
Copy the missing data transforms to your implementation layer.
In the header of Dev Studio, search for and open the missing data
transform, in the PegaAppCA class.
Copy the missing data transform to your implementation layer.
Repeat the above steps for all missing data transforms.
Open the ApplicationSettings data transform for
your implementation layer, and add the data transforms that you just
copied to your implementation layer.
Check for missing properties
Check whether your existing data transforms are missing any properties.
In the header of Dev Studio, search for and open these two data
transforms:
The ApplicationSettings data transform for
your implementation layer.
The ApplicationSettings data transform for
the locked PegaAppCA class in the built-on
application.
Starting with the first row, click the Open icon
to the right of the data transform name to view the data
transform.
Repeat the above step for the same row in the data transform for the
PegaAppCA class.
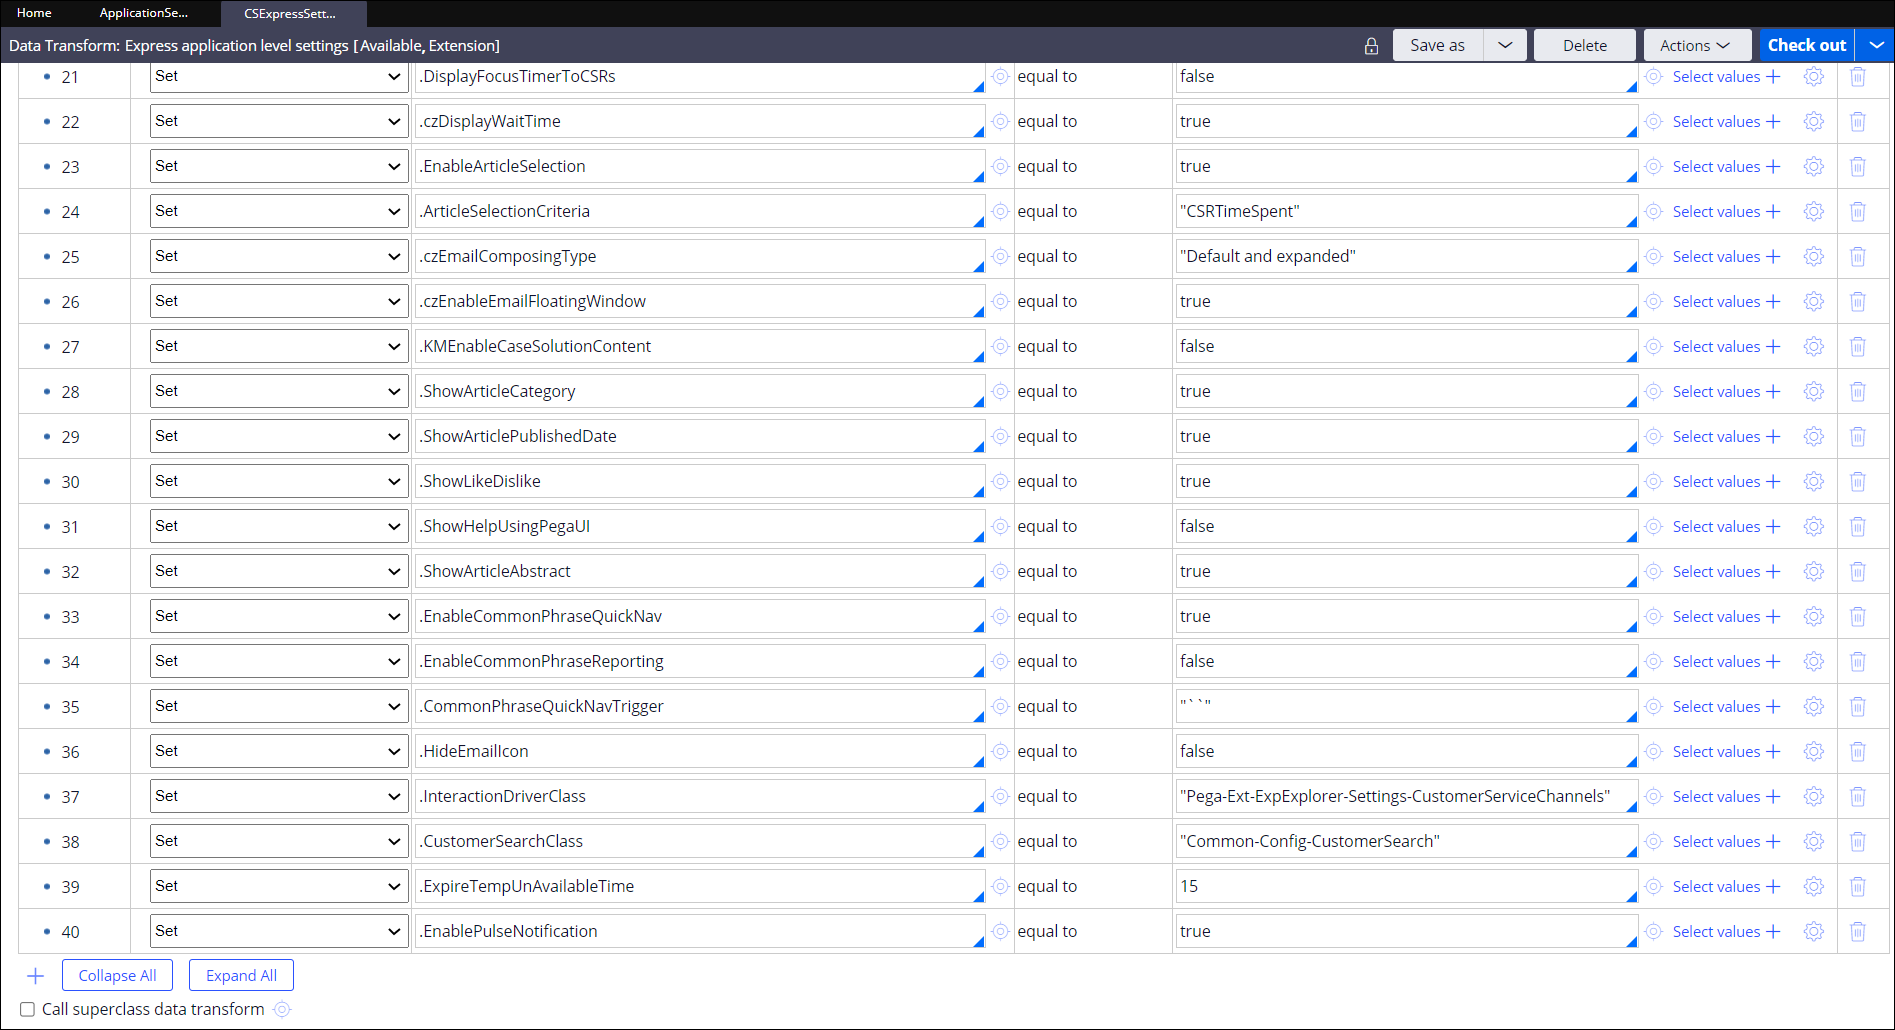
Compare the number of rows in each of the open data transforms.
Each row in the data transform identifies a property that controls a
setting for the application. If your implementation data transform
contains less rows than the PegaAppCA data
transform, then add the missing properties to the data transform that is
in your implementation
layer.
The
following figure shows the CSExpressSettings
data transform with 40 rows:Example of settings properties in a data
transform
Repeat the above steps for all of the settings data transforms that
were present in your ApplicationSettings data
transform before the update.
Enabling settings for business conditions (Pega Customer Service)
To ensure that business conditions are created for relevant categories and that they
are applied to the suggested cases, enable the settings for the
RelevantRecordCategories and
EnableBusinessConditionsToConfigureSuggestedCases rules. These
settings are disabled by default when you upgrade your application.
If you are using an industry application, complete this
procedure in the industry implementation application.
In the header of Dev Studio, click ConfigureSystemReleaseToggles.
To ensure that the business conditions are created, follow these steps:
On the Toggle Management page, in the
Identifier column, search for
RelevantRecordCategories.
In the When rule column, click
pzToggle-RelevantRecordCategories.
On the When rule page, ensure that the
Is Toggle Enabled using field has a value of
PegaRULES and in the drop-down list, you
select RelevantRecordCategories.
Click Save.
To ensure that business condition are applied to the suggested cases, follow
these steps:
On the Toggle Management page, in the
Identifier column, search for
EnableBusinessConditionsToConfigureSuggestedCases.
In the When rule column, click
Toggle_EnableBusinessConditionsToConfigureSuggestedCases.
On the When rule page, ensure that the
Is Toggle Enabled using field has a value of
Customer Service and in the drop-down list,
you select
EnableBusinessConditionsToConfigureSuggestedCases.
Click Save.
Adopting customer search (Pega Customer Service)
Version 8.7 of Pega Customer Service adds
enhanced customer search configuration capabilities. This new feature is disabled by default so
as not to interfere with existing customer searches. Customers updating from an earlier version of the application can choose to adopt the
new customer search feature by enabling the feature. New customers will enable this feature when
creating their implementation application.
Note: If using an industry application, complete this procedure in the industry
implementation application.
Version 8.7 adds enhanced customer verification
capabilities to the Pega Customer Service applications, and deprecates the little-used
legacy verification rules. To adopt this new feature, complete the steps below. For more
information about the new capabilities, see Customer verification.
Note: If using an industry application, complete this procedure in the industry
implementation application.
Define customer verification settings and questions for different interaction
types and service request types.
Version 8.7 of Pega Customer Service replaces the
old customer composite feature with a new version of the feature that you can configure in App
Studio. The new version of this feature is disabled by default so as not to interfere with
existing composites. After you update your application, you can choose to adopt the new customer
composite functionality by enabling the feature. If you are a new customer, the Application
Wizard automatically enables this feature when you create your implementation
application.
Note:
If you use an industry version of the Pega Customer Service application, complete
this procedure in the implementation application that you created for the industry version
of your application, and not in the base application.
If you do not enable this feature, the Configure customer
composites menu item that is used to configure composite tab content is
hidden.
In the header of Dev Studio, click ConfigureSystemReleaseToggles.
In the Identifier column, locate the
ConfigureComposites toggle, and then click the
Edit icon on the right side of the row.
Select the Enable toggle for all option.
Click Submit.
What to do next: Configure the composite tabs and content. For information, see
Customer composite.
Migrating from Legacy Webchat to Web Messaging (Pega Customer Service)
Switch to the Pega Customer Service application's Digital
Messaging interface from your existing Legacy Webchat interface if you want to use the new
React-based Web Messaging widget.
On the Security tab of the application definition in Dev
Studio, enter the Manager ID and the Manager
Key in the Digital Messaging security
section, and then click Save.
Note: Make sure you are in the application from your stack in which you are
setting up your channels.
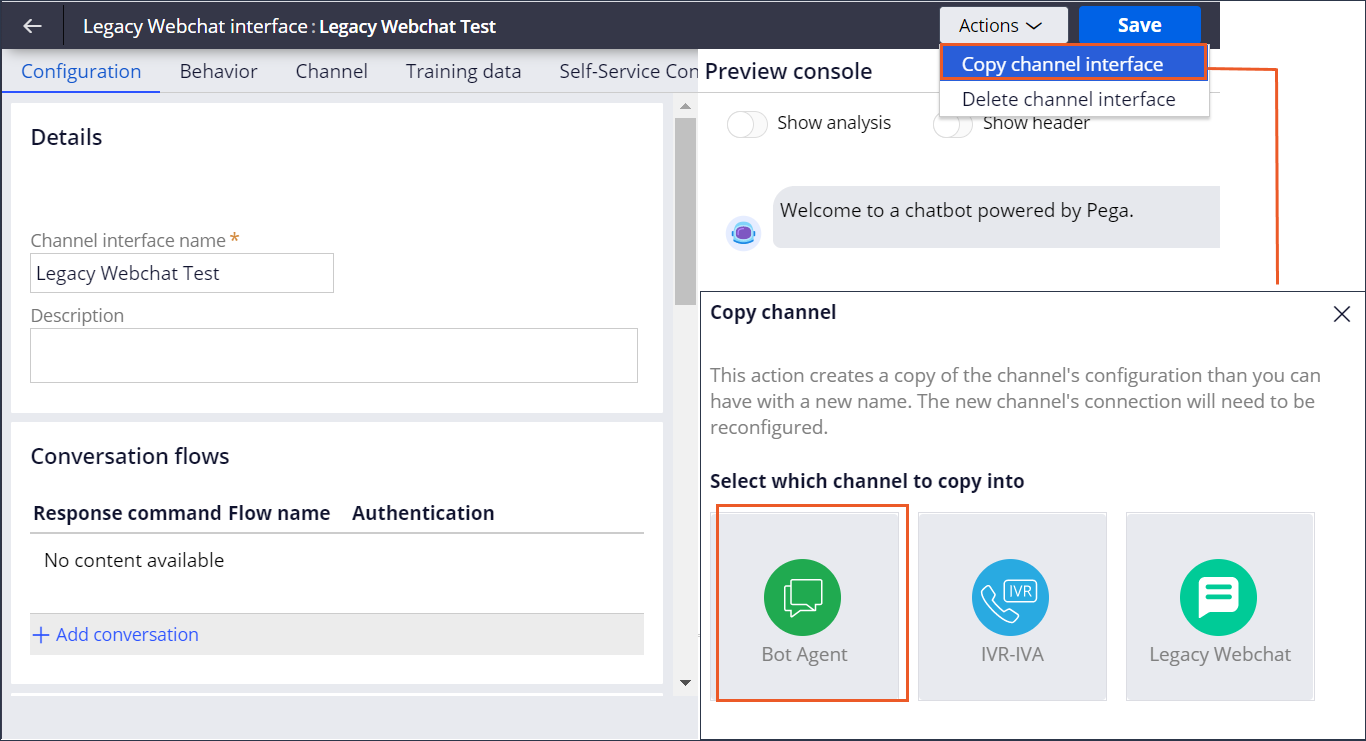
Navigate to your Legacy Webchat interface.
On the right side of the page, click ActionsCopy channel.
In the Copy channel pop-up window, click Bot
Agent to switch from your Legacy Webchat to the Digital
Messaging interface.
Switching from Legacy Webchat to Digital Messaging
interface
Note: Creating a copy of the Legacy Webchat channel using the Bot agent option
creates a digital messaging interface with built-in conversation flows, case
commands, and responses configured in the Legacy Webchat interface.
On the Channel tab of your new Digital Messaging
interface, in the Set up section, enter Template
Operator and Base URL (URL for the
instance), and then click Save. The system displays the
Manage connections button.
You can now add your connections to the different Digital Messaging channels
through the Digital Messaging Manager.
Click Manage connections to access the Digital Messaging
Manager.
In the Digital Messaging Manager, create a Web Messaging
connection and configure its appearance.
To display a welcome message to customers when they open the widget for the
first time, add the message in the Display Message field
on the General tab of Web Messaging connection. The
welcome message configured in the Behavior tab of the Digital Messaging
interface will not apply.
Deploy the Web Messaging widget on the client’s website pages by copying the
code snippet on the Installation tab of your Web
Messaging connection and using this snippet to replace the Legacy Webchat Mashup
script.
Checking your Pega Customer Service access roles for the required privilege
In Pega Customer Service, Pega Call, and Pega Knowledge versions 7.4 and later, security enhancements on several rules require
that an operator have new privileges to access the rules. Without the new privileges, an
operator cannot access the rules required to run the application. After you update, complete
the following steps to check if you need to add the new privileges to any of your access
roles.
If you update from an earlier release, and your application uses the out-of-the-box
access roles, your operators acquire the required privilege after the update.
Review your access groups to determine whether you use any of the access roles
that have been updated to include the new privilege:
Access role and privileges
Access role
Privilege
Pega Customer Service
PegaCA:CSR
crmCanCSUserRunActivity
PegaCA:Manager
crmCanCSUserRunActivity
PegaCA:SysAdmin
crmCanCSUserRunActivity
PegaCS:SelfServiceUser
crmCanCSUserRunActivity
Pega Call
PegaCTI:CSR
crmCanCTIUserRunActivity
Pega Knowledge
PegaKM:Approver
KMCanUserRunActivity
PegaKM:Author
KMCanUserRunActivity
PegaKM:CommunityUser
KMCanUserRunActivity
PegaKM:ExternalKM
KMCanUserRunActivity
PegaKM:Publisher
KMCanUserRunActivity
If an access group does not include an access role with the required
privileges, ensure that your operators can access the rules that are required to
run your application:
If you use out-of-the-box access roles, add the access role to the access
group.
Updating from Pega Customer Service for Insurance 7.22 or 7.31
After an update to the current version of Pega Customer Service for Insurance, perform the
following post-update tasks if you are updating from Pega Customer Service for Insurance 7.22 or
7.31.
If ruleset validation was in place, note that application validation is now
recommended instead. Starting in release 8.3, Pega no longer ships the Gateway
ruleset that was previously used for ruleset validation.
User defined functions (UDFs) are no longer supported for Cloud deployments.
Existing objects and instances referencing UDFs in the 8.4 and later application
will generate missing value errors for unexposed columns. If your customized
application rules used properties that relied on UDFs, you must optimize the
affected properties after the update by running the column population job to
repopulate these properties. To obtain the list of the properties you must
optimize after the update, review the DDL SQL file to find the altered database
tables.