

         This documentation site is for previous versions. Visit our new documentation site for current releases.      
 

Creating a case type rule form in Dev Studio

Updated on November 30, 2021

Provide advanced options for your business processes by creating case types through a case type rule form. For example, you can select an application layer in which to store your case type, or define multiple options at once, for example, for the people that your case type involves, processes that can support your case type, or dependencies with other case types.

Creating case types through a rule form is suitable for advanced developers. If your use case does not require advanced configurations, create a case type by using the Case Designer tool, which helps you visualize your business process in a low-code way. For more information, see Creating a top-level case type.
  1. In the header of Dev Studio, click CreateProcessCase Type.
  2. In the Case Type Record Configuration section, in the Label field, briefly describe the purpose of your case type.
    For example: Enter Loan requests review.
  3. In the Context section, define how your application stores the case type:
    1. If you use branches to work on your application, in the Development branch list, select a branch that you want to use to store the case type.
    2. In the list of application layers, select a layer in which you want to store the case type.
    3. In the Applies to field, press the Down arrow key, and then select the class to store the case type.
    4. In the Add to ruleset list, select a ruleset and a ruleset version to store the case type.
  4. Optional: To override the default work item that your application associates with this development change, press the Down arrow key in the Work item to associate field, and then select a work item.
  5. Click Create and open.
  6. Optional: To customize how the case appears at run time, change the icon that the system displays to users when processing the case:
    1. In the Appearance section, click Edit.
    2. In the Appearance dialog box, select a new icon.
    3. Click Submit.
  7. Optional: To define people involved in a case by reusing an existing rule, in the Work parties rule field, provide a relevant rule name.
    You can also define work parties manually. For more information, see Configuring case participants.
  8. In the Starting process section, click Add a row, in the text field press the Down arrow key, and then select a process that runs when the case starts at run time.
    You only provide a starting process for case types without the Create stage. For more information, see The Create stage.
  9. Optional: To enable users to supplement the case with additional processing, in the Case wide supporting processes section, in the text field press the Down arrow key, and then select a supporting process that users can add to this case.
    1. Optional: To add more supporting processes, click the Add a row icon, and then provide another process.
  10. Optional: To create dependencies between case types, in the Child case types section, enter a case type that users need to resolve before the current case reaches its resolution.
    For more information about configuring child case types on a rule form, see Creating case hierarchy on a case type rule form.
  11. In the Case wide actions section, define how users interact with a case by providing a flow action:
    1. In the Flow Action column, enter a flow action.
    2. In the Visibility column, define when a flow actions starts by selecting a When rule, an expression, or an option to always start the flow action.
  12. Optional: To look for similar cases in the database so that you avoid creating duplicate cases, in the Case match section, in the text field, enter a rule name that evaluates conditions used for finding duplicate cases.
  13. Click Save.

Creating case hierarchy on a case type rule form

Organize hierarchically your business processes by adding child case types to your main, parent case type. Consequently, you define which additional actions users need to resolve before your main process is complete. For greater flexibility and efficiency, you can define conditions under which a child case type starts. When you use a case type rule form to create case hierarchy, you can select advanced options and
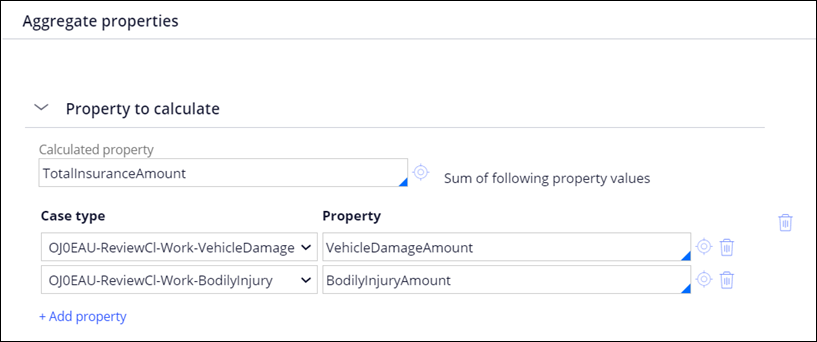
 perform additional configuration.

For example, you can supplement your parent case type Review a job candidate with a child case type Run a background check to provide more information about a candidate who applies for a position in your organization. To make the process more flexible, you can run a background check on some of the candidates, for example, when you want to hire a manager.
Before you begin: Create a parent case type by using a rule form. For more information, see Creating a case type rule form in Dev Studio.
  1. In the navigation pane of Dev Studio, click Records.
  2. Expand the Process category, and then click Case Type.
  3. In the list of case types instances, open the case type that you want to edit.
  4. On the Process tab, in the Child case types section, in the text field, press the Down arrow key, and then select a case type that you want to use in the case type hierarchy.
    For example: Enter Run background check.
  5. Optional: To define how case types in the hierarchy exchange data, click Data propagation, and then define the sharing options for the data:
    1. In the Data Propagation dialog box, click Add property values.
    2. In the Propagate property value column, enter a source property from the parent case type.
      For example: Enter PhoneNumber.
    3. In the To property value column, enter a destination property in the child case type.
      For example: Enter ContactNumber.
      Result: At run time, your application populates the contact number in a Run background check child case type using a value that a user provides for a phone number in a Review job candidate parent case type.
    4. Optional: To propagate values for more properties, repeat steps 5.a through 5.c.
    5. Optional: To use a data transform to pass the values, select the Apply data transform check box, and then, in the text field, enter a data transform.
    6. Click Submit.
  6. Optional: To define when the child case starts, click the Disclose icon, and then define case instantiation options:
    ChoicesActions
    Allow users to start a child case manually at run time
    1. Select the Manual instantiation check box.
    2. Optional: To allow users to start the case only under certain circumstances, in the Permitted When field, enter a When rule that defines when a user can start a child case.
      For example: Select a When rule that allow users to start a Run a background check child case type only if a job candidate applies for a manager position.
    Start a child case automatically
    1. Select the Automatic instantiation check box.
    2. Select whether a child case starts together with a parent case or if a child case starts when a case fulfills the dependencies.
    3. Optional: If you configure a case type to start during a parent case creation, to allow case instantiation only under certain circumstances, in the Permitted When field, enter a When rule that defines when the child case starts.
      For example: Select a When rule that starts a Run a background check child case type only when a job candidate has less than five years of work experience.
    Tip: You can select both manual and automatic start of a case type. If the system cannot start a case type automatically, a user can start the case manually. If you skip defining case instantiation options, the system always starts the child case.
  7. Optional: To define additional child case type settings, click the Disclose icon, and then provide relevant values:
    1. To define how many instances of a child case the application can start at run time, in the Max Instances field, enter an integer.
    2. Optional: To indicate that the parent case type cannot reach resolution before the child case type is complete, select the Required check box.
  8. Optional: To add more child case types, click Add a row, and then repeat steps 4 through 7.
  9. Click Save.

Calculating properties in a case type

Save time and manage your case type resources efficiently by automatically calculating aggregated properties. You can calculate a property by sourcing values from other case types instead of asking users to provide values manually.

For example, in an Insurance claim case type, you can calculate the total insurance amount by adding the values for the insurance amount from Vehicle damage and Bodily injury child case types.
  1. In the navigation pane of Dev Studio, click Records.
  2. Expand the Process category, and then click Case Type.
  3. In the list of case type instances, select the case type that you want to edit.
  4. On the Calculations tab, in the Aggregate properties, expand the Property to calculate section.
  5. In the Calculated property field, enter a destination property that is a sum of other properties.
    Select a single value property of an integer or decimal type.
    For example: Enter TotalInsuranceAmount.
  6. In the Case type column, select a case type that stores a source property.
  7. In the Property column, enter the source property that you want to use to provide the value.
    For example: Enter VehicleDamageAmount.
  8. Optional: To add more properties, click Add property, and then repeat steps 6 through 7.
    For example: Add a BodilyInjuryAmount property.
  9. Optional: To add more aggregated properties, click Add calculation, and then repeat steps 5 through 7.
  10. Click Save.
For example: The following figure shows a total insurance amount calculated by aggregating vehicle damage and bodily injury amounts:
Calculating aggregated properties
A case type rule form configured to automatically calculate aggregated properties.

Configuring stages on a case type rule form

Provide advanced configurations for sets of actions in your business processes by adding stages on a case type rule form. As a result, you can configure multiple settings from a single screen. For example, you can define which optional processes you want to enable for the case type, or what attachments users need to provide in order for the case to enter a specific stage.

In a sample scenario with a Review insurance claims case type, you can add primary stages that represent collecting information, reviewing gathered data, and making a decision about rejecting or approving a claim. Primary stages represent an expected path of a business process. You can also add an alternate path to define actions that happen in a case when an exception occurs. In the Review insurance claims case type, for example, you can create an alternate stage that the case enters after rejection of the claim.
Adding stages through a rule form is suitable for advanced developers. If your use case does not require advanced configurations, populate your case types by using the Case Designer tool, which helps you visualize your business processes in a low-code way. For more information, see Stages in a case life cycle.
  1. In the navigation pane of Dev Studio, click Records.
  2. Expand the Process category, and then click Case Type.
  3. In the list of case type instances, select the case type that you want to edit.
  4. On the Stages tab, add a stage to your case type:
    • To add a primary stage, in the Primary Stages section, click add primary stage, and then in the text field, enter a stage name.
    • To add an alternate stage, in the Alternate Stages section, click add alternate stage, and then in new text field, enter a stage name.
  5. Configure conditions for skipping a stage:
    • To ensure that a case always enters a stage, in the Skip stage list, select Never.
    • To skip a stage by evaluating a When rule, in the Skip stage list, select When Rule, and then in the text field, enter a When rule name.
    • To skip a stage by using an expression, in the Skip stage list, select Expression, and then in the text field, enter an expression name.
    Note: You can configure skip conditions for primary stages only. A case cannot skip the last stage.
  6. Configure case behavior when a stage is complete:
    ChoicesActions
    Move the case to the next stageIn the When all processes in this stage are complete section, select Automatically move to next stage.

    Note: This option is available for primary stages only.
    Allow users to perform optional actions before moving the case to the next stageIn the When all processes in this stage are complete section, select Wait for a user action.
    Resolve the case
    1. In the When all processes in this stage are complete section, select Resolve the case.
    2. In the Resolution status field, enter a status that a case enters upon resolution.
      For example: To display a successful resolution status, enter Resolved-Completed.
    3. Optional: To delete any work that remains after the case resolution, select the Delete open assignments check box.
    4. Optional: To delete any dependent cases after the case reaches resolution, select the Delete open assignments check box.
  7. Optional: To display a case progress status, in the Set case status on stage entry field, define the status that a case acquires when entering the next stage.
    For example: To display a status for an insurance case that enters a stage of reviewing gathered insurance data, enter Pending-Review.
    Tip: You can reuse existing statuses or enter a new value.
  8. Optional: To provide enough information to process a case, in the Requirements section, define the requirements that the case needs to meet before entering the next stage:
    • To validate data, in the Validation field, enter validation that the case needs to pass before entering the next stage.
    • To assign time frames to the stage and ensure that users resolve work in a timely manner, in the Service level field, enter a service-agreement rule.
    • To ensure that the case has at least one attachment before entering this stage, in the Attachments required for stage entry section, click Add required attachment, and then select an attachment category.
    For example: You can validate format of personal details that users provide or require a document with an expertise of damage of insured goods.
  9. In the Automatically launched processes section, define processes that occur in the case without additional triggers:
    1. Click Add process.
    2. In the Process field, enter a process that you want to run.
    3. In the Start process list, define whether a process runs always, when a When rule evaluates to true, or when an expression evaluates to true.
    4. In the Start Step list, define whether the process runs after the previous step or upon a stage entry.
      The first process in a stage always runs upon a stage entry.
    5. Optional: To apply time frames for users to resolve the process, in the Service level field, enter a name of a service-level agreement rule that you want to use.
    6. Optional: To add more processes, repeat steps 9.a through 9.e.
    The Create stage has a default CreateForm_Default automatically launched process. For more information about the Create stage, see The Create stage.
    For example: The following figure shows a sample configuration for a process that starts after a When rule evaluates to true and that users need to resolve within a goal and deadline defined by a service-level agreement rule:
    Configuring a process
    Case type rule form with sample configurations for a process
  10. Optional: To increase flexibility and provide additional processing in a case, add an optional process:
    1. In the Optional Processes section, click Add process.
    2. In the Process field, enter a name for the process that you want to use.
    3. In the Visible list, define whether a process runs always, when a When rule evaluates to true, or when an expression evaluates to true.
    4. Optional: To add more processes, repeat steps 10.a through 10.c.
    For example: You can add an optional process to review an insurance claim by a manager if an insurance amount exceeds a specific value.
  11. Optional: To allow users to perform out-of-sequence tasks that do not influence the main events in the case, in the Optional actions section, add an optional action:
    1. Click Add action.
    2. In the Local Action field, enter an action that you want to use.
    3. In the Visible list, define whether a process always runs, when a When rule evaluates to true, or when an expression evaluates to true.
    4. Optional: To add more actions, repeat steps 11.a through 11.c.
    For example: You can add an optional action responsible for updating the personal details of a customer. If necessary, a customer service representative (CSR) can update the details without interrupting the main case processing.
  12. Click Save.

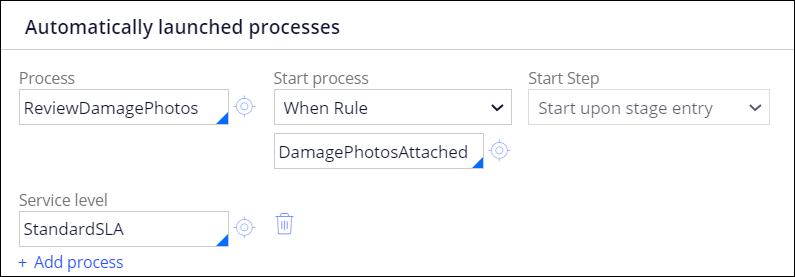
Categorizing attachments on a case type rule form

Organize the information and materials in your case types by creating categories for attachments. When you use a case type rule form to create attachment categories, you can access additional data about a category, such as a property that you can later use to reference attachments by category.

For example, in a Vehicle damage insurance claim case type, you can create an attachment category for photos of vehicle damage that a customer service representative (CSR) needs to examine when reviewing an insurance claim. You can then easily access attachments in this category by referencing a relevant property. To meet your specific business needs, you can also create multiple attachment categories for every case type.
Categorizing attachments through a rule form is an option suitable for advanced developers. You can also create attachment categories in Case Designer, in the case type settings. For more information, see Categorizing case attachments.
  1. In the navigation pane of Dev Studio, click Records.
  2. Expand the Process category, and then click Case Type.
  3. On the Attachment Categories tab, click Add attachment category.
  4. In the Category column, provide a category name:
    • To reuse an existing category, press the Down arrow key, and then select a category that you want to use.
    • To create a new category, enter a unique category name.
    Result: The system autopopulates the description and property reference of the category.
  5. Optional: To change the category description, in the Description column, enter some new text.
  6. Optional: To ensure that a case contains at least one attachment in the attachment category when a user submits the case, select the check box in the Required for resolution column.
  7. Optional: To change the name of the property, in the Property reference column, click Rename, and then, in the text box, enter a new name.
  8. Optional: To add more attachment categories, repeat steps 3 through 7.
  9. Click Save.
For example: The following figure shows an attachment category for photos that are required in a case type to review vehicle damage insurance claims:
Attachment category configuration
A case type rule form with a sample attachment category configured.

Defining purpose of a case type by creating specifications

Engage with your stakeholders and communicate goals that you want your case type to achieve by creating specifications. Specifications represent actions that users can perform by using your application so that all parties involved in the development process have a common understanding of the purpose of your application.

For example, for a Hiring a job candidate case type, you can create specifications that describe the following actions:
  • HR worker can collect personal information from the candidate
  • Job candidate can upload documents
  • Hiring manager can accept the candidate
Before you begin: Create specifications that you want to associate with your case type.
Associating specifications with case types is suitable for advanced developers. To describe the purpose of your application in a low-code and more user-friendly way, create features.
  1. In the navigation pane of Dev Studio, click Records.
  2. Expand the Process category, and then click Case Type.
  3. In the list of case type instances, open the case type that you want to edit.
  4. On the Specifications tab, click Click to associate specifications.
  5. In the Name column, press the Down arrow key, and then select a specification that you want to associate with the case type.
  6. Optional: To add more specifications, repeat steps 4 through 5.
  7. Click Save.

Have a question? Get answers now.

Visit the Support Center to ask questions, engage in discussions, share ideas, and help others.

Did you find this content helpful?

Want to help us improve this content?

We'd prefer it if you saw us at our best.

Pega.com is not optimized for Internet Explorer. For the optimal experience, please use:

Close Deprecation Notice
Contact us