Creating design templates
Meet the business needs of your projects by creating custom design templates that you can use to arrange the content of your application into reusable patterns. Design templates define the shape of the regions that hold the elements of your interface.
While Pega Platform provides out-of-the-box templates to cover a variety of design scenarios, you can also create custom patterns.In the header of Dev Studio, click .
On the Create Section tab, specify the label, context, class, and ruleset for the design template, and then click Create and open.
If the section is based on a template, in the section editor header, click convert to full section editor, and then confirm the conversion.
On the Settings tab, convert your section to a design template:
In the list, click Design template.
Next to the Template icon field, click the Show image viewer icon.
Browse for and select the image that you want to use as an icon that represents your design template in the design menu, and then click OK.
On the Design tab, define the structure of your template:
From the Structural list, add layouts to the work area of your template, and then configure them to represent the structure of your design template.
To add a control to a layout, expand the list representing the control type, drag the control that you want to add to the work area, and then configure the control.
When you add a control to a template, all sections that use that template reference that particular control. For more information on configuring controls, see Controls.
Convert empty dynamic layouts into regions:
Select the dynamic layout that you want to convert, and then click the View properties icon.
In the Dynamic layout properties window, in the Design template section, select Use as template region.
In the Region name field, provide a meaningful name for the region.
Click Submit.
To convert other layouts, repeat steps 6.a through 6.d for that layout.
On the section form, click Save.
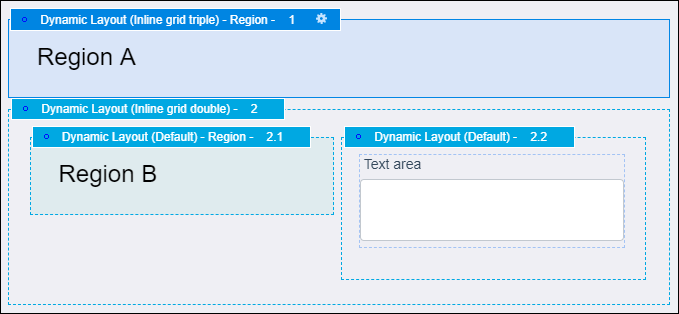
The following design template has two regions. Region A is a dynamic layout configured as an inline grid triple section. When you apply the template to a section and populate it with UI elements, this region's settings arrange those elements into three columns.
Region B is embedded in an inline grid double dynamic layout. The inline grid double layout displays content in two columns. In this example, both columns contain embedded layouts. The dynamic layout on the right side of the template cannot be converted into a region, because it holds a text area control.
Previous topic Best practices for design templates Next topic Referencing data