Creating navigation rules
Build intuitive menus that match the business requirements of your application by creating custom navigation rules. Navigation rules help you define the structure and content of a context menu or a navigation panel.
For example, your loan management application might require the following menu:- Transfer
- Transfer to user
- Transfer to manager
- Attach note
- Send email
For the Send email row, you want the menu to display the customer email address as a badge next to the menu row. To prepare, you create a CustomerEmail field that stores this information.
In the header of Dev Studio, click .
On the Create Navigation tab, specify the label, context, and ruleset for the section, and then click Create and open.
On the Editor tab, define the structure of the navigation rule by adding rows from the editor menu.
For example:Sample navigation rule structure and the editor menu 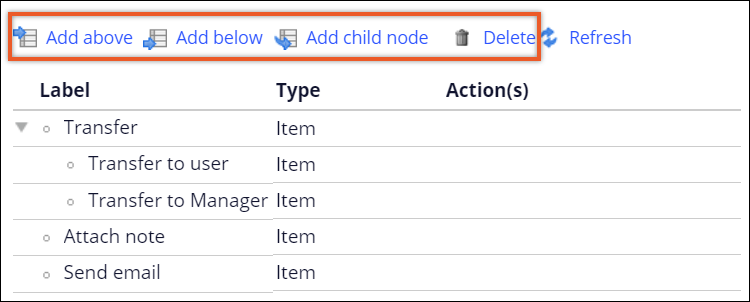 You can also drag menu rows into place.
Double-click a navigation rule row to open the properties pane on the right side of the screen, and then, in the Type list, define the response to launch when users select the row:
- To launch an action, select Item.
- To launch a node that you source from a list or page group, select Item list.
- To launch another navigation rule, select Reference.
- To launch a custom activity, select Custom.
- To insert a horizontal separator in place of the node, select Separator.
- To launch a right-click menu, select Selected item.
On the General tab, define the basic settings for the menu row.
For the Item and Item list menu row types, on the Presentation tab, in the Selection field, define how the user selects the menu item:
- To hide selection marks, select None.
- To display a check box or a radio button, select Checkmark, and then add the when rule associated with the selection.
- To allow users to select a group of items, select Group, and then provide the ID of the group.
For the Item, Item list, and Selected item menu row types, on the Actions tab, click Add an action, and then select what happens when users click a menu row.
In the After action field, select the refresh strategy for the menu row.
For the Item list rows, on the rule form, in the Pages & Classes tab, declare the page.
On the Edit Navigation tab, click Save.
- For standard menus, attach the rule to a Menu control in the target section. For more information, see Creating custom menus.
- For right-click menus, add a Menu action set to the control to which you want to attach the context menu. For more information, see Adding action sets to a control and Available UI actions.
Previous topic Creating custom menus Next topic Accessing the UI Gallery