Configuring a list-based landing page
Help users quickly process large amounts of information by setting up list views. Pega Platform applications display lists as tables or tiles, which you can configure to support filtering, sorting, and custom presentation options.
For example, a portal for loan officers can include a table that lists mortgage applications. Each manager can then gain quick insight into upcoming work and the status of ongoing cases. You can also set up multiple views to help users filter the data according to their needs.- Open the list page that you want to edit:
- In the navigation pane of App Studio, click Channels.
- In the Current channel interfaces section, click the icon that represents the portal with the page that you want to edit.
- On the portal page, on the Content tab, click the Landing pages category.
- In the Landing pages pane on the left side of the screen, click the page that you want to edit.
- Change the icon of the page by clicking Choose icon, and
then select an image that you want to use.Pega Platform includes a set of default icons.
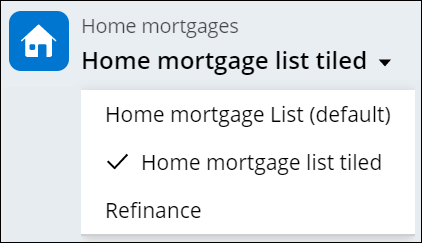
- From the options under the List page title field, select
Custom list page.
- In the Data page field, select the data page from which you want to source the table contents.
- In the Display name field, enter the name for the view,
and then define how you want to present the data to the user:
Choices Actions Table In the Template list, select Table. Tile-based gallery - In the Template list, select Gallery.
- In the Card header list, select the field that you want to use as the header for your tile.
- In the Secondary text field, select the field that you want to use as the source of additional text on your tile.
- In the Columns section, add the columns that you want to include in the view by clicking Add, and then selecting the field that you want to associate with the column.
- In the Column to take up remaining width, define which column stretches to fill free space in your table.
- Optional: To define what data is displayed in the table, set one or more filters:
- In the Filter by list, select Custom, and then click the Properties icon.
- In the Condition Builder window, define the
expression that you want to use to filter the table contents.For more information, see Using conditional logic in Cosmos React.
- In the Sort by list, add the property by which you want sort the list by clicking Add, and then selecting the field that you want to use as a filter.
- In the list that appears next to the property field, select the order in which you want to sort the table.
- Optional: To group the table contents by a property, in the Group by list, add the property by which you want group the table by clicking Add, and then selecting the target field.
- Optional: To define additional table behavior, select any of the check boxes in the User Personalization section.
- Optional: To add a new view to the list, under the data source list, next to the Default view tab, click +Add.
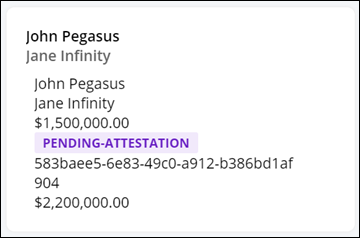
If you configure your view as a gallery, the UI displays list entries as tiles. The following image represents a sample gallery tile:
Previous topic Configuring a column-based landing page Next topic Configuring a tab-based landing page